
New Admin UI
Overview
The revamped Vehicles Admin page provides a streamlined way to manage vehicles within the Azuga web platform, offering improved visibility and easier administration.
With this update, the page has been redesigned for a cleaner, more user-friendly experience, making it simpler to search, add, edit, and organize vehicles in one place.
This guide covers how to navigate the updated Vehicles Admin page and efficiently manage your vehicle list and details.
List of Contents
- Accessing Vehicles Page
- Vehicles Page Overview
- Table Fields
- Additional Table Features
- Vehicle Detailed View
- Add Vehicle Workflow
- Edit Vehicle Workflow
- Delete Vehicle Workflow
- Vehicle Image Feature
- New Driver and User Admin
Accessing Vehicles Page
- Log in to the Azuga Fleet web platform.
- Navigate to Admin >> Vehicles Tab >> Vehicles(New).

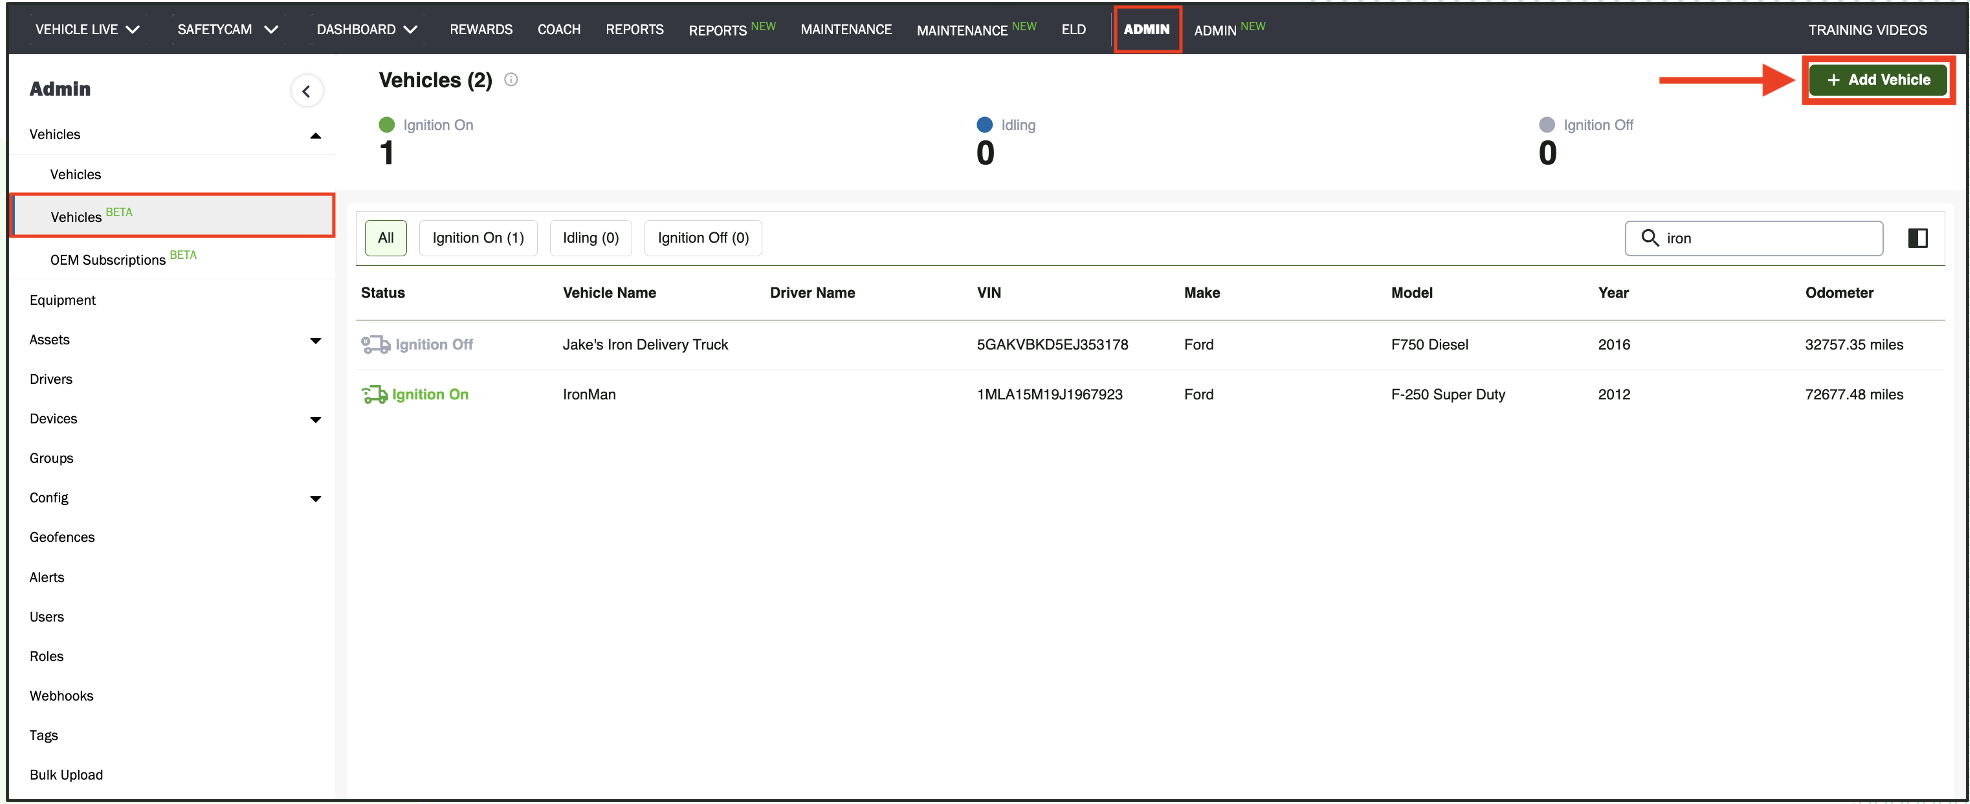
Vehicles Page Overview
The Vehicles Page displays all vehicles in your account, along with their current status and more details.
At the top of the page, you can see the total count of vehicles and the summary count of vehicles, broken down by:
- Ignition On: Vehicles currently active with ignition running.
- Idling: Vehicles running but not in motion.
- Ignition Off: Vehicles not in use or currently Ignition OFF.
- Offline: A vehicle is considered Offline when it has not communicated or sent any data for 72 hours.
Quick Filters: Use the available filters to locate specific vehicles based on their status quickly:
- All: Displays every vehicle in the list.
- Ignition On: Shows vehicles that are currently running.
- Idling: Shows vehicles with the ignition on but not moving.
- Ignition Off: Shows vehicles that are turned off.
- Offline: Shows vehicles that have not reported any data for the last 72 hours.
Search Field: Quickly find vehicles by entering keywords such as name, VIN, license plate, or driver.

Table Fields
The Vehicle Table has multiple available columns that can be configured based on user needs. By default, the Status and Vehicle Name column is always enabled, while others can be configured based on user needs. Each column provides specific information about the vehicle, driver, or fleet operations.
Below, we’ve listed all the columns with a short explanation for easy reference.
- Status – Displays the current state of the vehicle (Ignition On, Idling, Ignition Off).
- Vehicle Name – The assigned name of the vehicle in the system.
- Address – The last known location of the vehicle.
- Driver Name – The driver currently associated with the vehicle.
- VIN – The Vehicle Identification Number.
- Make – The vehicle manufacturer (e.g., Ford, Toyota).
- Model – The specific model of the vehicle.
- Year – The vehicle’s model year.
- Odometer – The vehicle's recorded/entered odometer reading.
- Group Name – The fleet group to which the vehicle is assigned.
- Max Voltage – Maximum voltage recorded for the vehicle battery/system.
- License Plate Number – The registered license plate number.
- Last Trip End Time – The timestamp of when the last trip ended.
- Vehicle Type – Defines the category of the vehicle (e.g., car, truck, van).
- Vehicle Ownership – Indicates whether the vehicle is company-owned, leased, or rented.
- Asset No – The unique asset identification number assigned.
- Device Serial Number – Serial number of the tracking device installed in the vehicle.
- SafetyCam Serial Number – Serial number of the SafetyCam device (if installed).
- Fuel Type – The type of fuel used (e.g., petrol, diesel, electric).
- Notes – Custom notes added for the vehicle.
- Fuel Tank Capacity – The maximum fuel tank capacity of the vehicle.
- Tags – Custom tags linked to the vehicle for categorization or search.
- Upcoming Service – The next scheduled service due for the vehicle.
- Registration Date – The official date of vehicle registration.
- Insurance Date – The insurance renewal or expiry date.
- Emission Date – Expiry or renewal date for the vehicle’s emission certificate.
- Road Tax Date – Due date for road tax payment or renewal.
- Permit Date – Expiry or renewal date for vehicle permits.
- Safety Tags Date – Date for renewal or validity of required safety tags.
- RTSI Docs Date – Expiry date for Road Transport Safety Inspection documents.
- Fire Extinguisher Date – Inspection or replacement due date for the onboard fire extinguisher.
- Vehicle Weight – The registered weight of the vehicle.
- First Aid Kit – Indicates whether a first aid kit is available/valid.
- Seat Belt Support – Indicates if the vehicle supports/has functional seat belts.
- Odometer Support – Identifies whether the odometer is supported via device/OEM.
- Odometer – Latest recorded odometer value of the vehicle.
- Tire Pressure – Latest recorded tire pressure readings.
- Oil Life – Remaining oil life percentage before next service.
- Fuel Level – Current fuel tank level.
- Fuel Consumed – Total fuel consumed over a period.
- Battery Status – Current charge level/status of the battery.
- Battery Health – Health condition of the battery.
- Air Consumption – Recorded air usage (for air brake systems).
Additional Table Features
- Sorting Functionality: Hover over a column header to see a sorting arrow. Click the column header to sort the table.
- Search Functionality: Search vehicles by multiple fields for easy access to specific data.
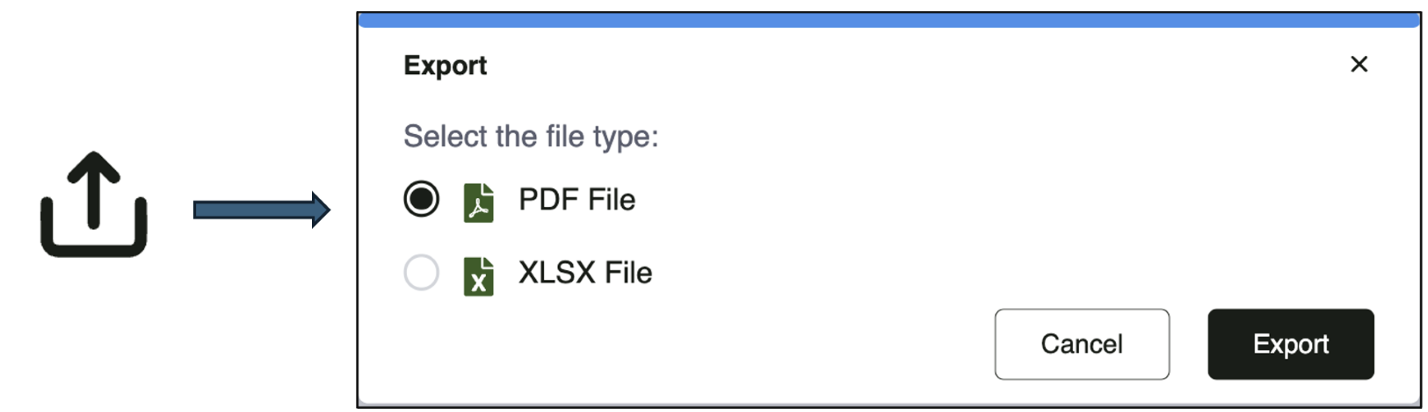
- Export Option: Export table data as an XLSX file for reporting or record-keeping.
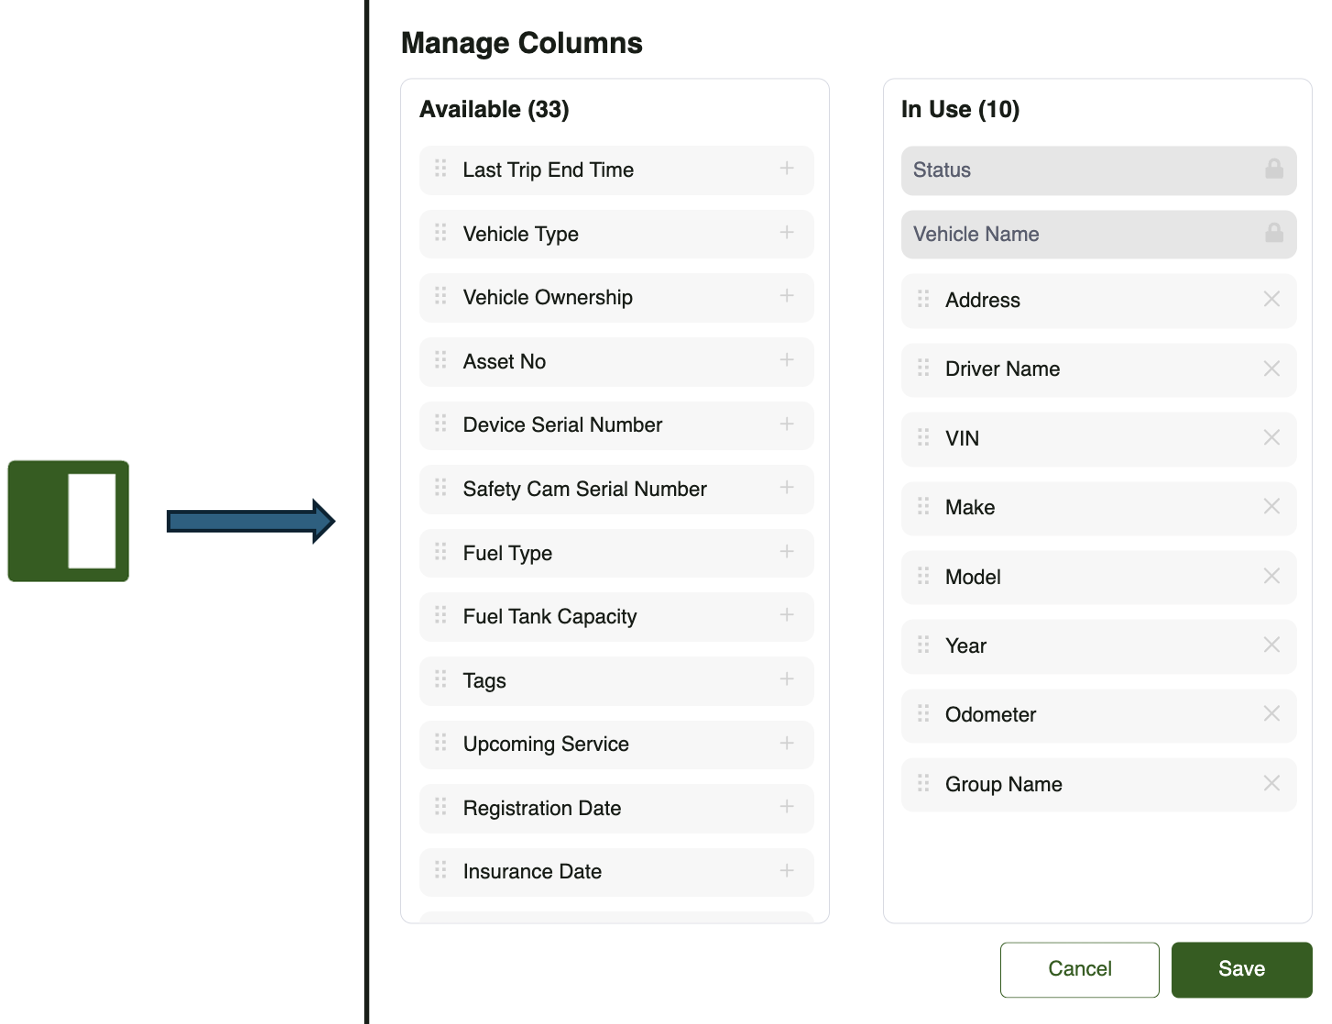
- Customize Columns: Add/remove fields via the “+” and “x” icons or by dragging and dropping, then save.
Vehicle Detailed View
You can view detailed information for a vehicle by clicking on its row in the Vehicles table. This opens a
detailed view panel that provides comprehensive information about the selected vehicle, including:
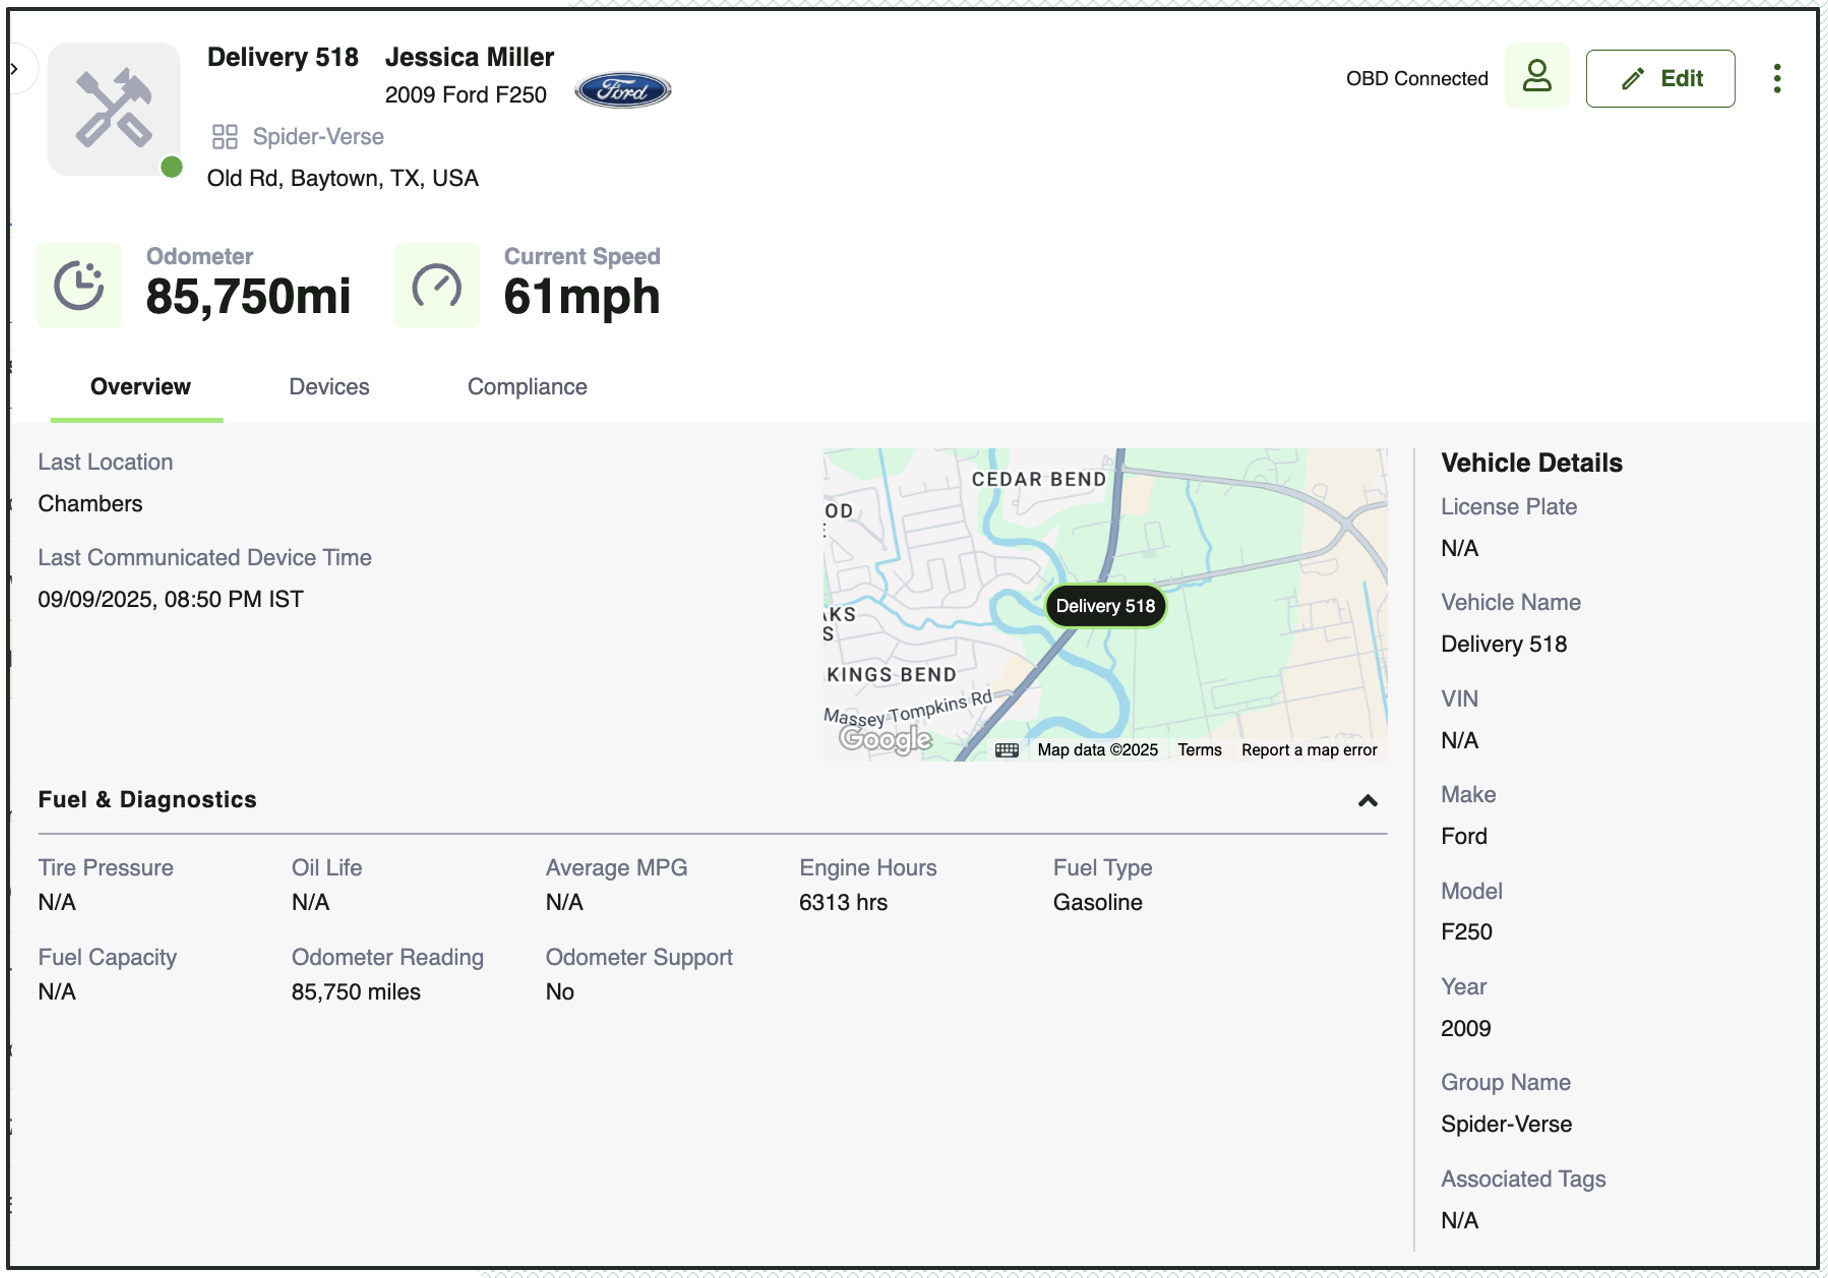
The Vehicle Header remains constant across all tabs and provides high-level information about the selected vehicle.
Information Displayed:
- Vehicle Name
- VIN
- Make, Model, Year
- Driver Name
- Group Associated
- Address
- Odometer Reading
- Current Speed
- Fuel Level (If supported by Vehicle, Only OBD vehicle at this point)
Actions Available (Right Side Top):
Edit – Allows editing of vehicle details.
More Options (⋮) – Provides the option to delete the vehicle.
Tabs (Overview, Devices, Compliance) – Switch between different sections for more specific details.
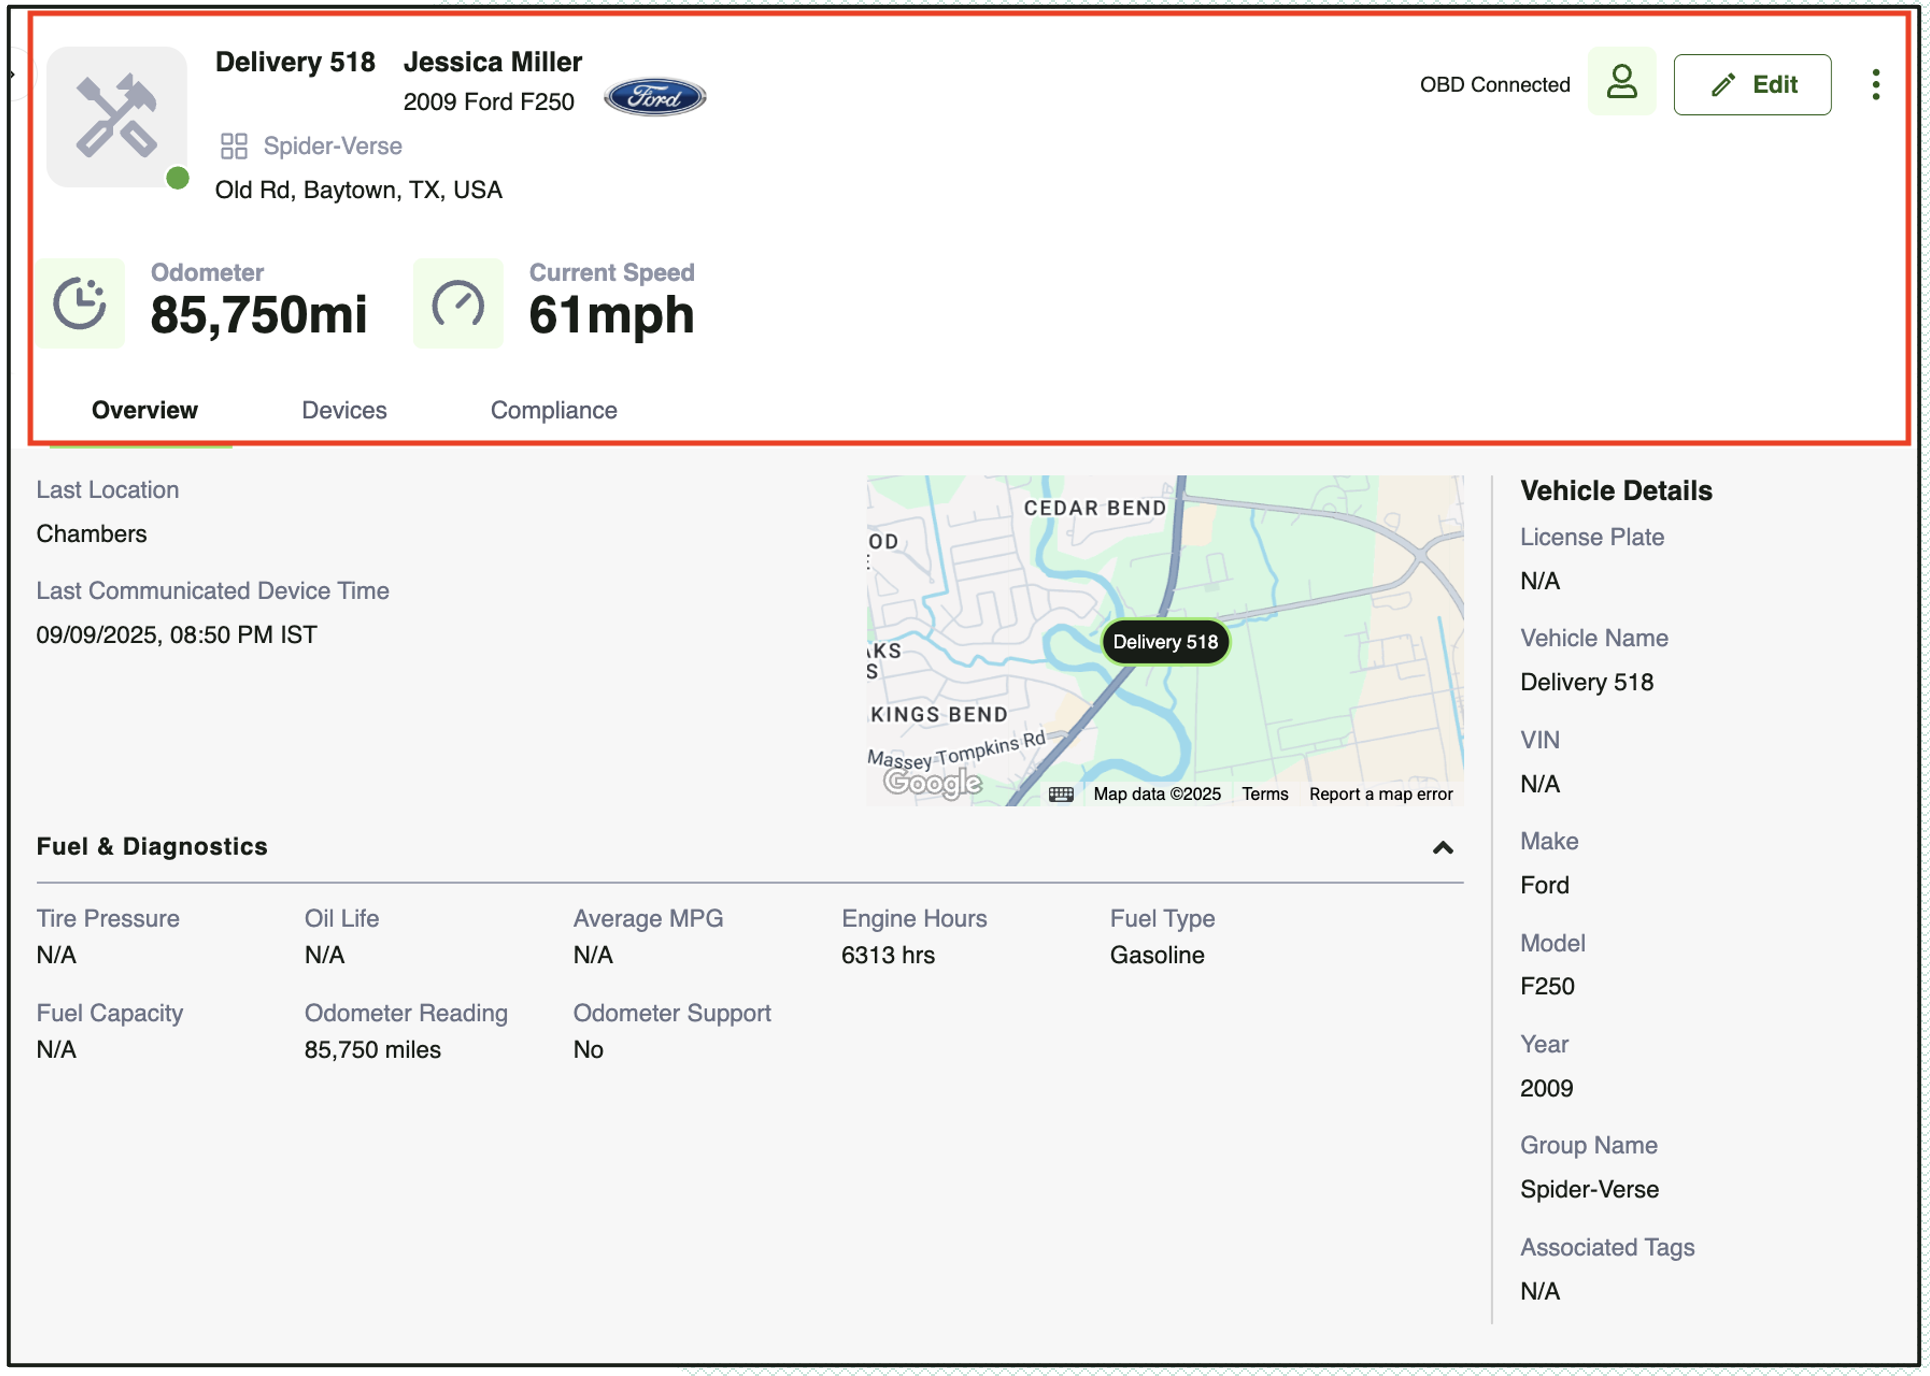
Overview Tab
The Overview tab provides a quick snapshot of the vehicle’s most important information, including location, communication status, odometer, speed, diagnostics, and custom fields.
Last Location and Communicated Device Time:
- Last Location – Displays the most recent location of the vehicle.
- Last Communicated Device Time – Shows the last time the device successfully communicated data.
A map view is available for quick visualization.
Fuel & Diagnostics Data:
- Tire Pressure – Displays the recorded tire pressure values.
- Oil Life – Indicates the remaining oil life (if available).
- Average MPG – Shows the vehicle’s average miles per gallon.
- Engine Runtime – Displays the total engine runtime in hours.
- Fuel Type – Indicates the type of fuel the vehicle uses (e.g., Gasoline, Diesel).
- Fuel Capacity – Displays the total fuel tank capacity.
- Odometer Reading – Shows the current odometer reading of the vehicle.
- Odometer Support – Indicates whether odometer data is directly supported by the system (Yes/No).
Vehicle Details (Side Panel):
Displays quick-access details such as License Plate, Vehicle Name, VIN, Make, Model, Year, Group Name, and Associated Tags.
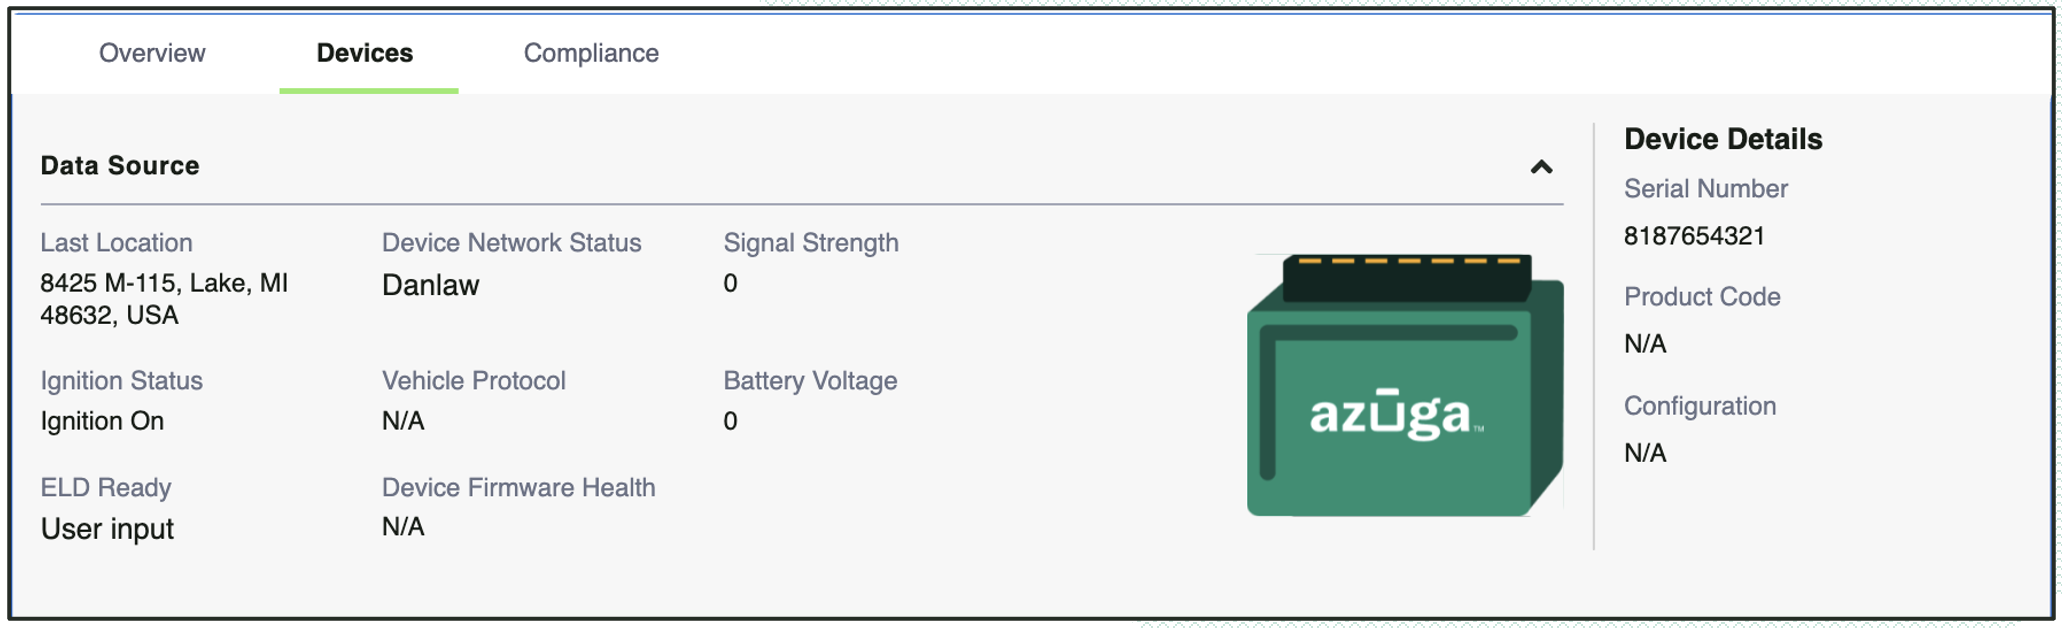
Devices Tab
The Devices tab provides detailed insights into the telematics device connected to the vehicle. This includes its status, connectivity, and technical details, helping administrators monitor device performance and troubleshoot issues when needed.
Data Source Information:
- Last Location – Displays the device-reported location of the vehicle.
- Device Network Status – Shows the device network provider or connection type (e.g., Danlaw).
- Signal Strength – Indicates the device’s current signal reception strength.
- Ignition Status – Displays whether the vehicle ignition is On or Off.
- Vehicle Protocol – Specifies the communication protocol used by the device (if applicable)
- Battery Voltage – Displays the detected vehicle battery voltage.
- ELD Ready – Shows whether the device is ready for Electronic Logging Device (ELD) compliance.
- Device Firmware Health – Indicates the current firmware status of the device.
Device Details (Side Panel):
- Serial Number – Unique identifier for the installed device.
- Product Code – Displays the product version or code (if available).
- Configuration – Shows the applied configuration for the device.
Device Illustration:
A graphical representation of the Azuga device is displayed for visual identification.
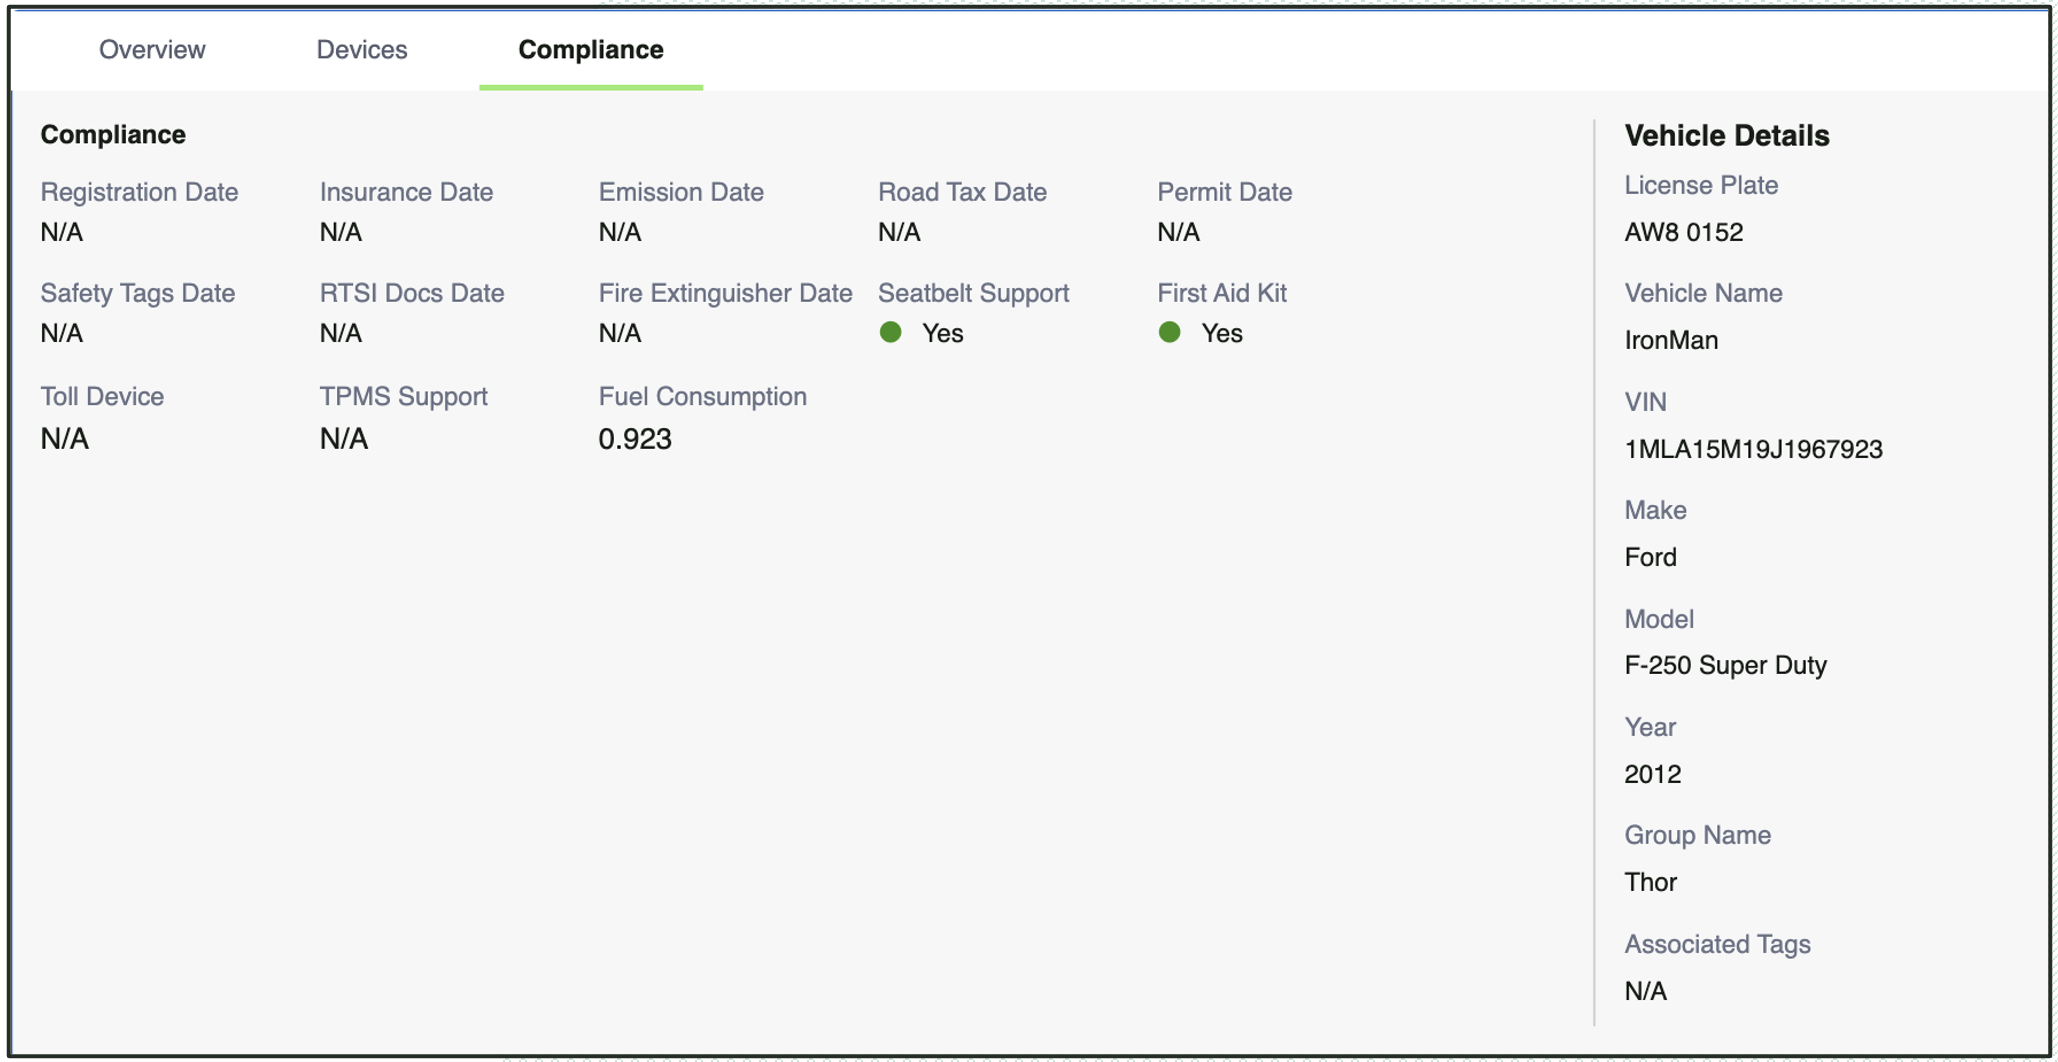
Compliance Tab
The Compliance tab consolidates all vehicle compliance-related information. It helps ensure that the vehicle meets regulatory and safety standards by tracking important documents, certifications, and equipment availability.
Compliance Dates:
- Registration Date – Displays the vehicle registration date.
- Insurance Date – Indicates the validity of the insurance policy.
- Emission Date – Specifies the emission compliance check or certification date.
- Road Tax Date – Tracks the due date for vehicle road tax.
- Permit Date – Shows the date of permit issuance or renewal.
- Safety Tags Date – Displays the validity date of safety tags.
- RTSI Docs Date – Indicates date related to Road Transport Safety Inspection (RTSI) documents.
- Fire Extinguisher Date – Tracks fire extinguisher compliance date.
Safety & Equipment Compliance:
- Seatbelt Support – Shows if the vehicle supports seatbelt monitoring (Yes/No).
- First Aid Kit – Confirms if a first aid kit is available in the vehicle.
Additional Compliance Parameters:
- Toll Device – Displays if a toll device is available and active.
- TPMS Support – Indicates Tire Pressure Monitoring System (TPMS) support status.
- Fuel Consumption – Displays recorded fuel consumption data.
Vehicle Details (Side Panel):
Displays quick-access details such as License Plate, Vehicle Name, VIN, Make, Model, Year, Group Name, and Associated Tags.
Add Vehicle Workflow
The Add Vehicle button allows administrators to register a new vehicle in the system by entering essential details related to vehicle identity, diagnostics, compliance, and custom attributes.
Navigation:
Go to Admin > Vehicles > “+ Add Vehicle” button.
Steps:
- Click the + Add Vehicle button.
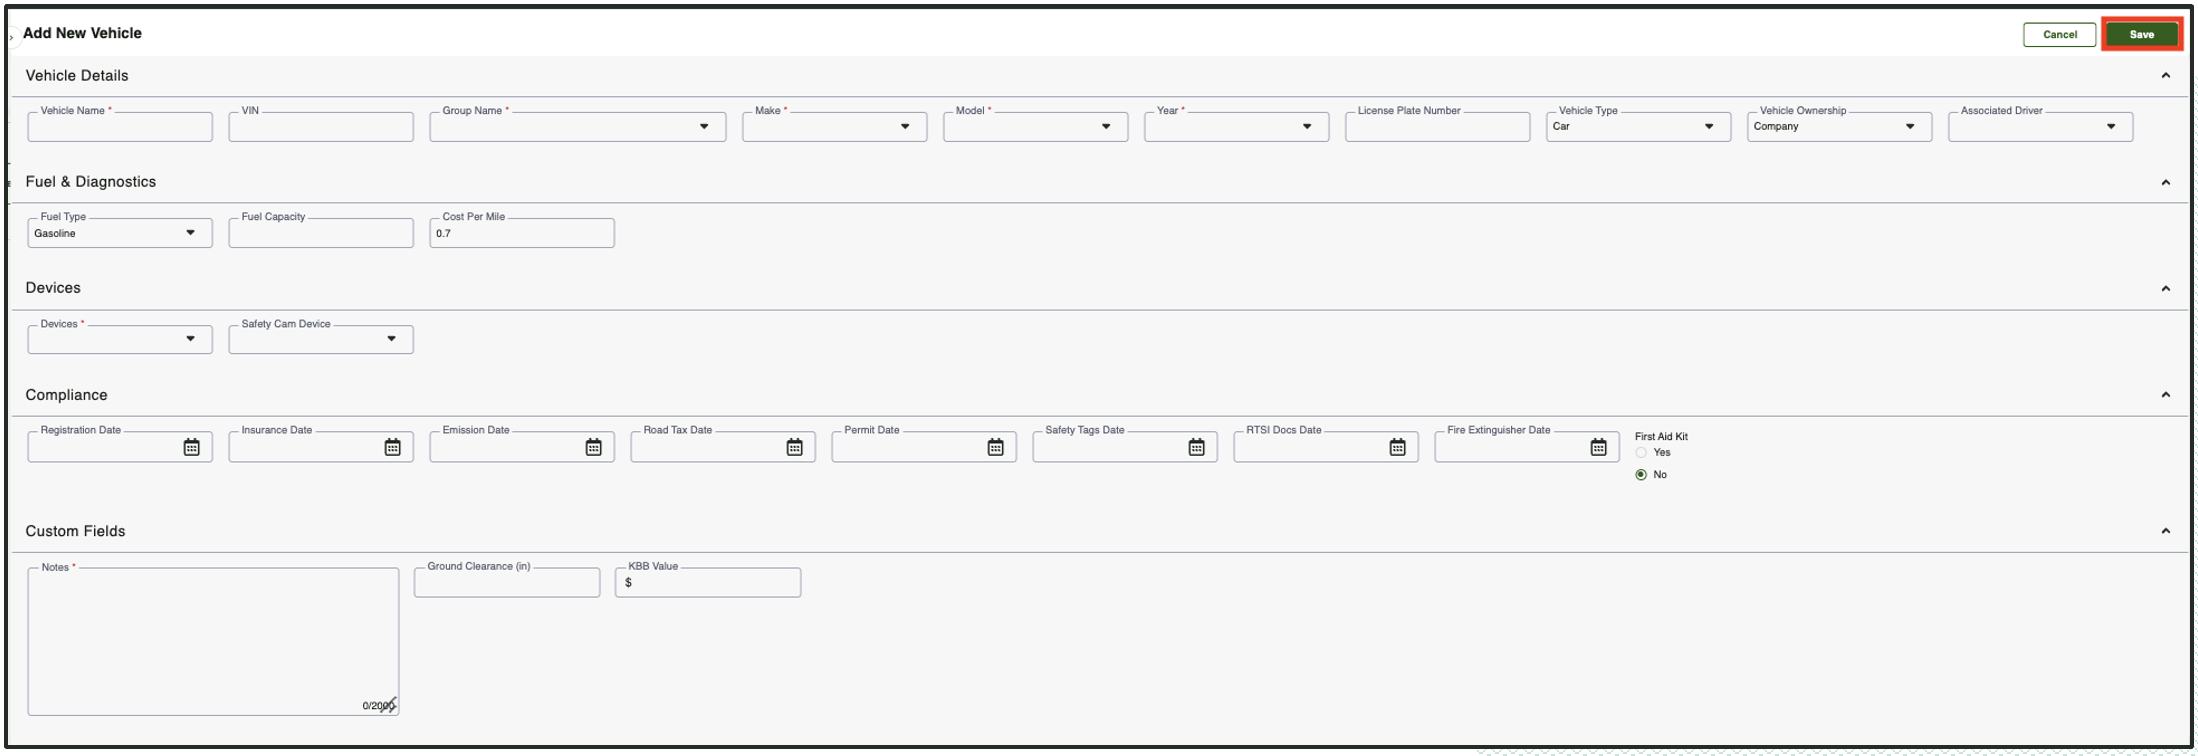
- Fill in the required fields across the different sections.
- Once all details are entered, click Save to add the vehicle.
Vehicle Details:
- Vehicle Name – Assign a unique name to the vehicle.
- VIN – Enter the Vehicle Identification Number.
- Group Name – Specify the group the vehicle belongs to.
- Make & Model – Select the manufacturer and model of the vehicle.
- Year – Choose the vehicle’s manufacturing year.
- License Plate Number – Enter the official registration/license plate.
- Vehicle Type – Select the vehicle category (e.g., Car, Truck).
- Vehicle Ownership – Specify ownership type (e.g., Company, Leased).
- Associated Driver – Link a driver to the vehicle.
Fuel & Diagnostics:
- Fuel Type – Select the fuel type (Gasoline, Diesel, Electric, etc.).
- Fuel Capacity – Enter the total tank/battery capacity.
- Cost per Mile – Define cost per mile for tracking expenses.
Devices:
- Devices – Select the telematics device associated with the vehicle.
- SafetyCam Device – Add an optional safety camera device.
Compliance:
- Registration Date – Vehicle registration validity date.
- Insurance Date – Insurance policy expiry date.
- Emission Date – Emission certificate compliance date.
- Road Tax Date – Road tax payment due date.
- Permit Date – Permit validity date.
- Safety Tags Date – Expiry date of safety certification tags.
- RTSI Docs Date – Road Transport Safety Inspection document date.
- Fire Extinguisher Date – Expiry date for fire extinguisher compliance.
- First Aid Kit – Yes/No
Custom Fields
The Custom Fields section allows storing additional account-specific information related to vehicles. These fields are currently created and managed from the backend and are not available for customers to configure in the first version of the Vehicle release.
Edit Vehicle Workflow
The Edit Vehicle workflow allows administrators to update or correct existing vehicle information, such as diagnostics, compliance, ownership details, or custom fields.
Navigation:
Go to Admin > Vehicles > Open the vehicle (detailed view) > Edit button (top right corner).
Steps:
- Navigate to the Vehicle List.
- Select the vehicle to open its Detailed View.
- Click the Edit button at the top-right corner.
- Update the required details across the available sections.
- Click Save to apply the changes.
The fields available for editing are the same as those described in the Add Vehicle section. Please refer to the Add Vehicle section for a detailed explanation of each field.
Note: Only users with the necessary permissions can make changes

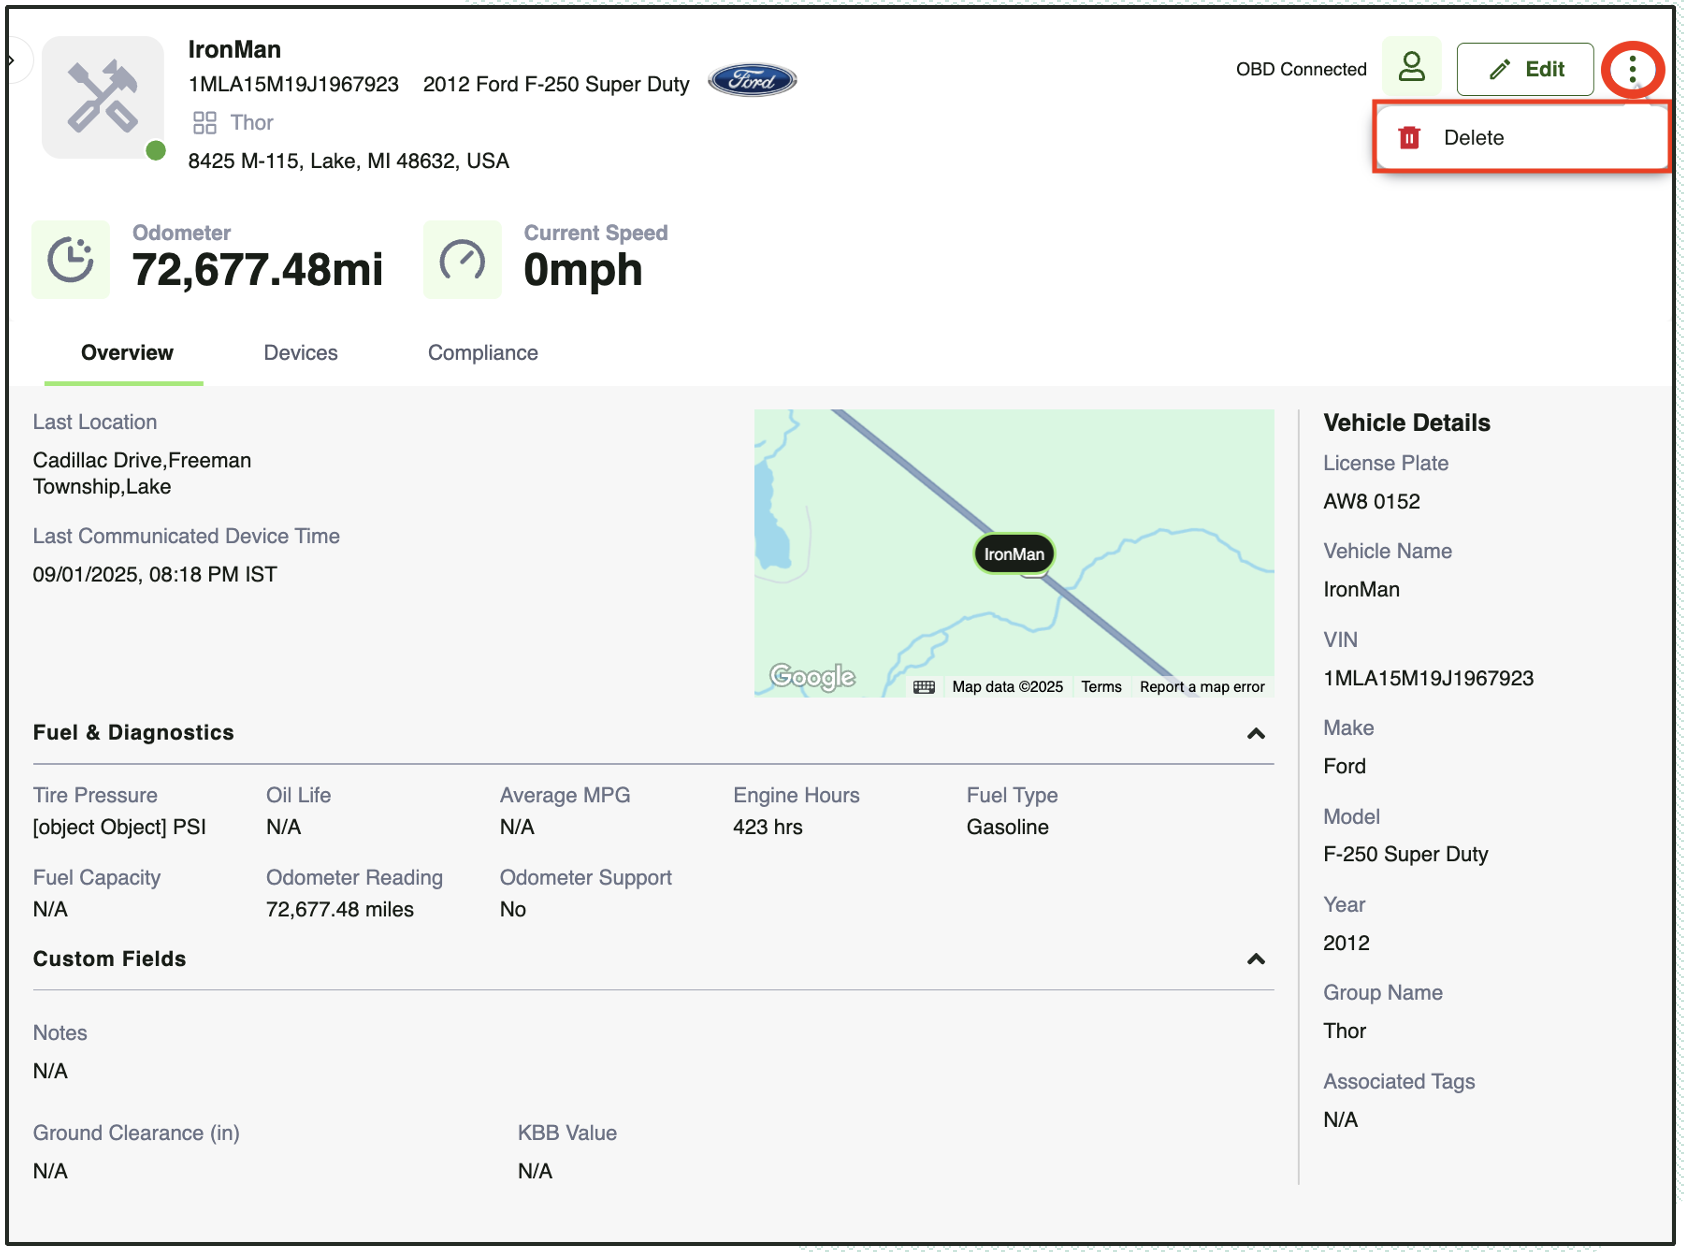
Delete Vehicle Workflow
To delete a vehicle, follow these steps:
Navigation:
Go to Admin > Vehicles > Open the vehicle (detailed view) > 3 dots (top right corner) > Delete.
Steps:
- Navigate to the Vehicle List.
- Select the vehicle to open its DetailedView.
- Click the three dots (top-right corner).
- Select Delete.
- Confirm the action to permanently remove the vehicle.
When you delete a vehicle:
- The vehicle and its associated details are permanently removed from the system.
- The linked device (if any) will be automatically unassigned and moved back to the available device pool.
Note:
- Deletion is permanent. Make sure the vehicle is not in use before performing this action.
- Only users with the necessary permissions can make changes.
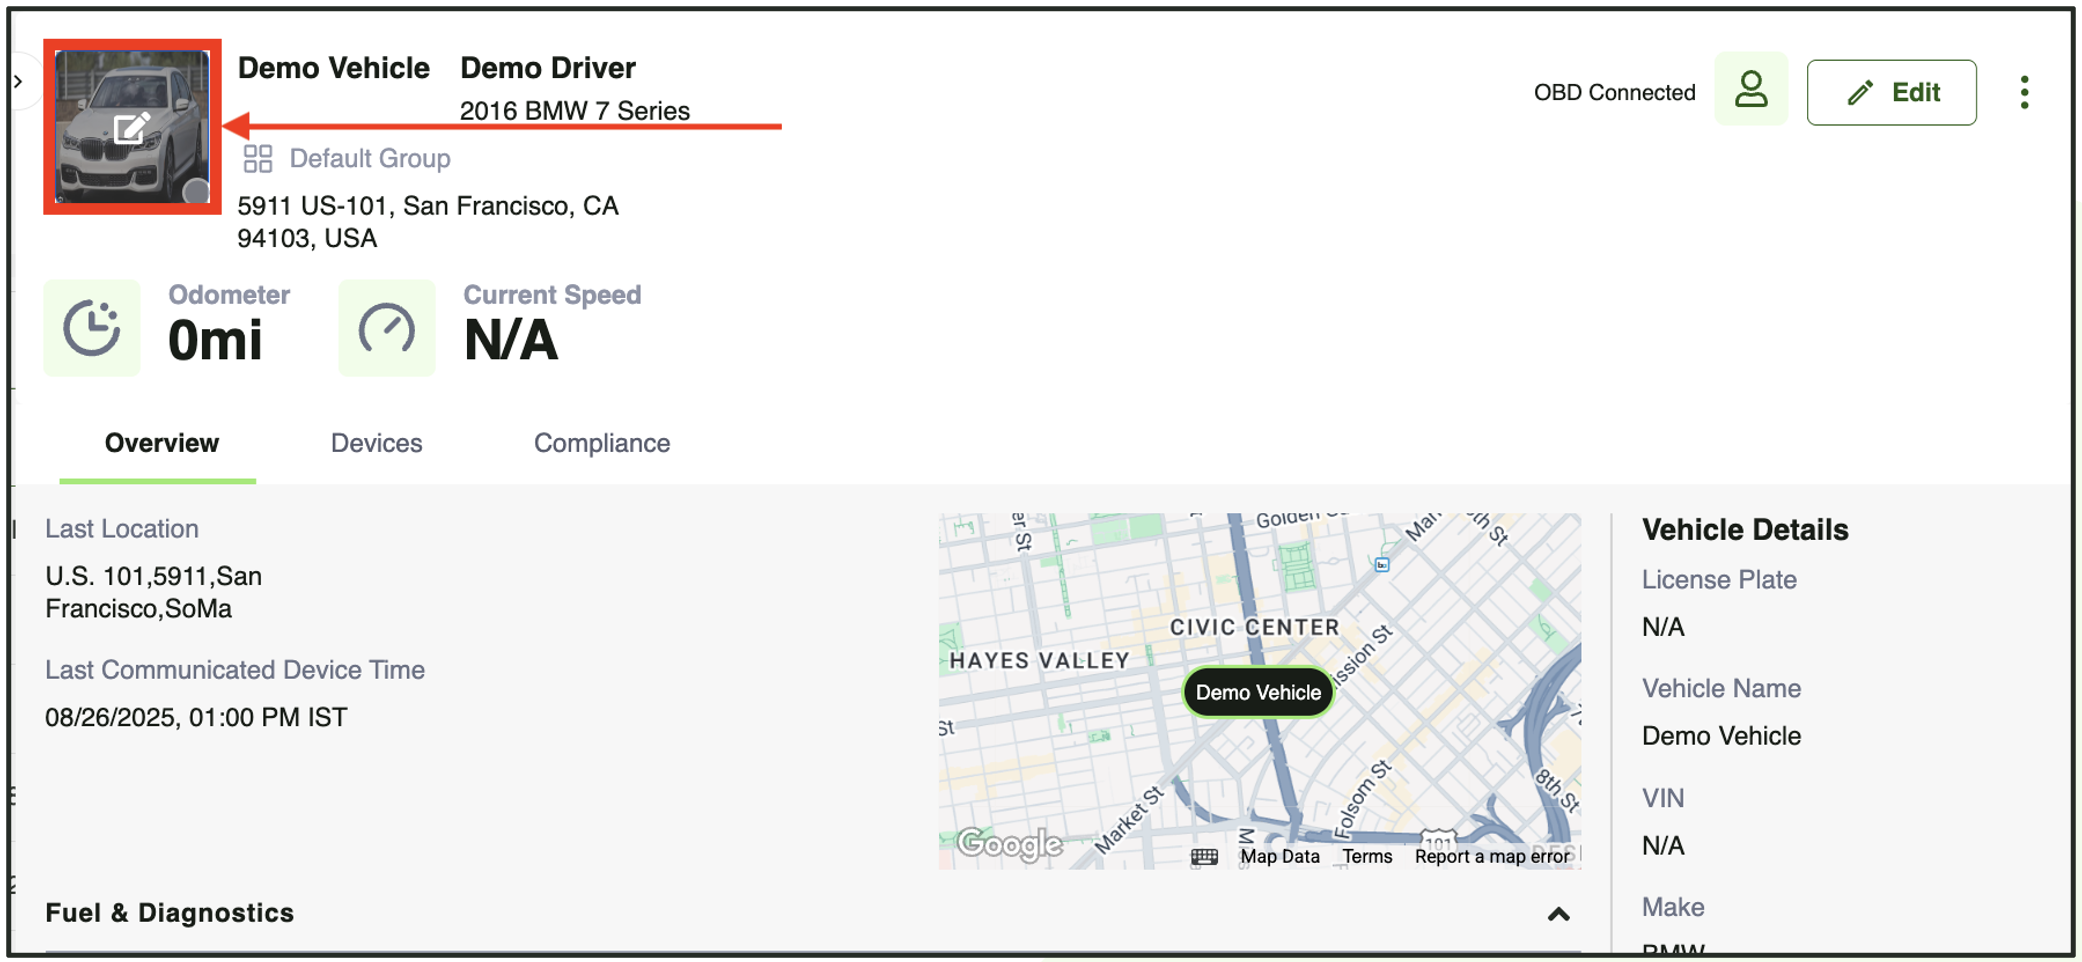
Vehicle Image Feature
The Vehicle Image feature allows you to upload and manage images of your vehicles directly within the platform. This helps in visually identifying vehicles, improving fleet organization, and adding a personalized touch to the vehicle profile.
Steps:
- Navigate to the Vehicle List.
- Select the vehicle to open its Detailed View.
- Hover over the vehicle image placeholder (or existing image).
- Click the Edit Image icon.
- Upload a new image from your system.
New Drivers & Users Admin
Overview
The revamped Drivers and Users Admin pages provide a streamlined and centralized way to manage people and access within the Azuga web platform. With an improved layout and simplified workflows, administrators can quickly create, search, edit, and manage both driver and portal user records with greater efficiency and visibility.
These updates introduce a cleaner interface, faster filtering and search capabilities, and more structured data entry forms, making day-to-day administration easier and more consistent.
This guide explains how to navigate and use the updated Drivers and Users Admin pages effectively.
Accessing Drivers Page
- Log in to the Azuga Fleet web platform.
- Navigate to Admin >> Drivers >> Drivers (New).

Drivers Page Overview
The Drivers page displays all drivers with their vehicle association and ELD status.
At the top of the page, administrators can view:
- Total driver count
- Association filters (All/ Paired / Unassociated)
- Search and filter options

Note: For more features, refer to Additional table features
Table Fields:
The Drivers Table includes multiple available columns that can be configured based on user needs. By default, the Driver Name, Vehicle Name, ELD, and Group columns are enabled, while other columns can be turned on as required. Each column provides specific information about the driver, compliance, qualifications, and employment details. Below are all available columns with a short explanation for easy reference.
Driver Name – Displays the name of the driver configured in the system.
Vehicle Name – Shows the vehicle currently associated with the driver.
ELD – Indicates whether the driver is enabled as an ELD driver (Yes/No).
Group – The group to which the driver is assigned.
Age – Displays the driver’s age based on the recorded date of birth.
Blood Group – Shows the driver’s blood group if configured.
Date of Birth – The driver’s date of birth.
DDC – Driver Due Compliance or certification tracking field (if enabled).
Email – Driver’s registered email address.
Employee Id – Internal employee identifier for the driver.
Date of Joining – The date the driver joined the organization.
License Expiration – Driver license expiration date.
License Date – License issue date.
License State – State that issued the driver’s license.
License – Driver license number.
Location – Driver’s assigned or last known location (if configured).
Medical Test – Indicates medical certification status (Pass/Fail).
Phone – Driver’s contact phone number.
Police Verification – Shows police verification status if recorded.
Date of Resignation – Driver resignation or exit date, if applicable.
Safety Trainings – Safety training details or completion status.
Status – Current driver status (Active/Inactive or configured status).
Time Zone – Driver’s assigned time zone.
Total Experience – Total driving or work experience recorded for the driver.
Driver Detailed View
To see full details about a driver, simply click on any driver row in the Drivers list. This opens a detailed side panel where you can quickly review all driver related information in one place.
At the top, you’ll see the driver’s basic identity details such as name, role, and profile image. From here, you can also directly edit the driver record using the Edit button or open the more options menu (⋮) for additional actions(Provides the option to delete the driver).
The page is organized into clear sections to make information easy to scan:
- Overview — Shows key employer and profile details like joining date, experience, and identifiers
- Personal Information — Displays contact details, username, time zone, and personal data
- License Details — Contains license number, issue date, expiration date,and issuing state
-
Compliance — Shows status fields such as medical test, DDC, safety training, and verification info
Each section can be expanded or collapsed, so you can focus only on what you need without clutter.

Add Driver Workflow
The Add New Driver page allows administrators to create and register a new driver in the system by entering personal, license, compliance, and employment details in one place.
You can also associate vehicles, define driver roles, and upload supporting documents during creation.
Steps:
- Click + Add Driver.
- Enter the required driver details in each section
- Assign role, time zone, and associated vehicles
- Add license and compliance information (if available)
- Upload supporting documents if needed
- Click Save to create the driver record
- You can click Cancel anytime to discard changes.


Enter the available driver details below to create a new driver record. Mandatory fields are marked in the form.
Driver Details:
Driver Name – Enter the full name of the driver.
Associated Vehicles – Select and link one or more vehicles to the driver.
Role Name – Choose the driver role/profile from the dropdown.
Time Zone – Select the driver’s operating time zone.
Phone Number – Enter the driver’s contact number.
Email Address – Provide the driver’s email ID.
Username – Set the login username for the driver.
Password – Create a login password.
Confirm Password – Re-enter the password for confirmation.
External ID – Enter an external reference ID if used by your organization.
Employee ID – Enter the internal employee identifier.
Status – Set the driver’s active/inactive status.
Tags – Add tags for grouping or classification.
Driver Age – Enter the driver’s age.
Date of Birth – Select the driver’s birth date.
Driver License State – Select the issuing state of the license.
Driver License Number – Enter the license number.
Driver License Expiration Date – Select the license expiry date.
Medical Test – Mark medical test result (Pass/Fail).
ELD Driver – Indicate whether the driver is an ELD driver (Yes/No).
Upload Photo – Add a driver profile photo.
Employer Information Fields:
Safety Trainings – Enter completed safety training details.
Badge Number – Enter the assigned badge number.
Badge Validity – Select badge expiration date.
Years of Experience – Enter total driving experience.
DDC – Enter DDC details/date if applicable.
Date of Resignation – Provide resignation date if the driver is inactive.
Documents:
Documents – Upload driver-related documents (licenses, certificates, verification files).
Accessing Users Page
- Log in to the Azuga Fleet web platform.
- Navigate to Admin >> Users >> Users (New).

The Users page shows the complete list of users available in the system along with their usernames, assigned roles, and group associations.
At the top of the page, administrators can quickly view and use:
- Total user count
- Search bar to find users by name or username
- Filter option to narrow results
- Add Users button to create a new user
- Export option to download the user list
Users Detailed View
You can open a user’s detailed profile by clicking on any user row in the Users table. This page gives a complete overview of the selected user, including account details, role, and group access.
The User Header at the top stays visible and shows key information such as username, assigned role, and group count.
Top Actions Available:
Edit – Update user details and permissions
More Options (⋮) – Access additional actions (Provides the option to delete the user).
The page is divided into simple sections, so user information is easy to review and manage:
- Overview — Displays core account details such as user type, role, contact info, time zone, and last login activity
- User Information — Shows identifiers and system-level data like User ID and API key (if enabled)
- Associated Groups — Lists all groups the user is assigned to, with search and expand options for quick navigation
- Access & Role — Highlights the assigned role and permission scope for the user
Each section can be expanded or collapsed, allowing you to focus only on the required details and keep the page uncluttered.

Add Users Workflow
Use the Add New User page to create a new portal user and assign their access role and group permissions. Provide the basic account and contact details, then select the appropriate role and groups.
Steps:
- Click + Add Users
- Enter the required user details in the User Information section
- Select role, time zone, and landing page
- Provide login credentials (username and password)
- Add contact details and employee ID (if available)
- Select associated groups for access control
- Upload a profile photo if needed
- Click Save to create the user account
- Click Cancel anytime to discard changes

For more information refer to - [Customer] User Guide - New Admin