
User Guide - Equipment Management
Introduction:
Managing valuable assets demands reliable tracking. Azuga’s GV620MG asset tracker and Equipment Beacon work together to monitor your equipment, ensuring it remains secure and well-maintained.
The Equipment Beacon continuously emits a Bluetooth signal detected by the GV620MG asset tracker. The tracker then uses cellular networks to monitor and update the real-time location of smaller tools and equipment. Together, they help keep track of your assets, updating their locations automatically to a centralized system for efficient asset tracking.
In Azuga Fleet, Equipment Beacon has two statuses that are visible on Live Maps in both the web fleet and the AFM app.
- With: When an equipment beacon is actively detected by an asset tracker, it is considered “With" that tracker. The equipment beacon’s location is updated based on the asset tracker's position.
- Dropped: When an equipment beacon is not currently detected by any asset tracker, it is marked as "Dropped," and Azuga Fleet displays its last known location.
This system ensures real-time visibility and location updates, keeping all equipment easily trackable, reducing the risk of loss, and improving operational efficiency.
Setting Up Equipment in Azuga Fleet Web:
Adding Asset Trackers & Equipment Beacons:
With your subscription activated, you’ll find your asset tracker and the equipment beacons details prefilled in the Azuga UI, streamlining the setup process.
Adding Equipment:
- Log in to the Azuga Fleet web application with your credentials.
-
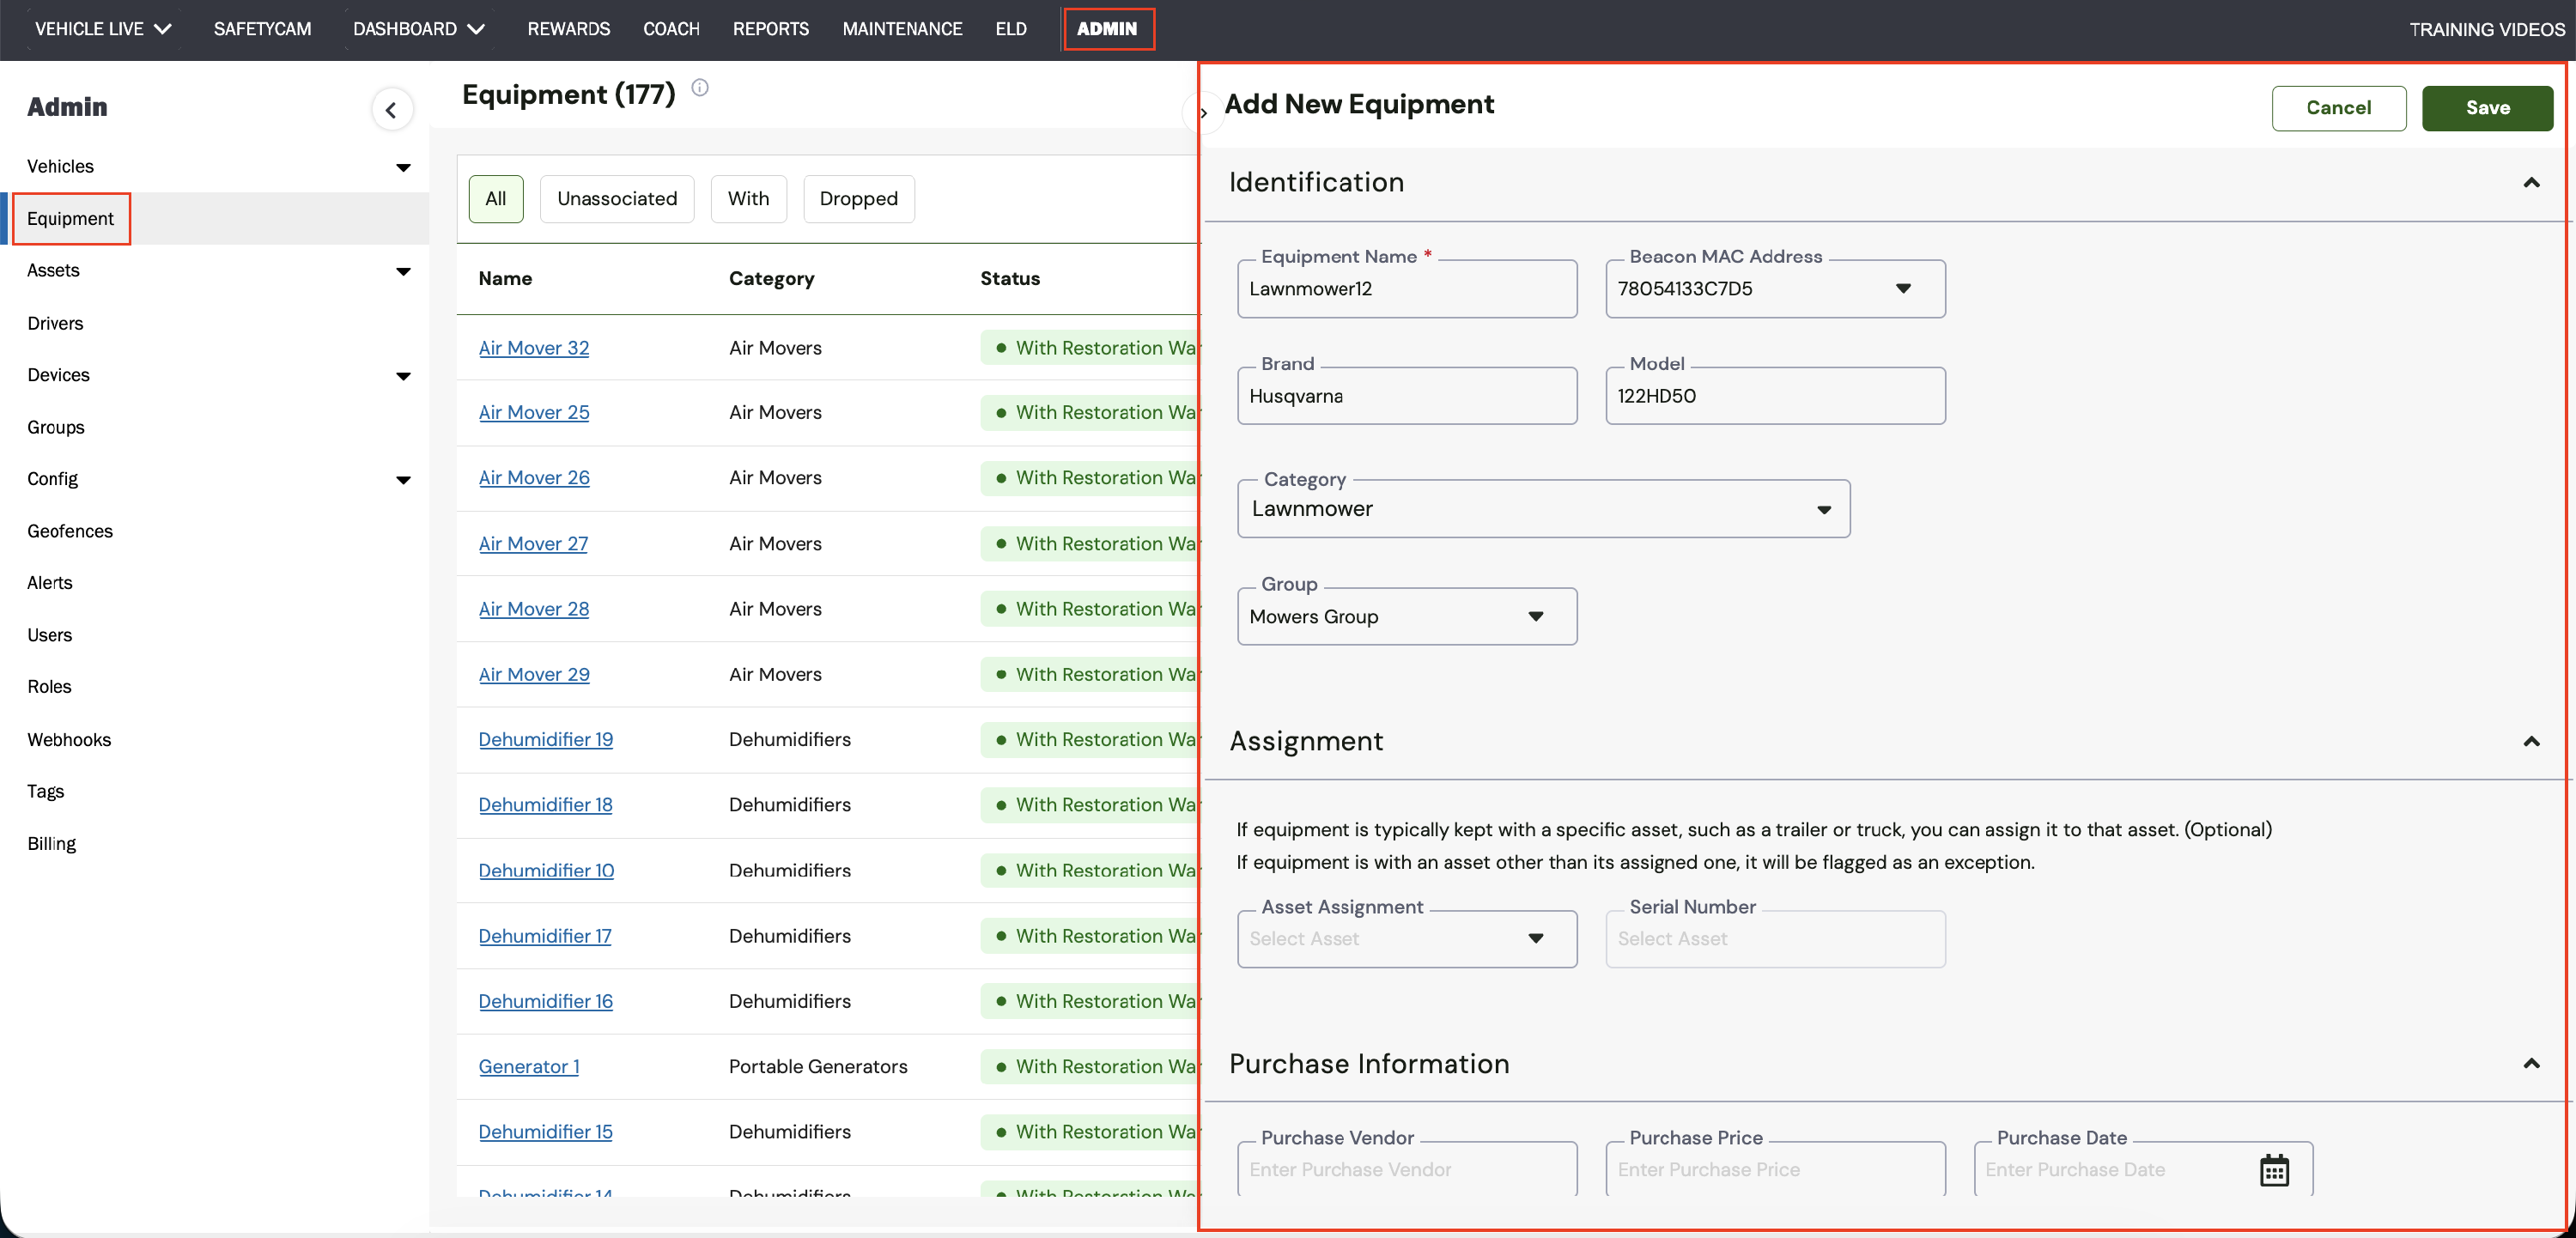
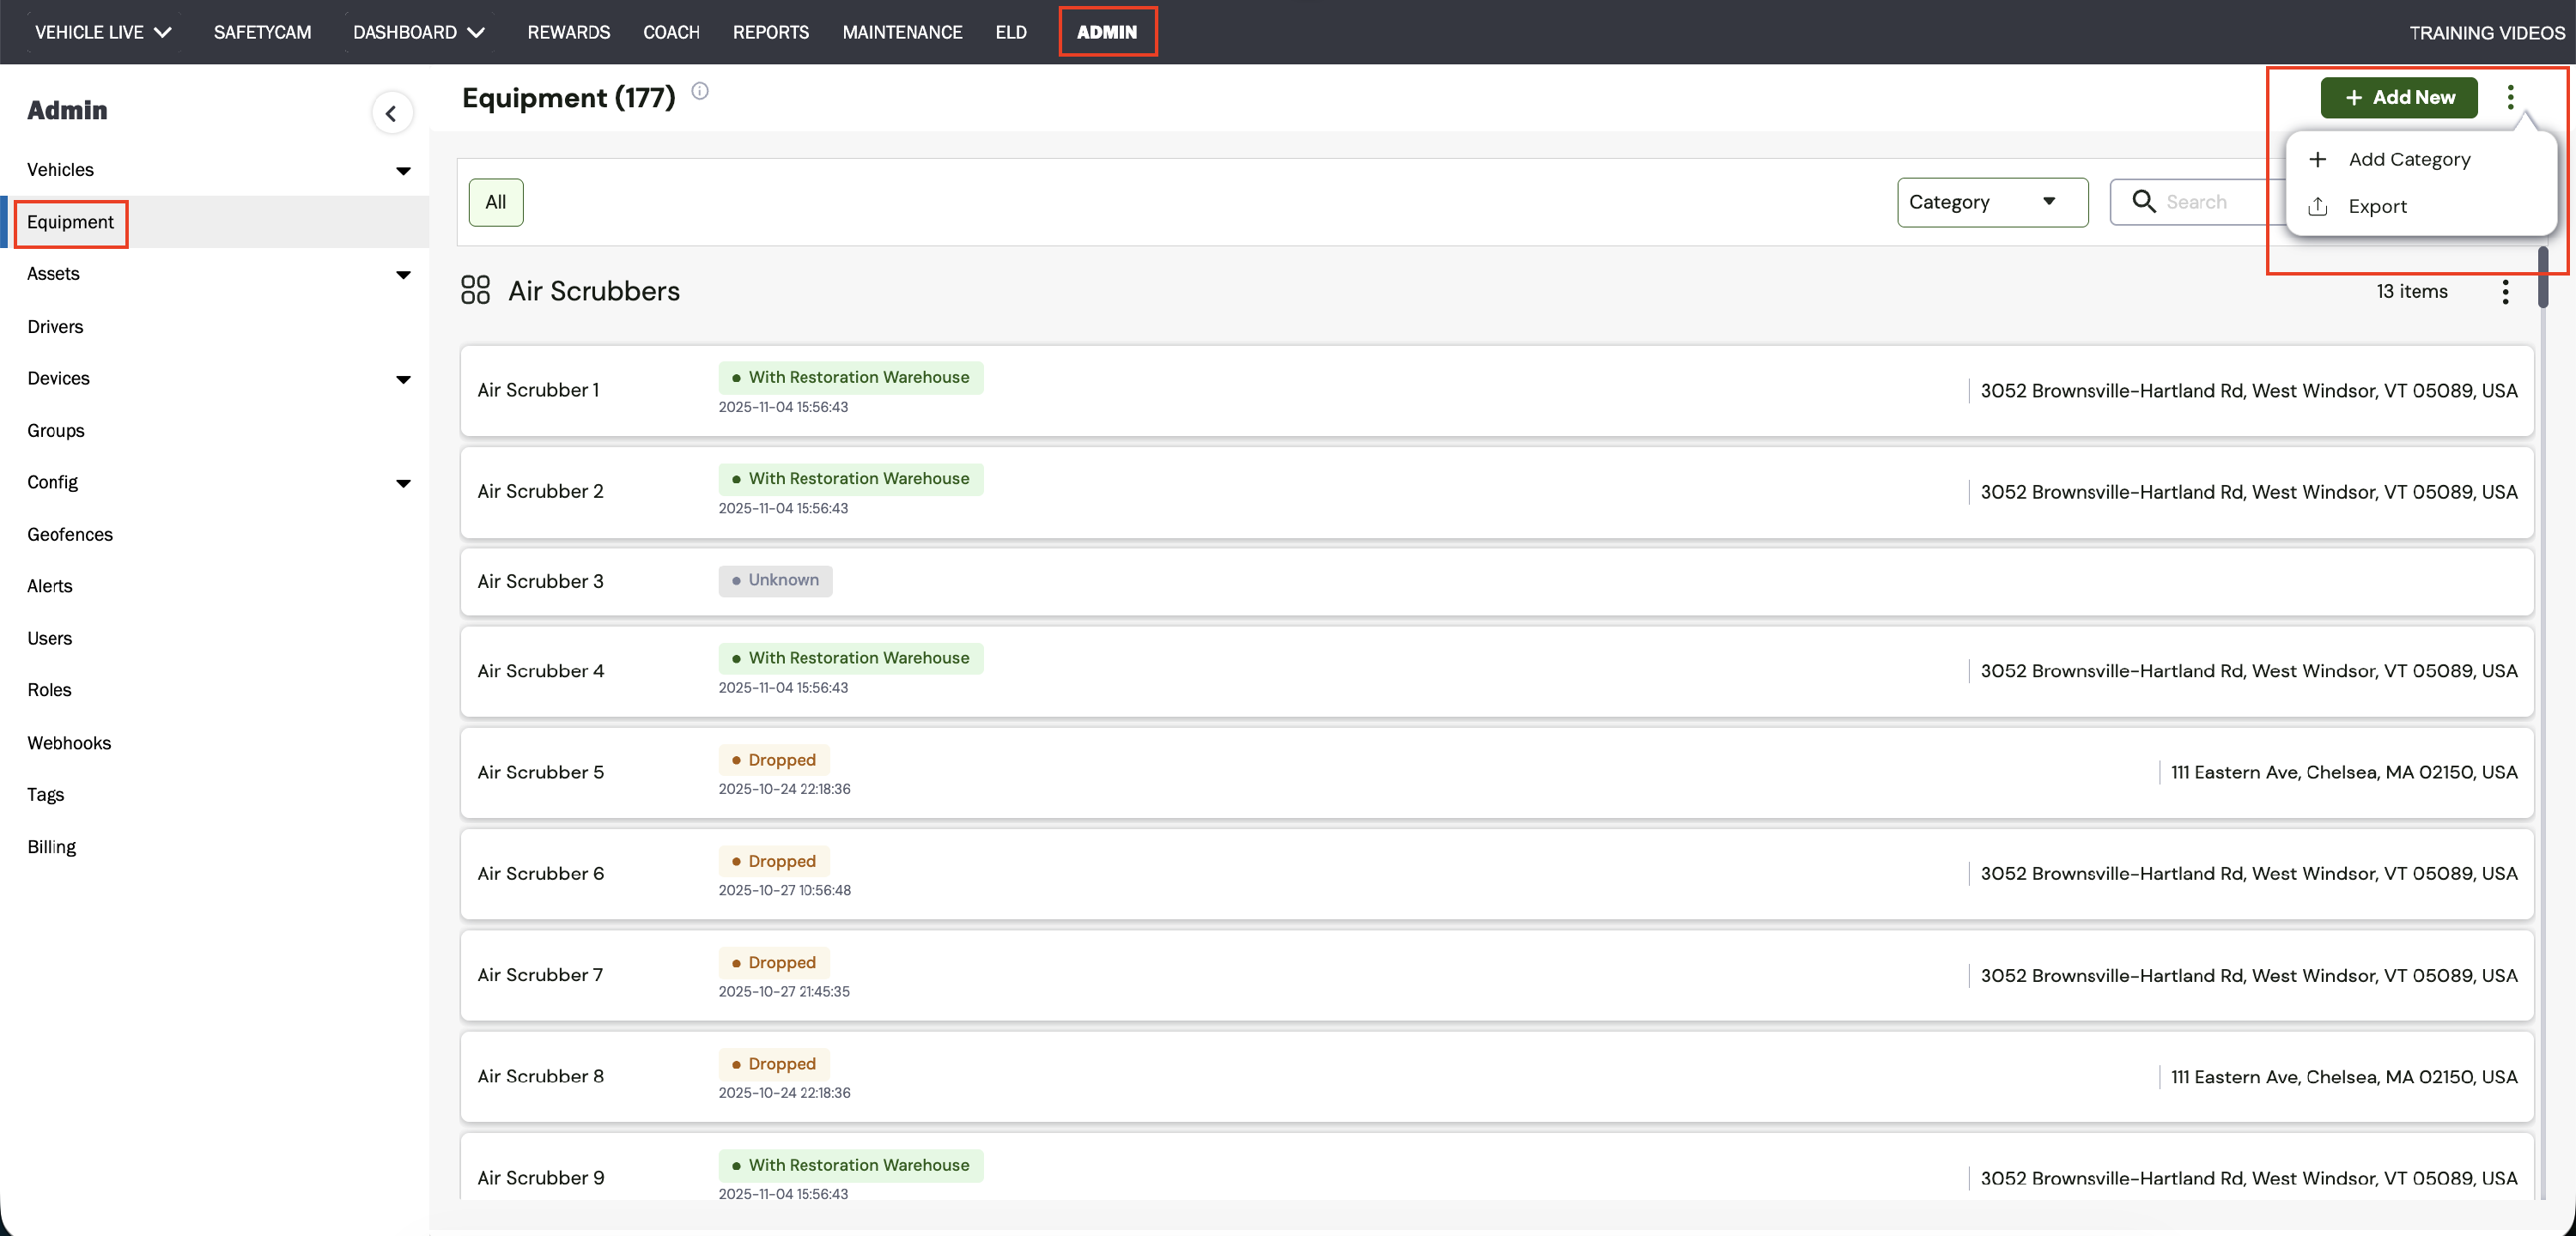
Navigate to Admin> Equipment >+Add New button.
In the Add New Equipment screen:- Under the Identification section, enter the Equipment Name.
- Select the Beacon MAC Address from the drop-down list.
- Enter the Brand Name, Model, and select the Category from the drop-down list. If there is no category available for the equipment type, select +Add New to create a new category.
- Enter the required details on the page.
- Click Save to add the new equipment.
| Note: Fields marked with a red star are mandatory. |
To edit or delete existing equipment, click the three dots at the end of the row on the Equipment screen.
Equipment Page Overview in Azuga Fleet Web:
The Equipment module offers two distinct views to help users organize and visualize their equipment:
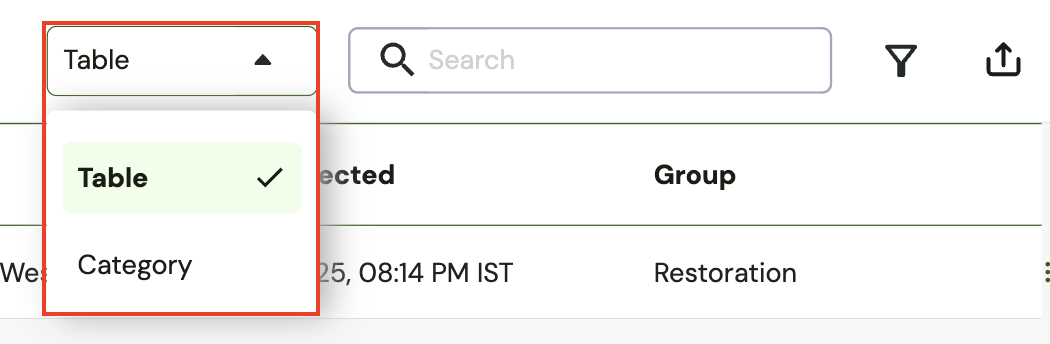
- Table view
- Category view
Table View:
- The Table View provides a consistent and organized layout across the Admin interface, making it easy to access key details for each piece of equipment.
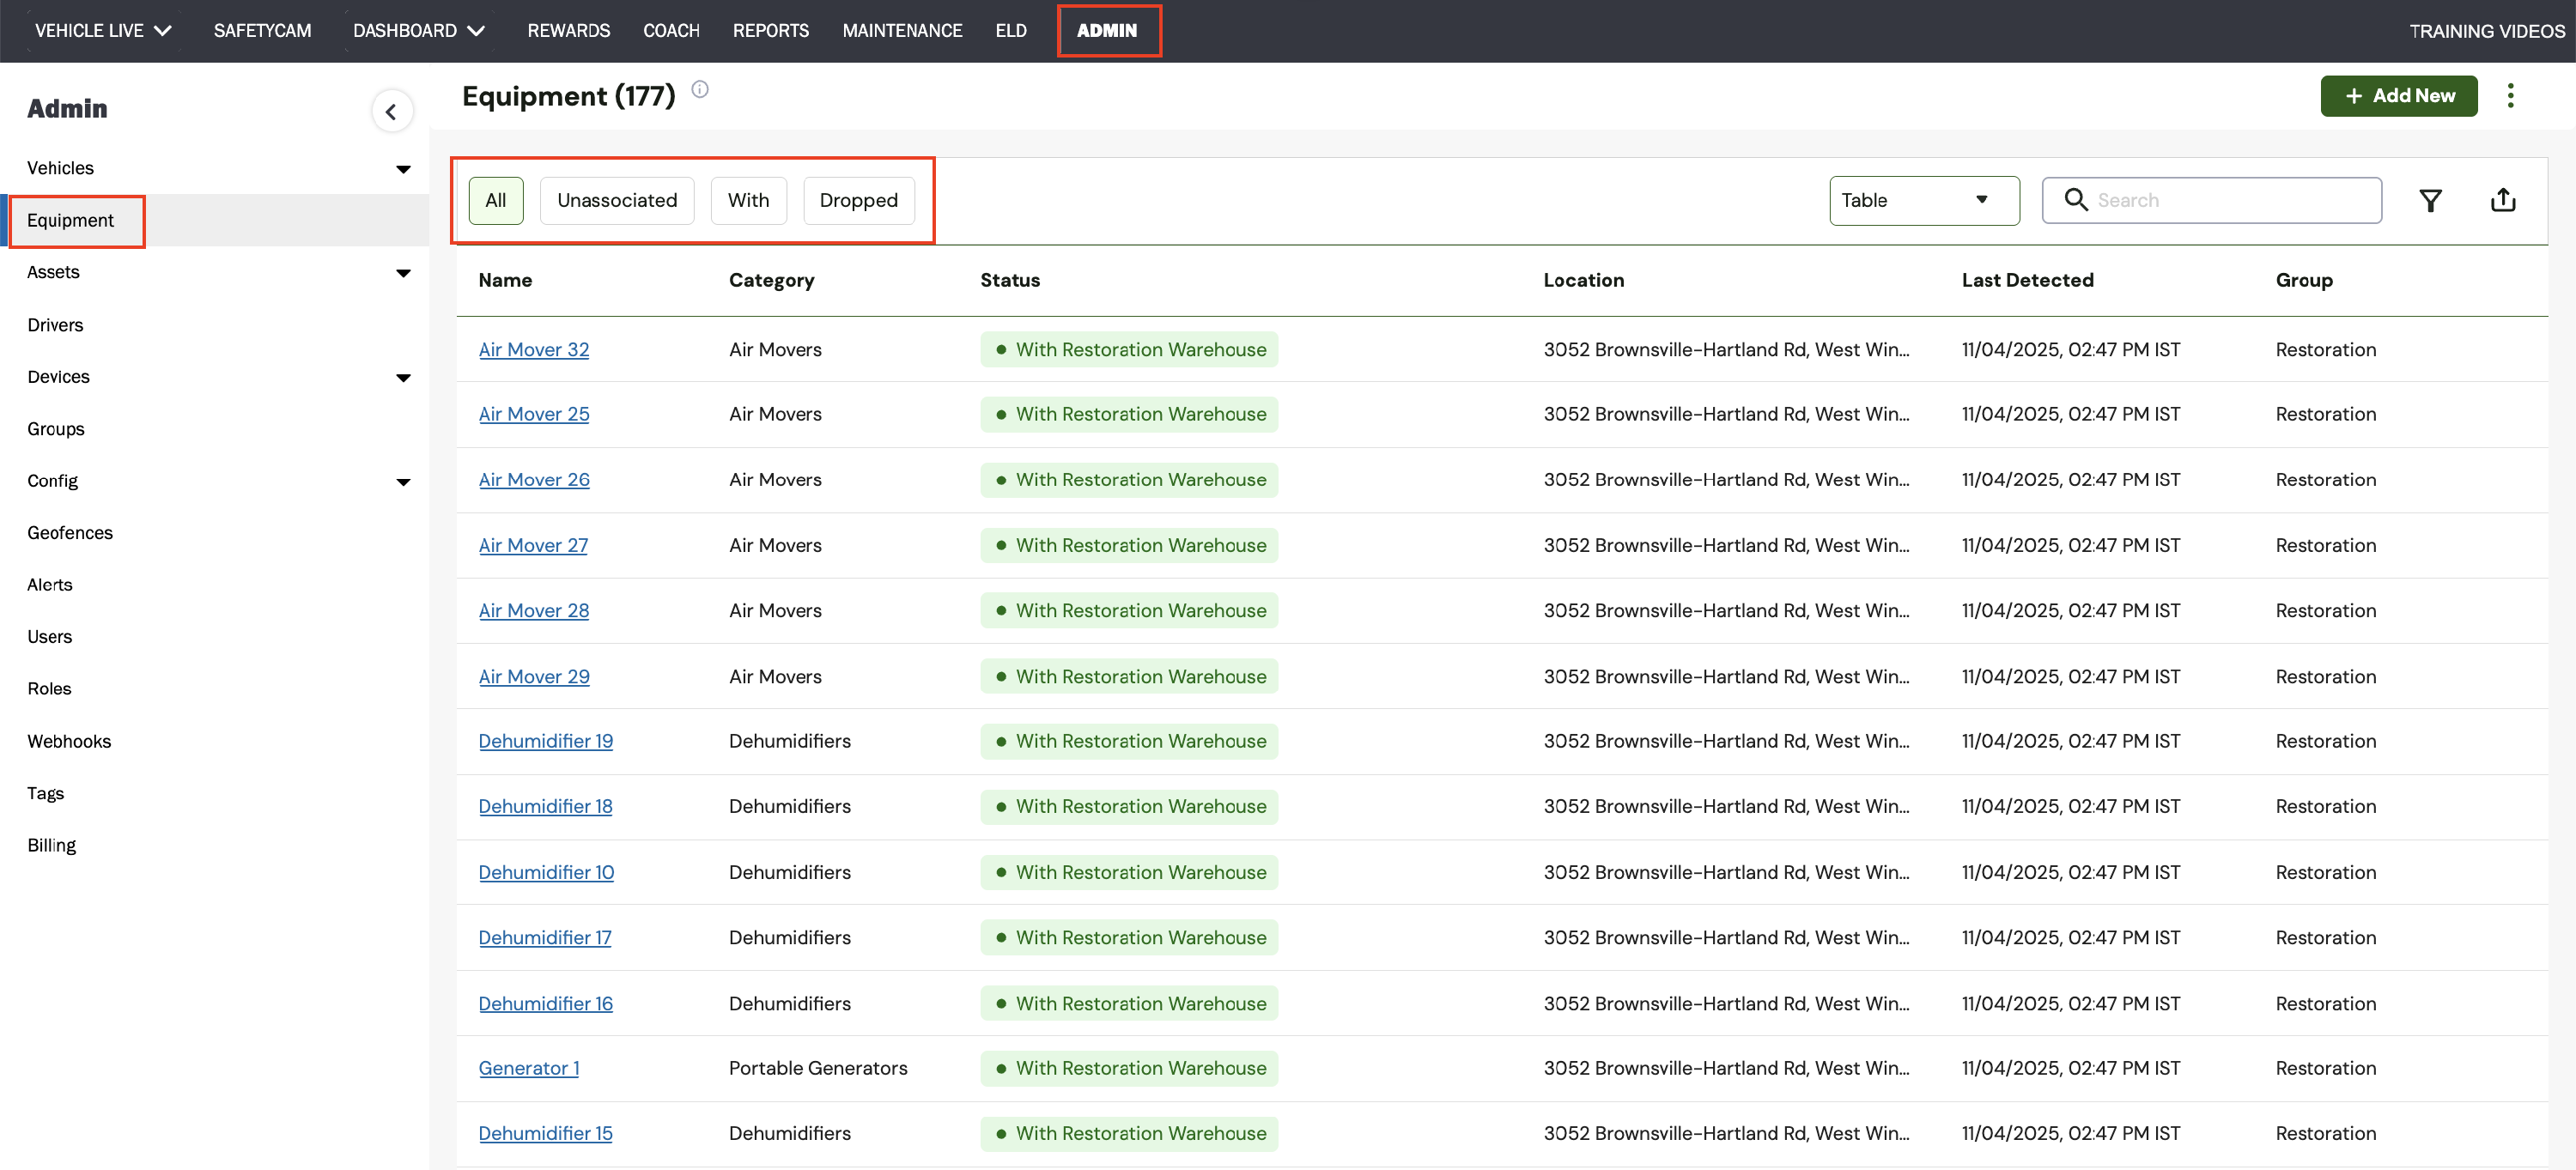
- This view displays column headers such as Name, Category, Status, Location, Last Detected, and Group, offering essential information at a glance. It also includes filter options to help streamline the search experience.
Filter Options Available - All, Unassociated, With, and Dropped:
These buttons are provided for customer convenience, allowing them to easily view and filter the list of equipment in different ways.
- All: Displays all equipment, regardless of beacon association or tracking activity.
- Unassociated: Lists equipment that has no active association with an equipment beacon.
- With: Displays equipment that is currently attached to a trailer and is being actively tracked.
- Dropped: Lists equipment that is no longer detected by any asset tracker, with its last known location recorded.
Additional Table Features:
- Sorting Functionality: Hover over a column header to display the sorting arrow, then click the header to sort the table accordingly.
- Search Functionality: Search for equipment across multiple fields to easily access specific records.
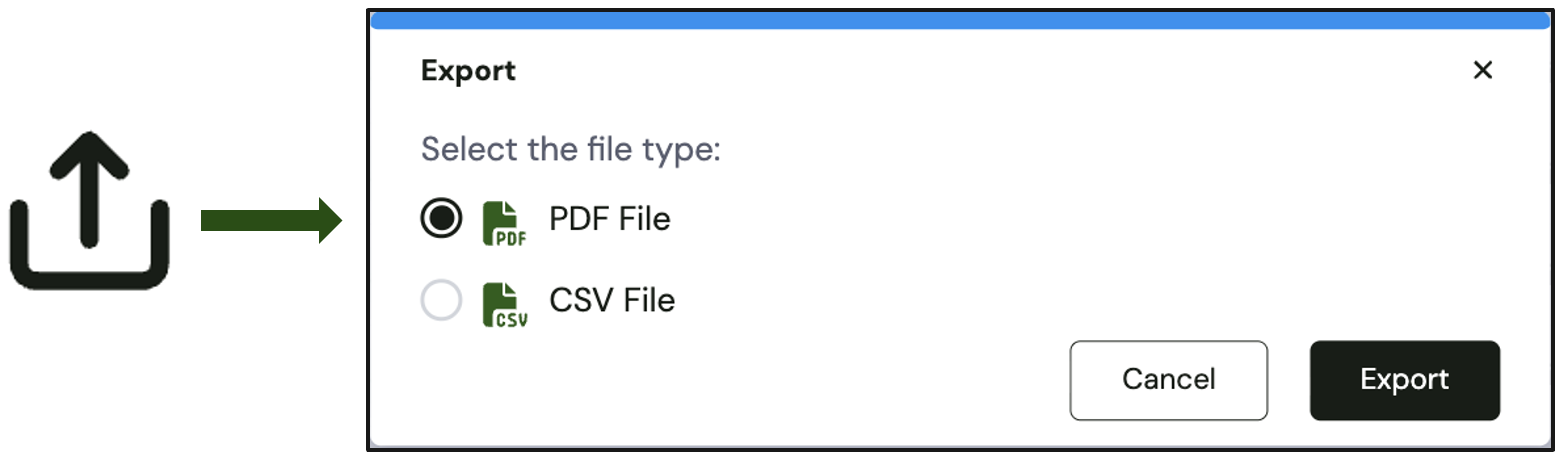
- Export Option: Export table data as PDF or XLSX files for reporting or record-keeping.
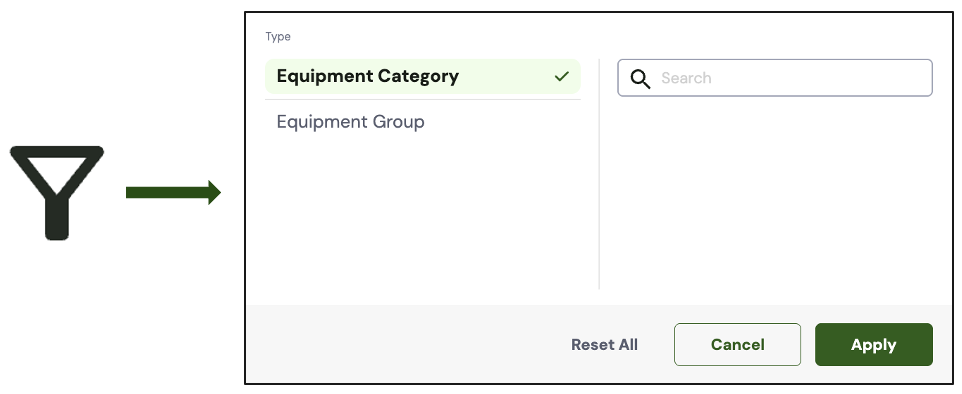
- Filter by Type: Use this field to filter equipment records by Equipment Category or Equipment Group. Select a type and click Apply to filter and manage equipment by category or group. Click Reset All to clear filters and restore the default table view.
- Three-Dot Menu: Click the three-dot menu to access additional options such as Add Category and Export Table details.
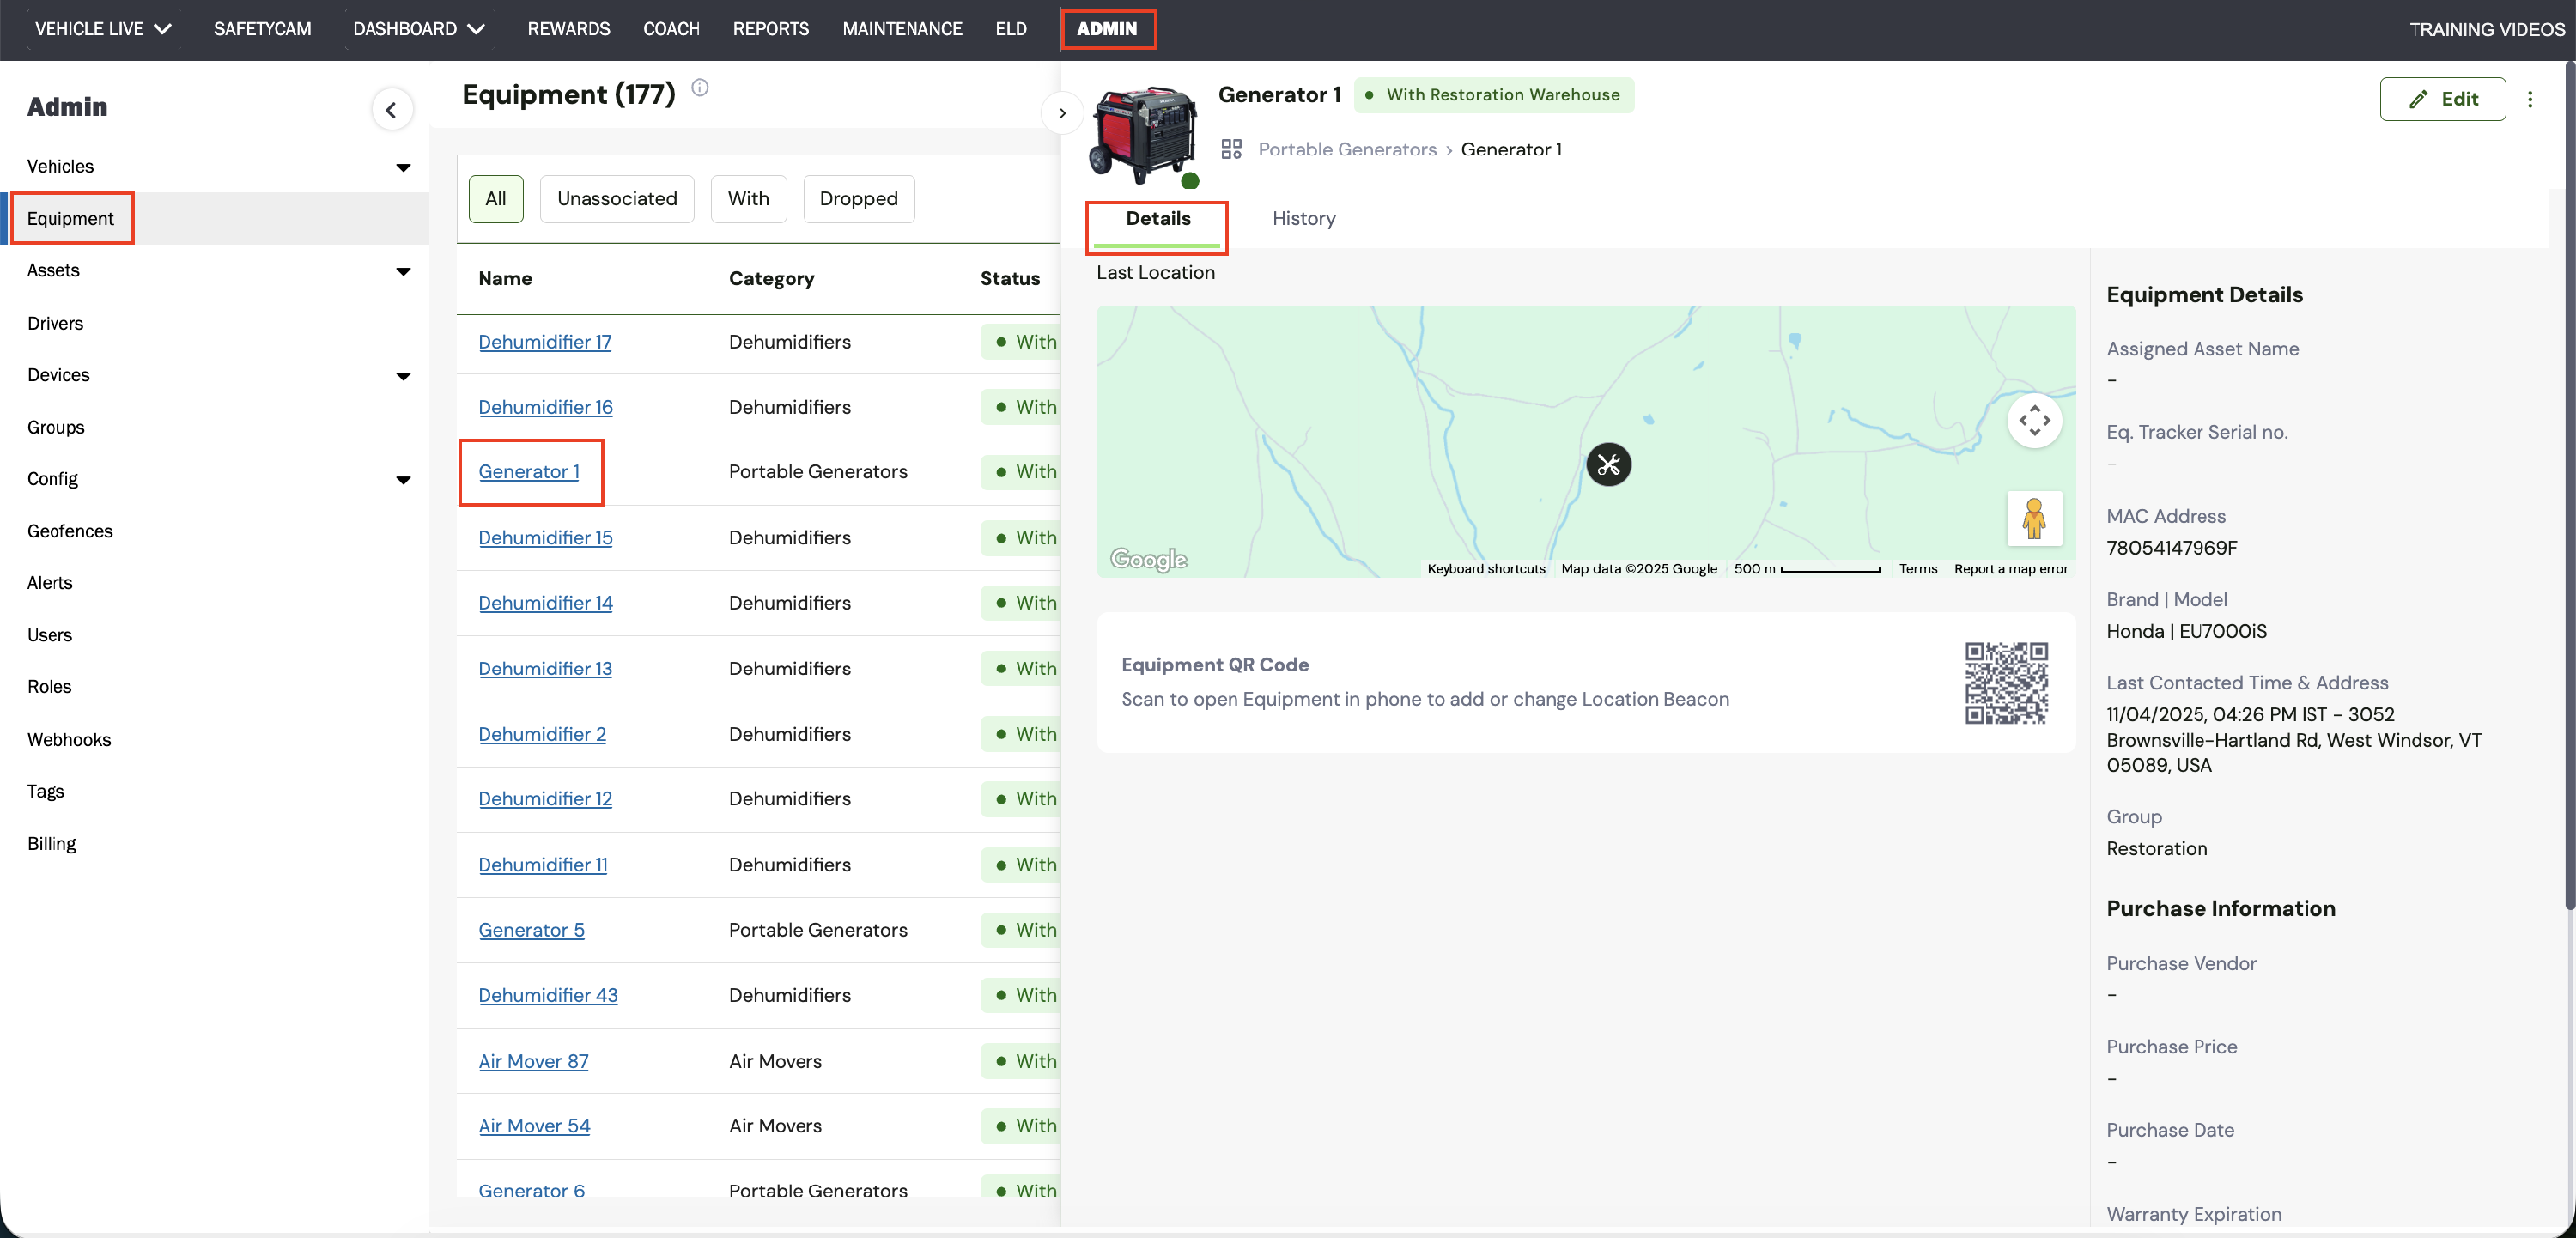
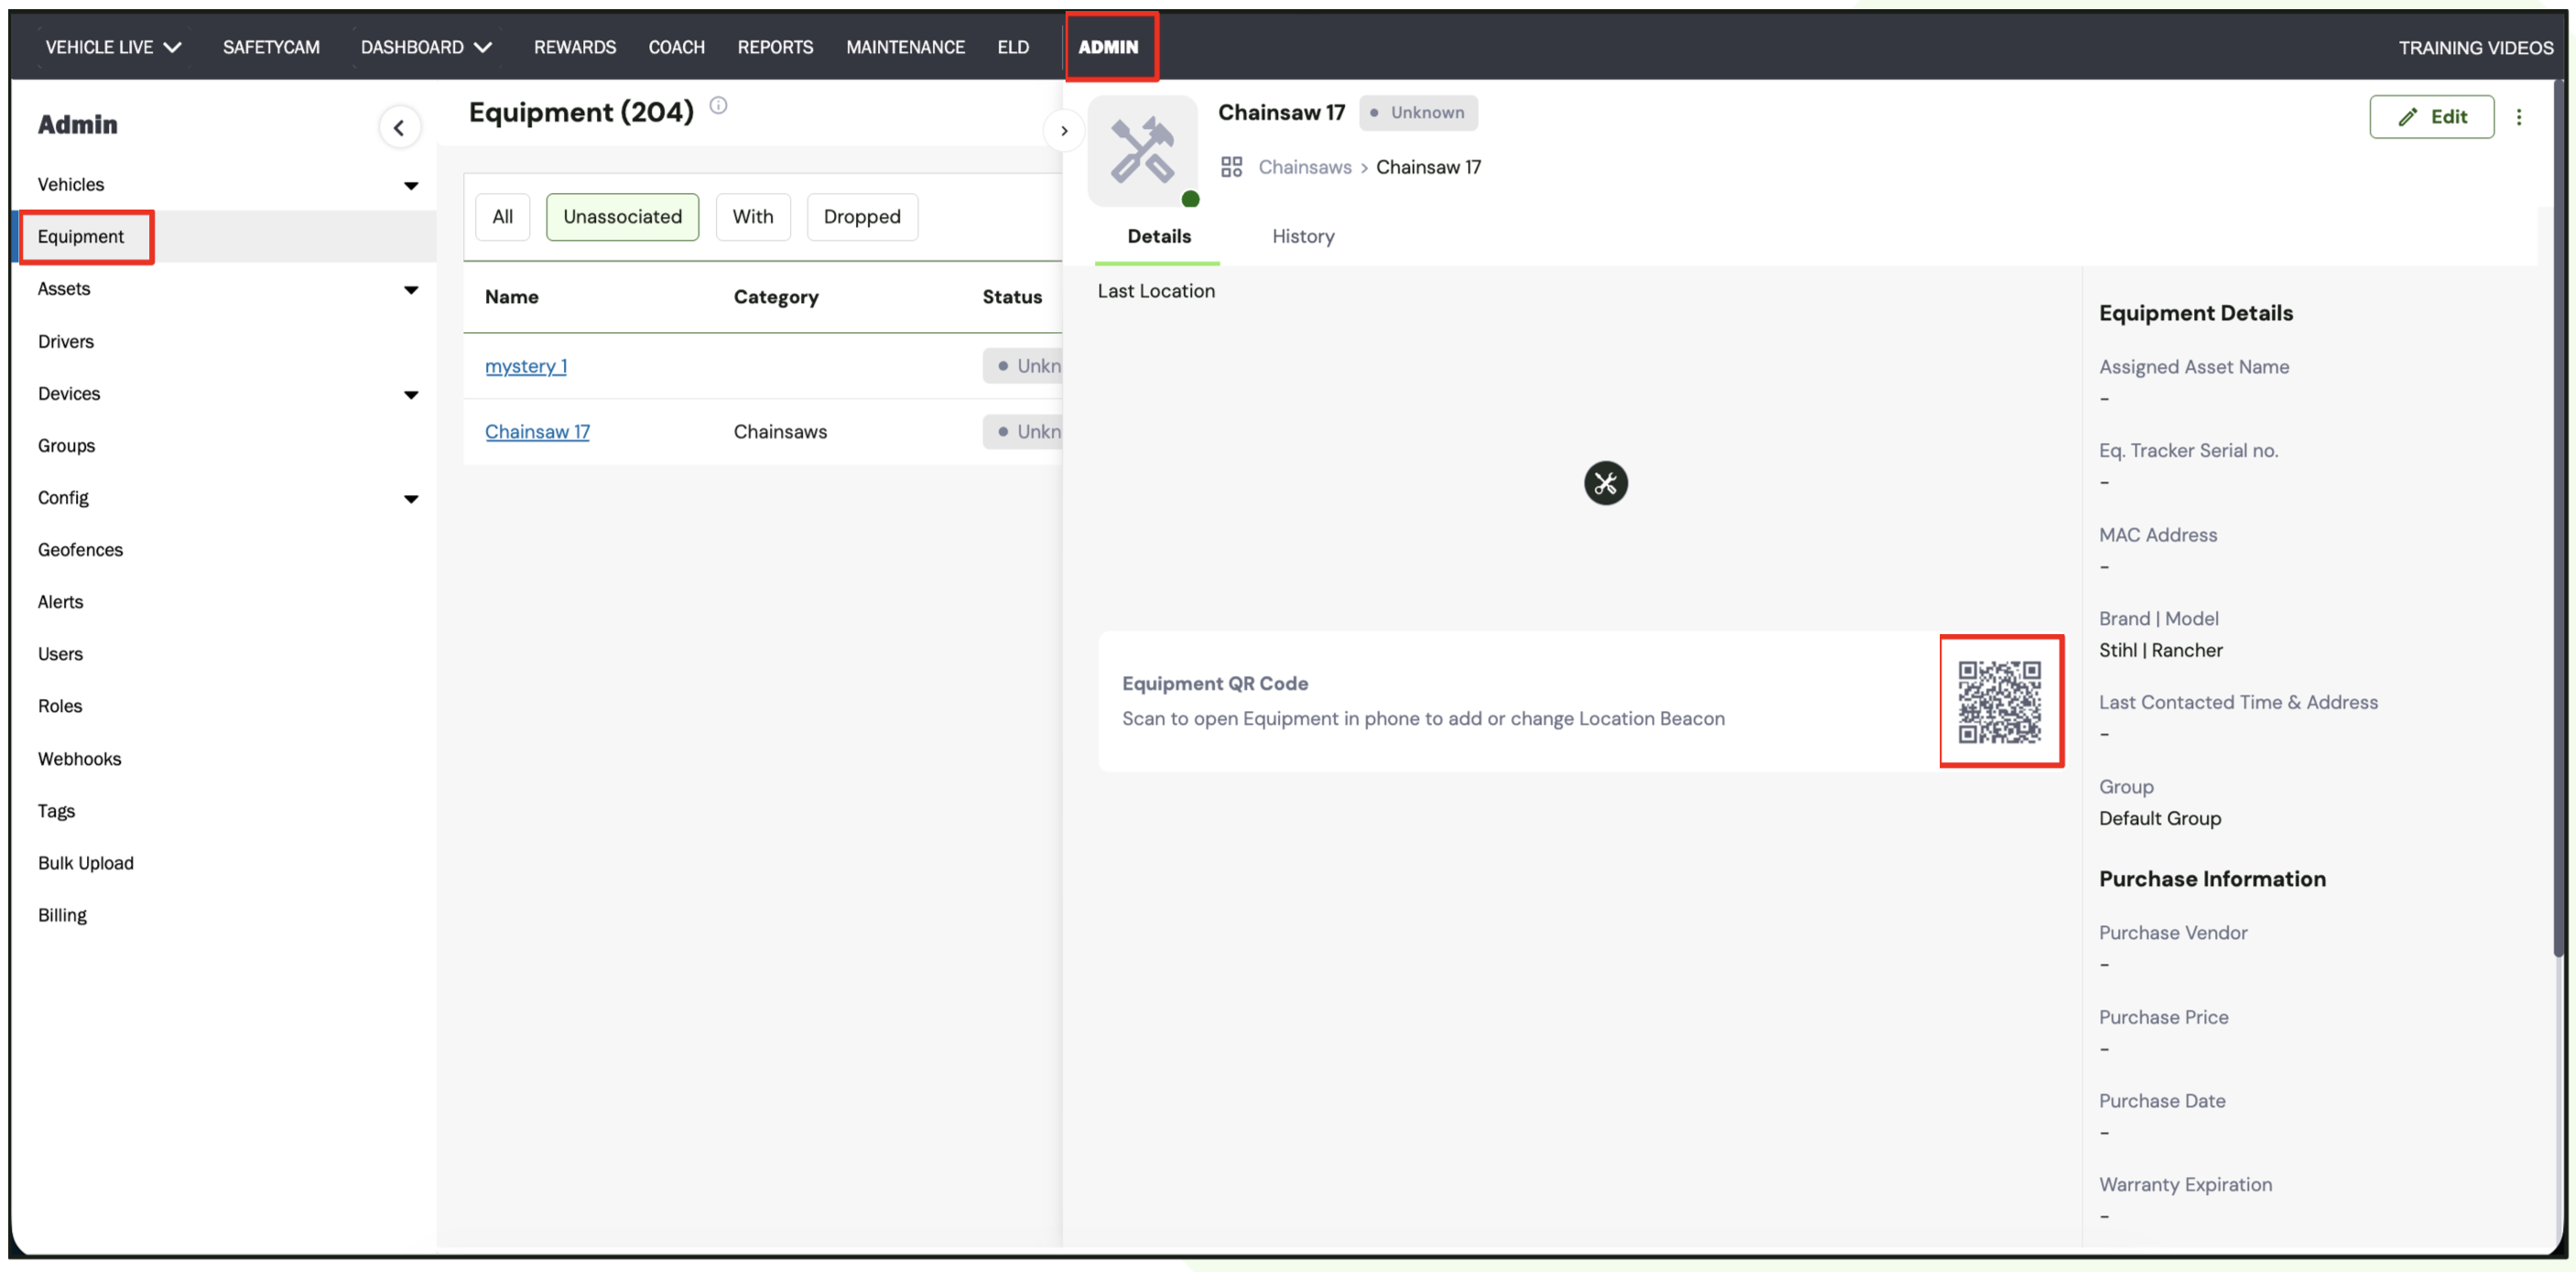
Equipment Details Page:
Clicking an equipment link opens a comprehensive snapshot of the item, highlighting its key specifications. You can also edit equipment details directly from the Details page. The three-dot menu provides options to Unassociate Beacon and Delete Equipment, allowing you to manage your assets without leaving the view.
-
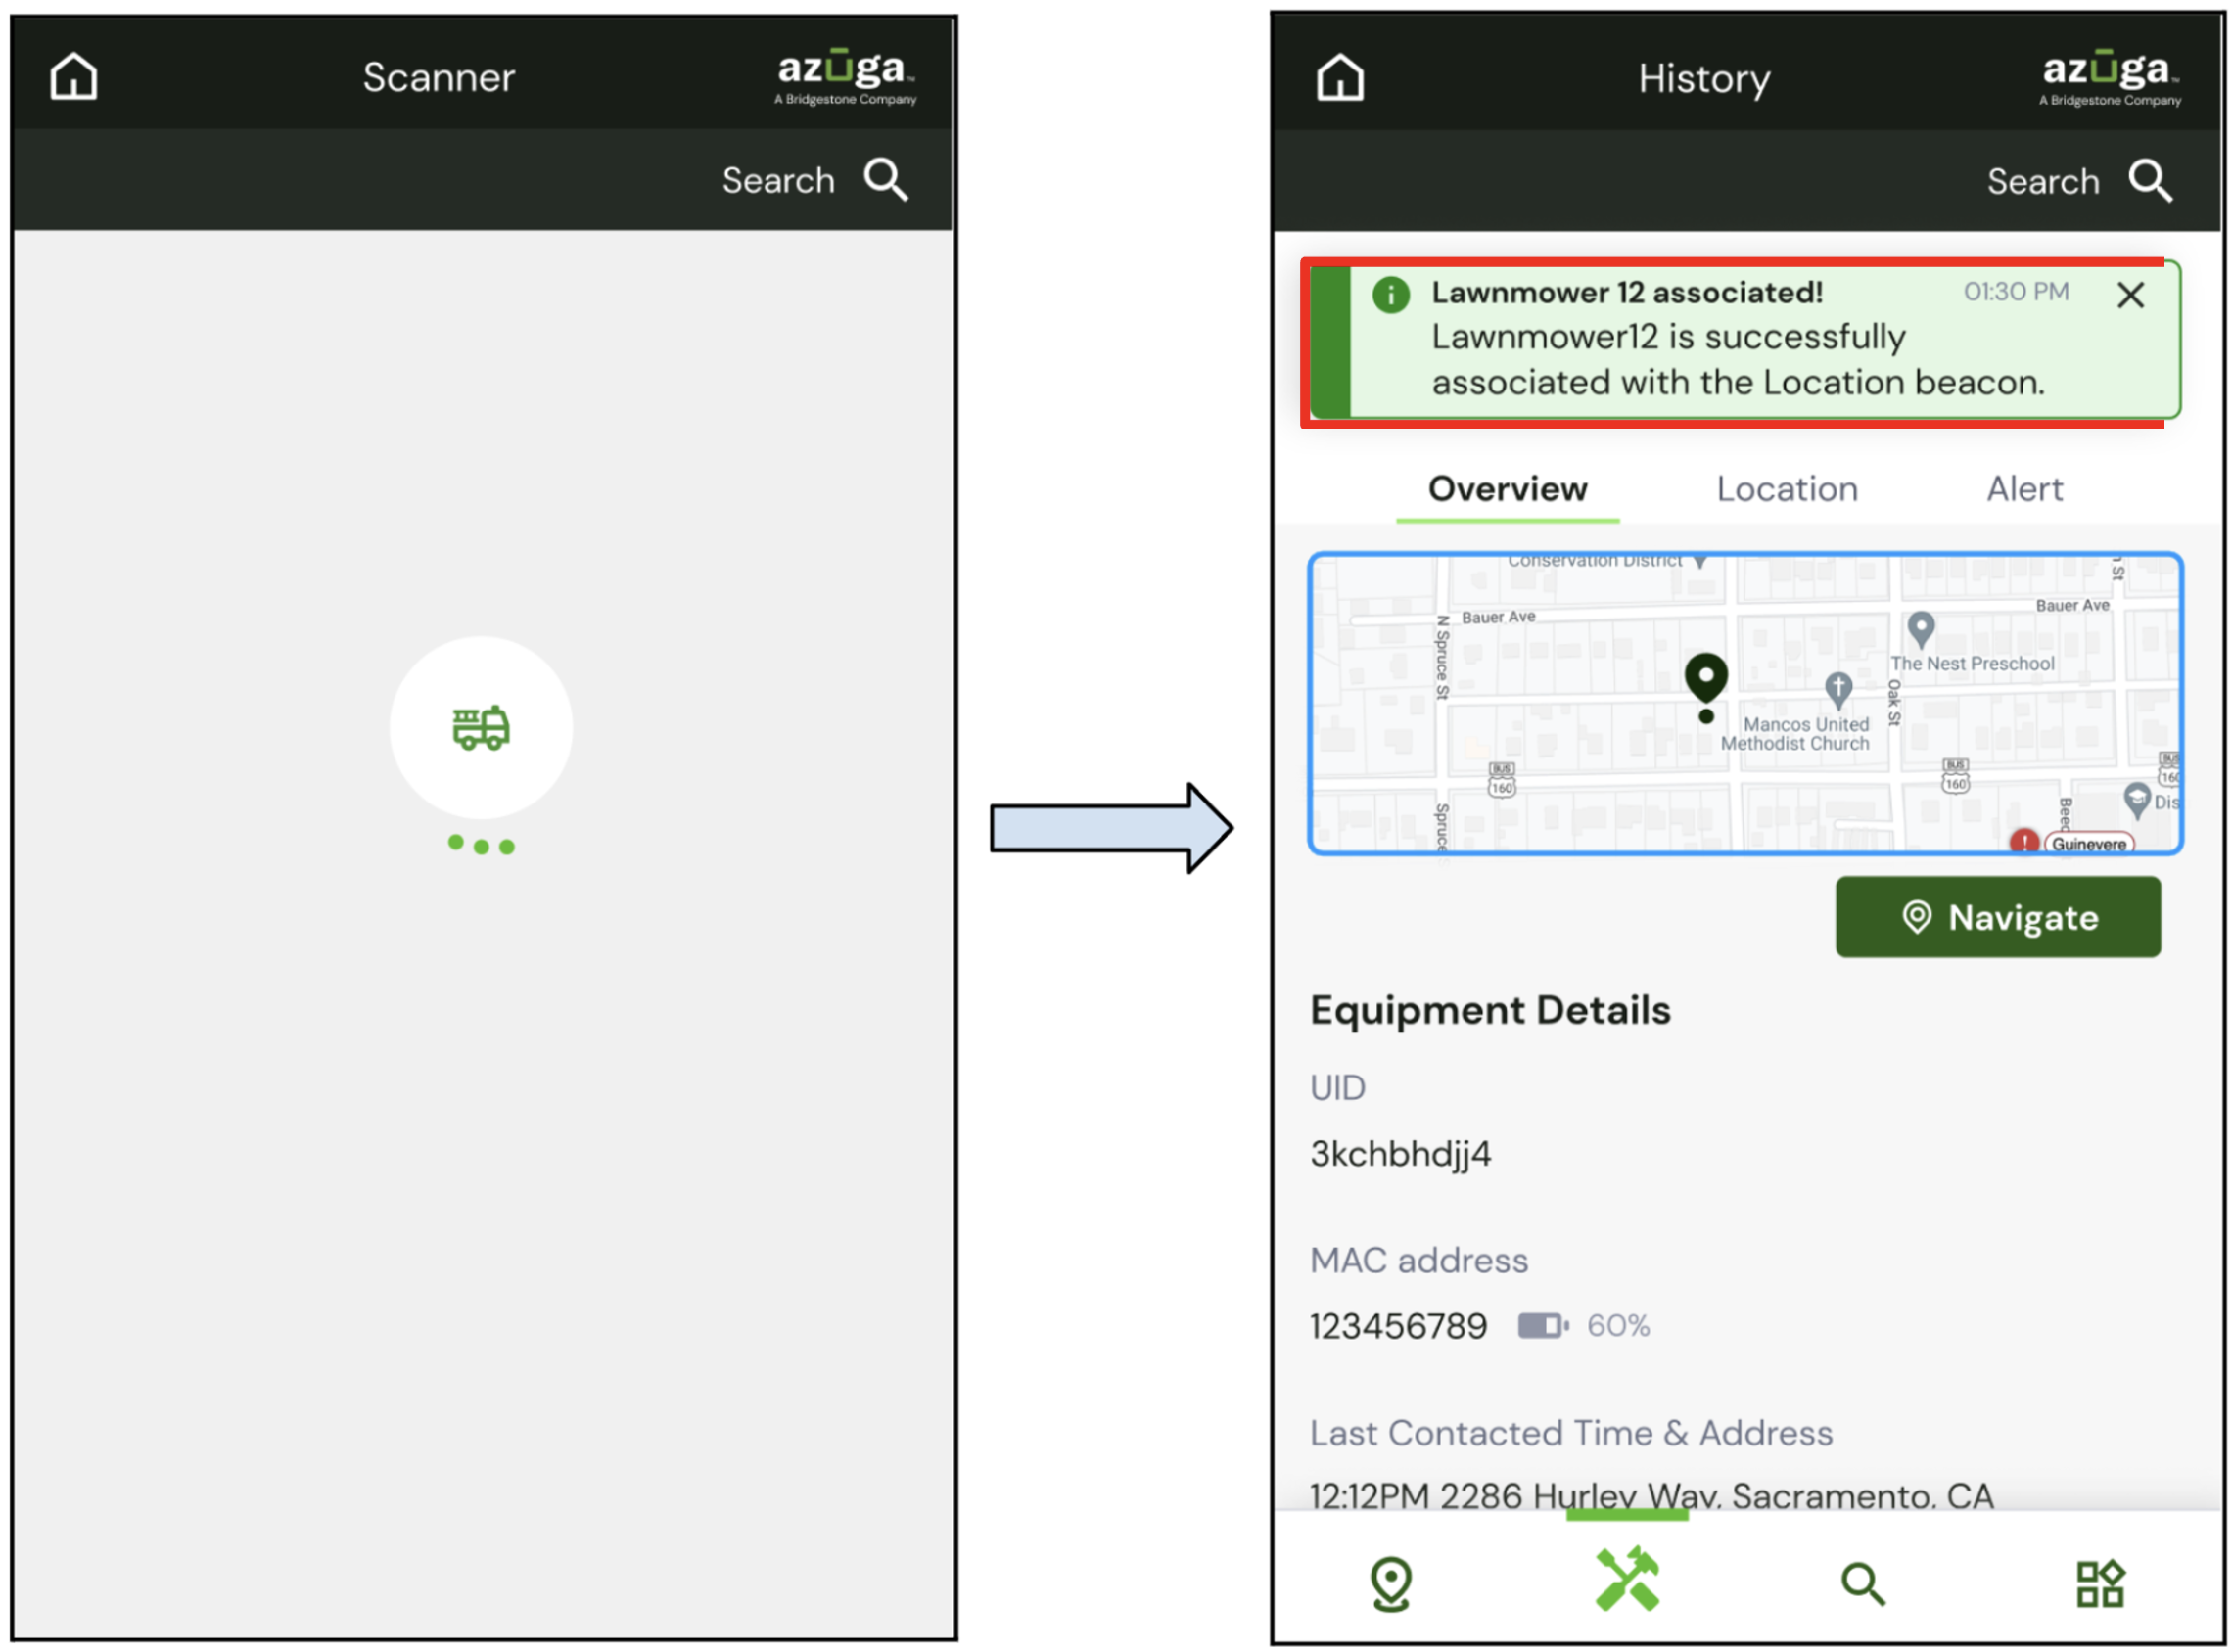
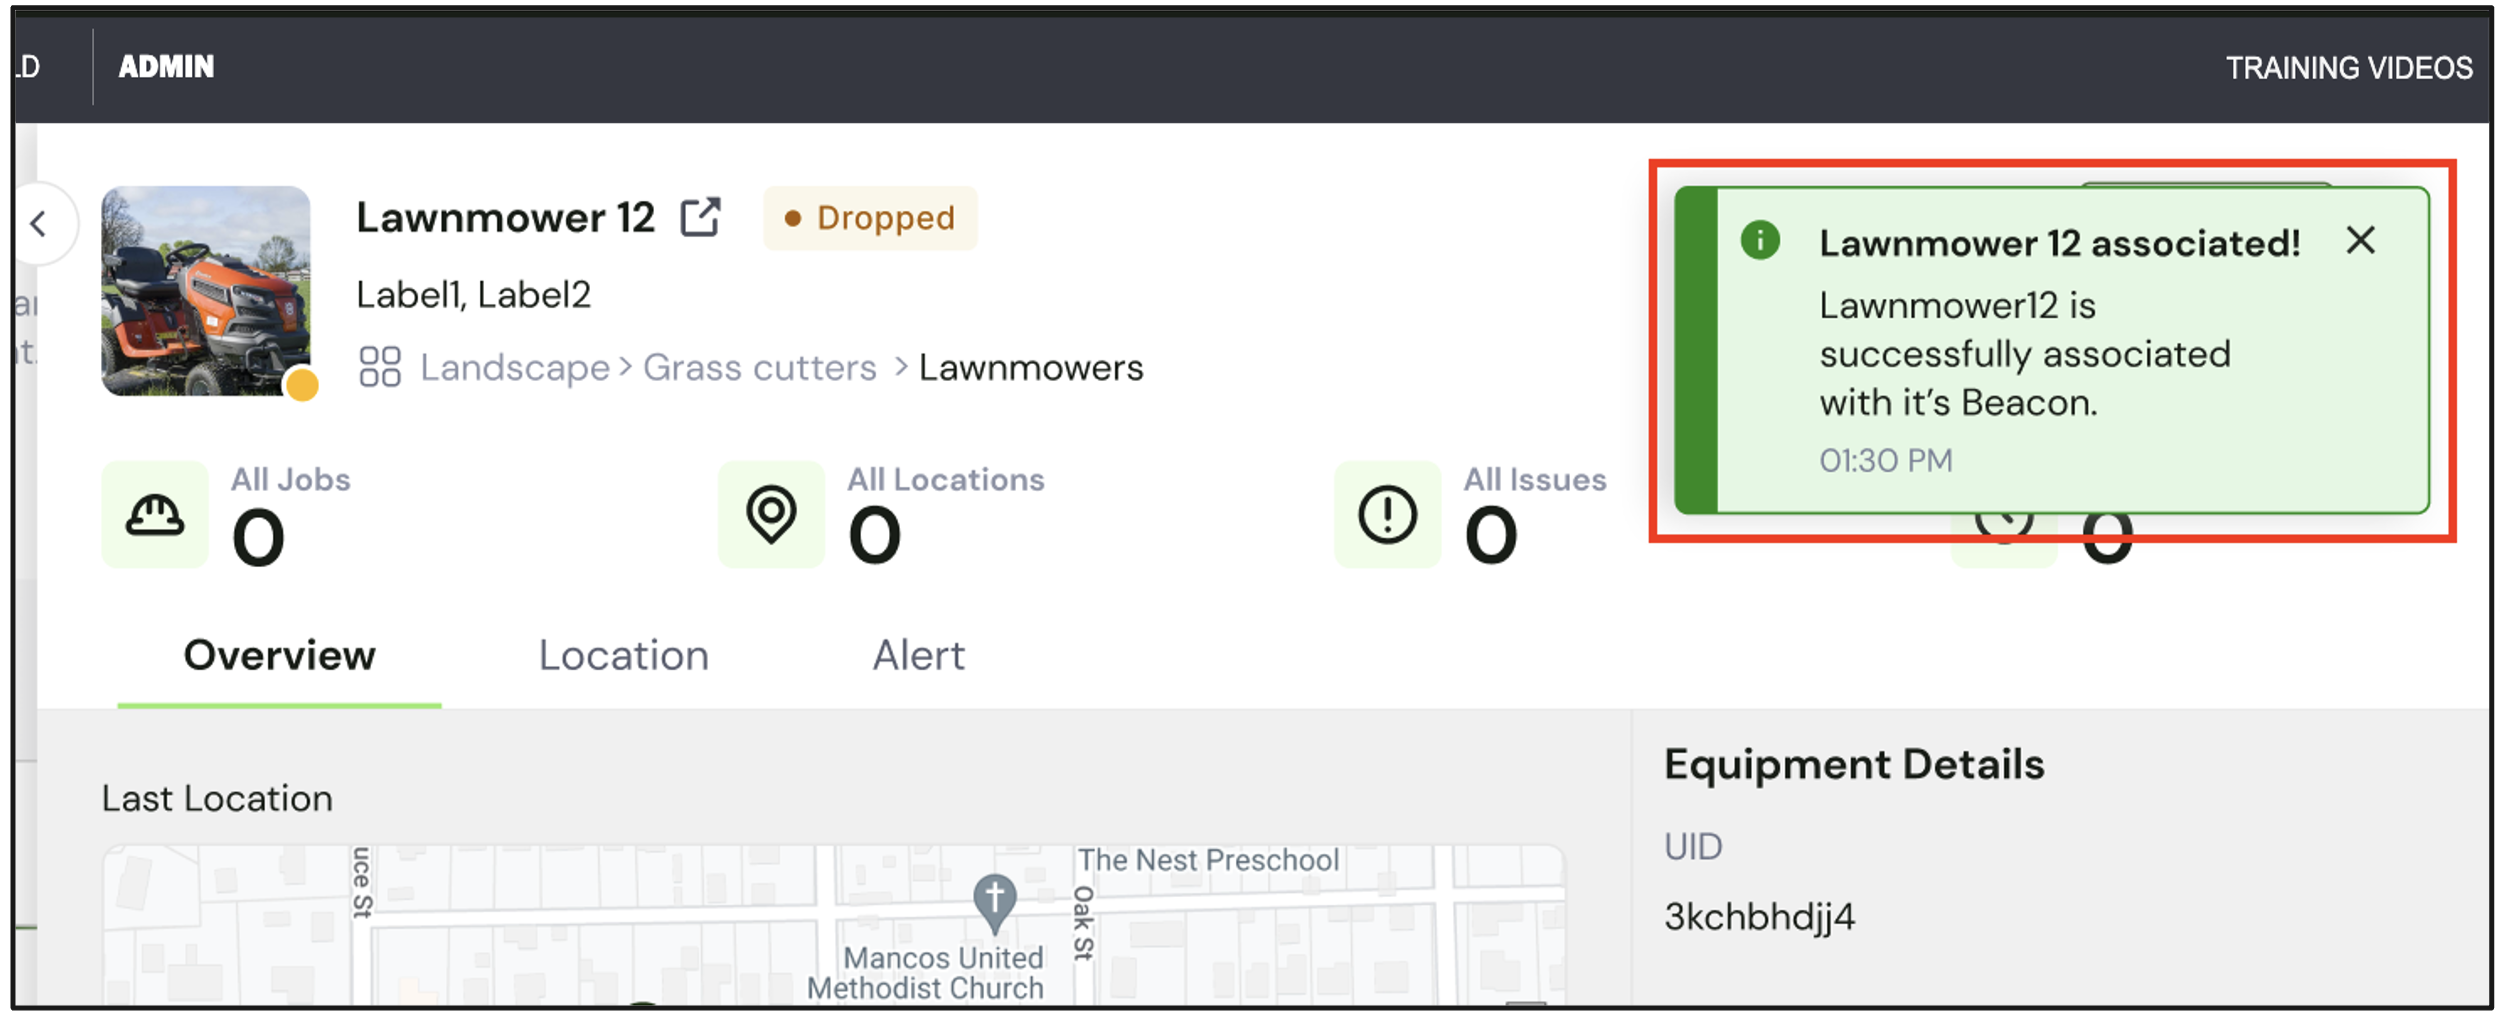
Details Page: This section shows key information about the equipment, including its current location, equipment details, purchase information, and service information. It provides a quick summary of the equipment’s status and main details at a glance.
You can scan the QR code to open the equipment on your phone and add or change the location beacon.
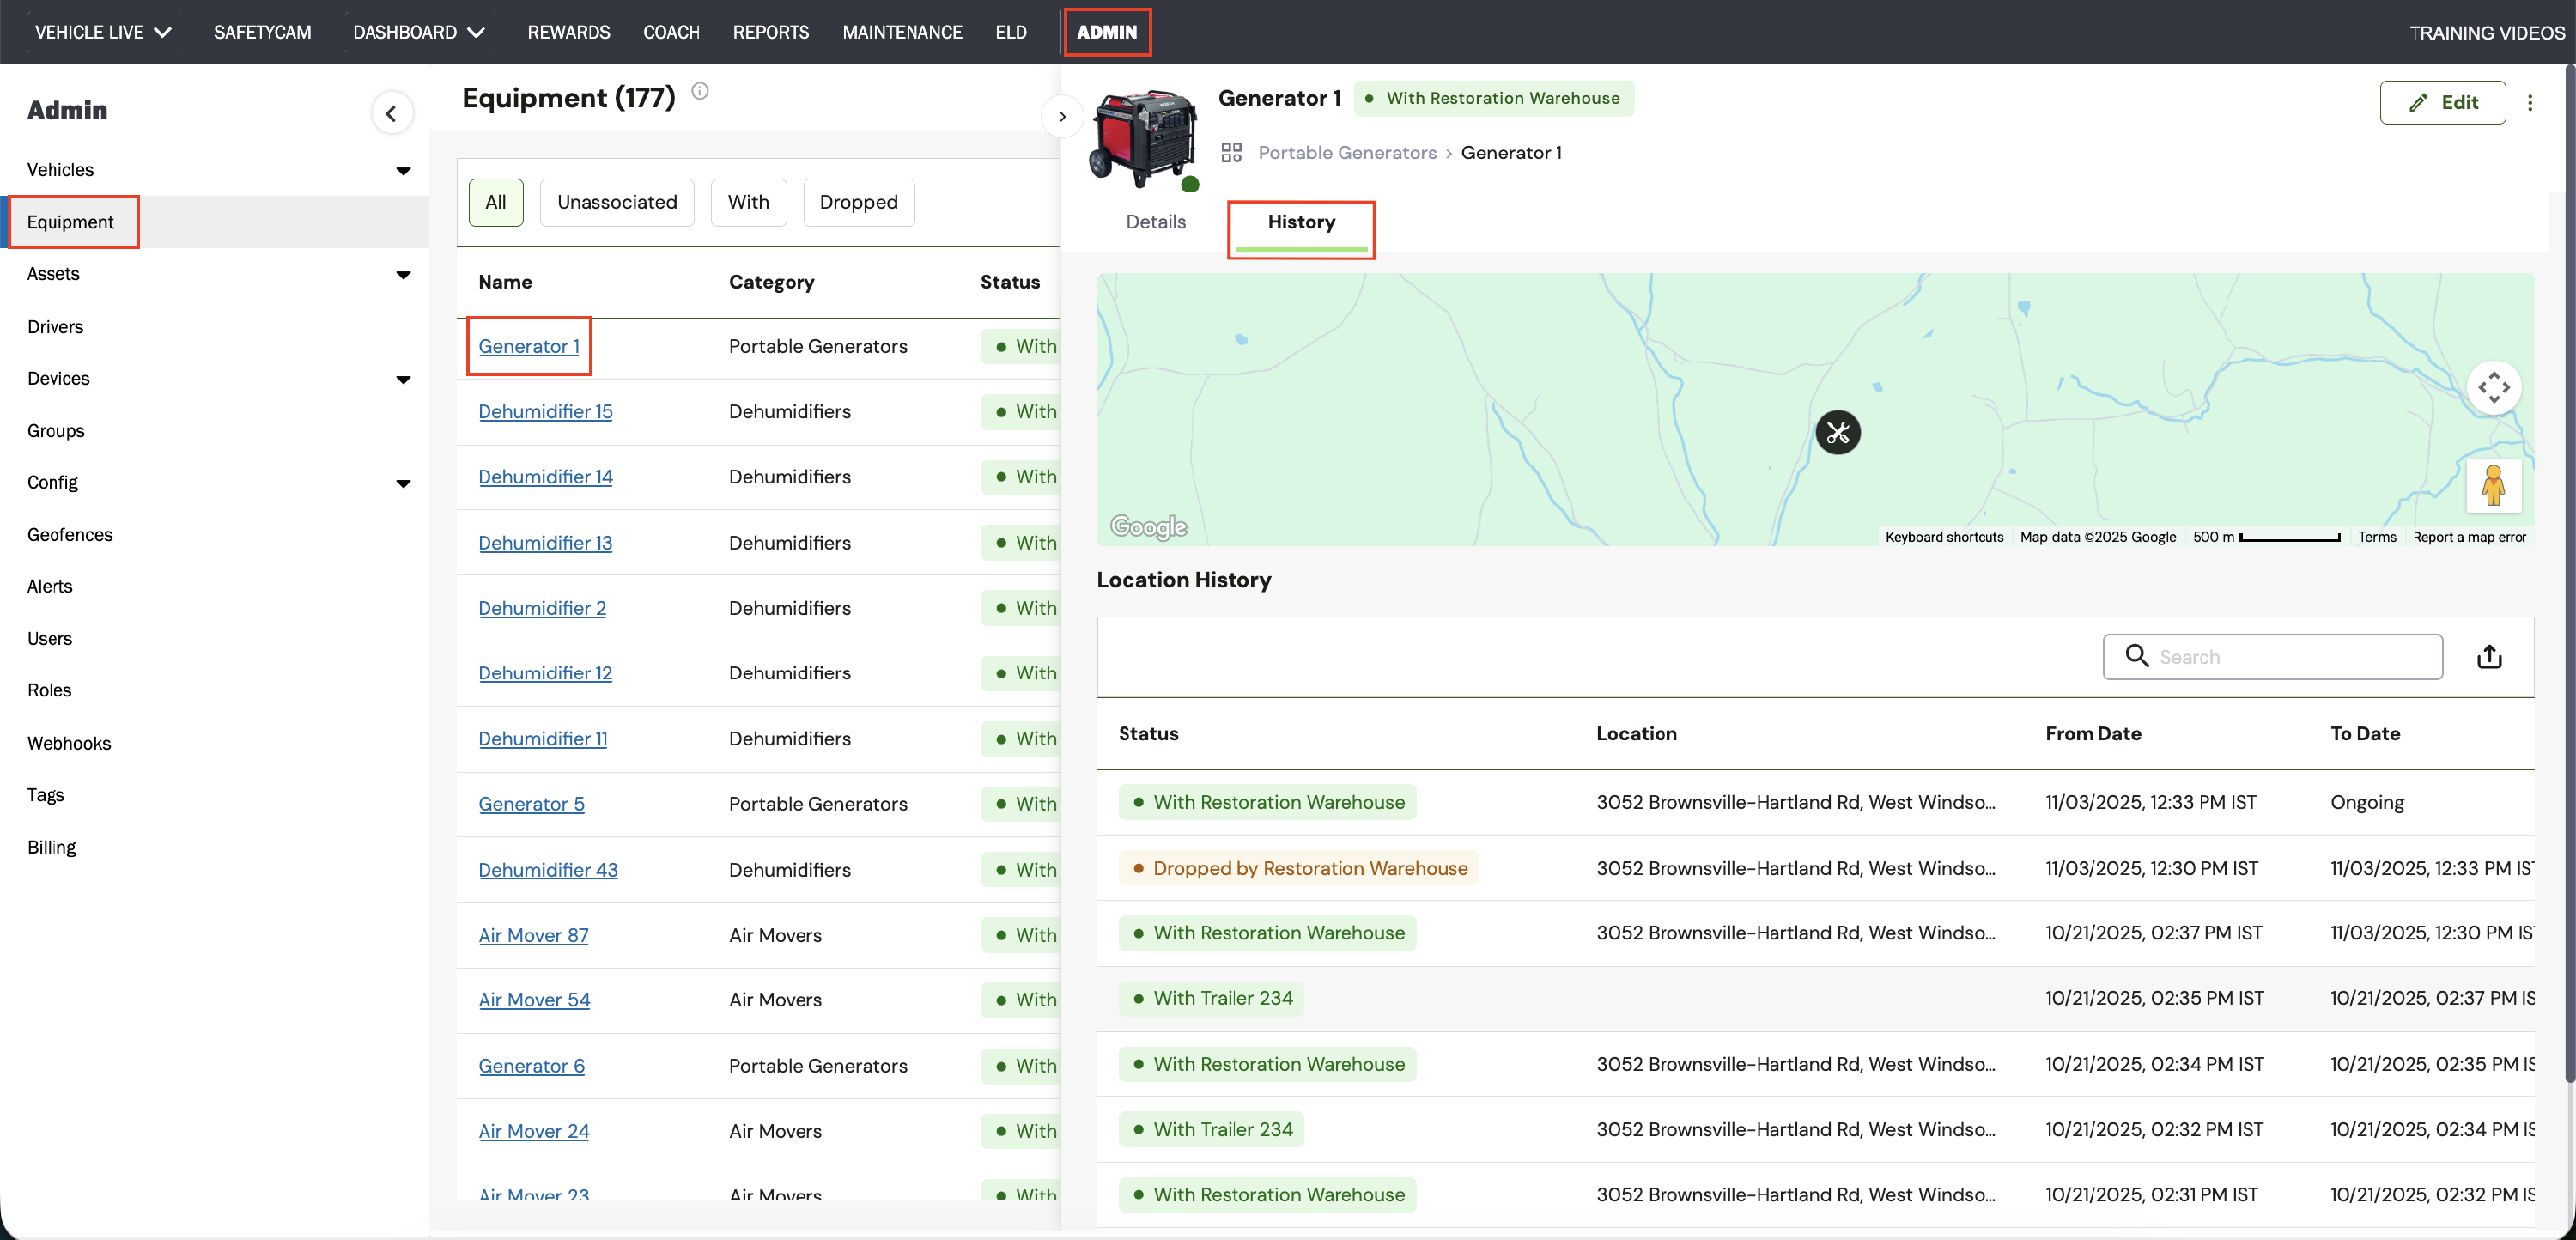
Equipment Location Page:
- Location: This section displays the equipment’s location history, including its status (With or Dropped) and the associated trailer. It also shows the last reported location, along with the reported date and time (From Date and To Date). This view provides a clear overview of the equipment’s movement and current whereabouts. You can also search for specific location history records and export the Equipment Location History table.
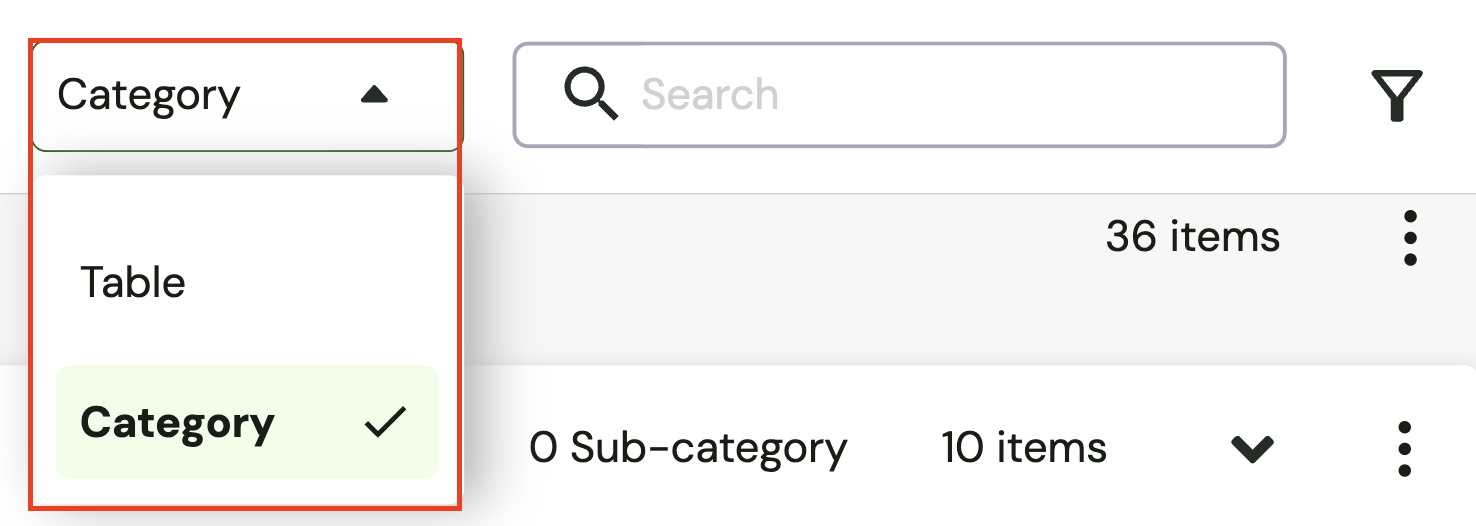
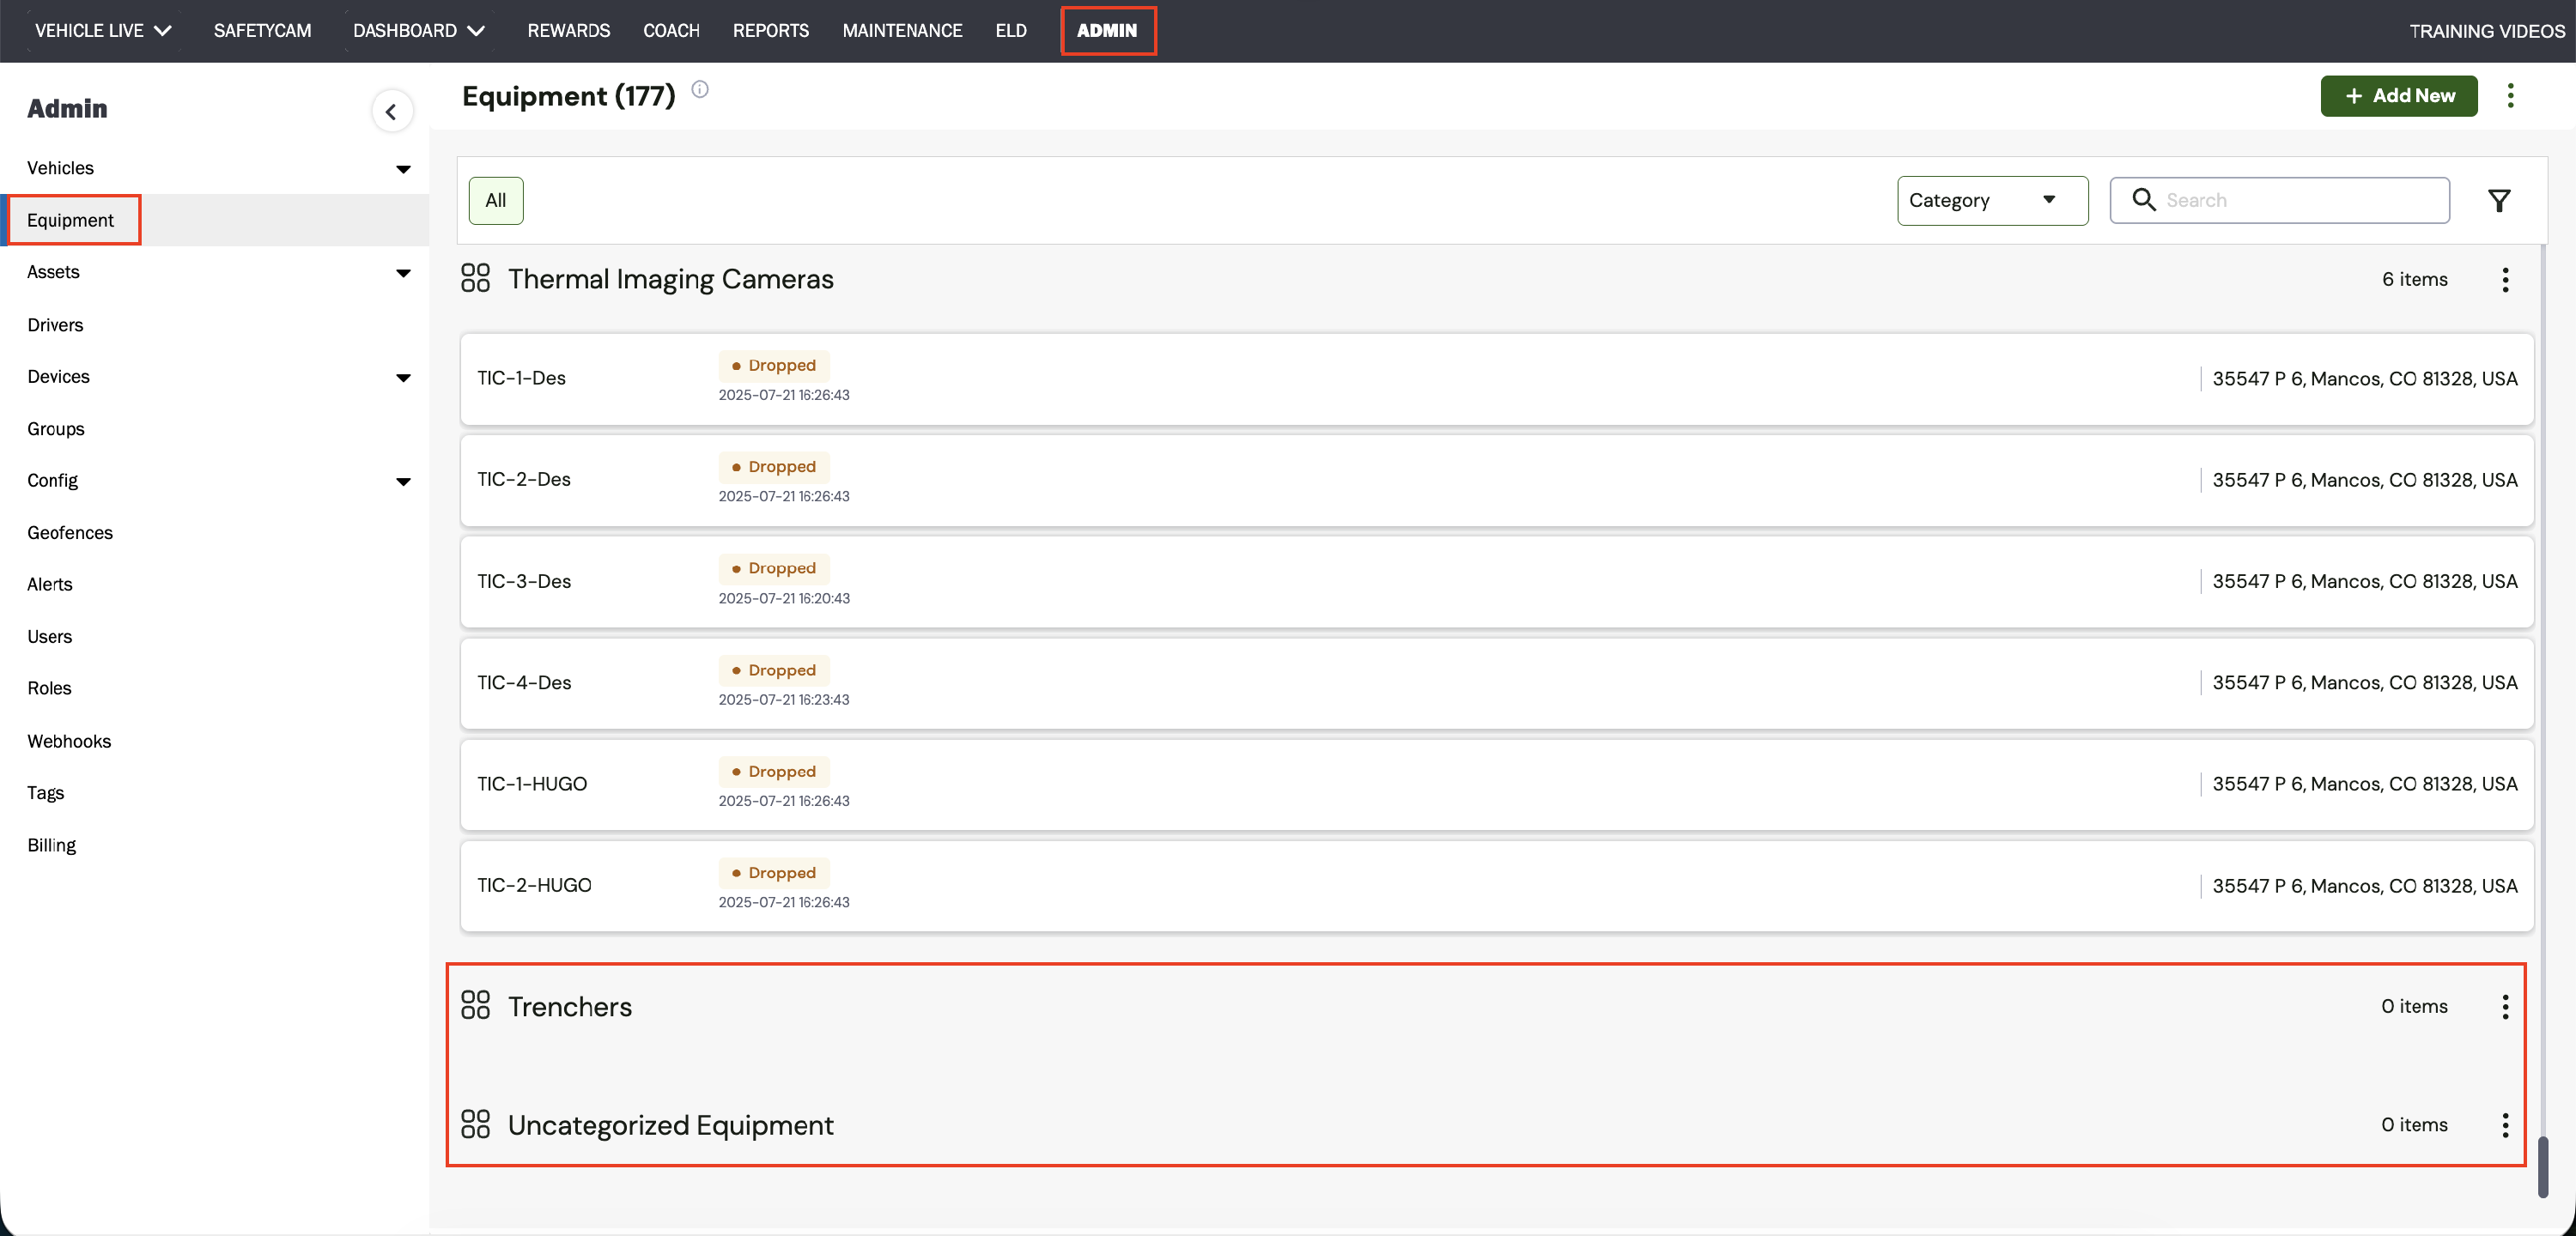
Category View:
- The “Category view” enables users to organize and visualize equipment by categories and subcategories, offering an intuitive way to manage and group items.
- This view simplifies handling large inventories, making it easier to quickly locate specific equipment. Users can create custom categories based on various criteria such as warehouse locations, usage locations, or similar equipment types.
- Maintaining a consistent naming pattern for these categories is essential, as it enhances the clarity and utility of insights in Reports and Dashboards.
Managing Categories and Subcategories:
-
Add a New Category:
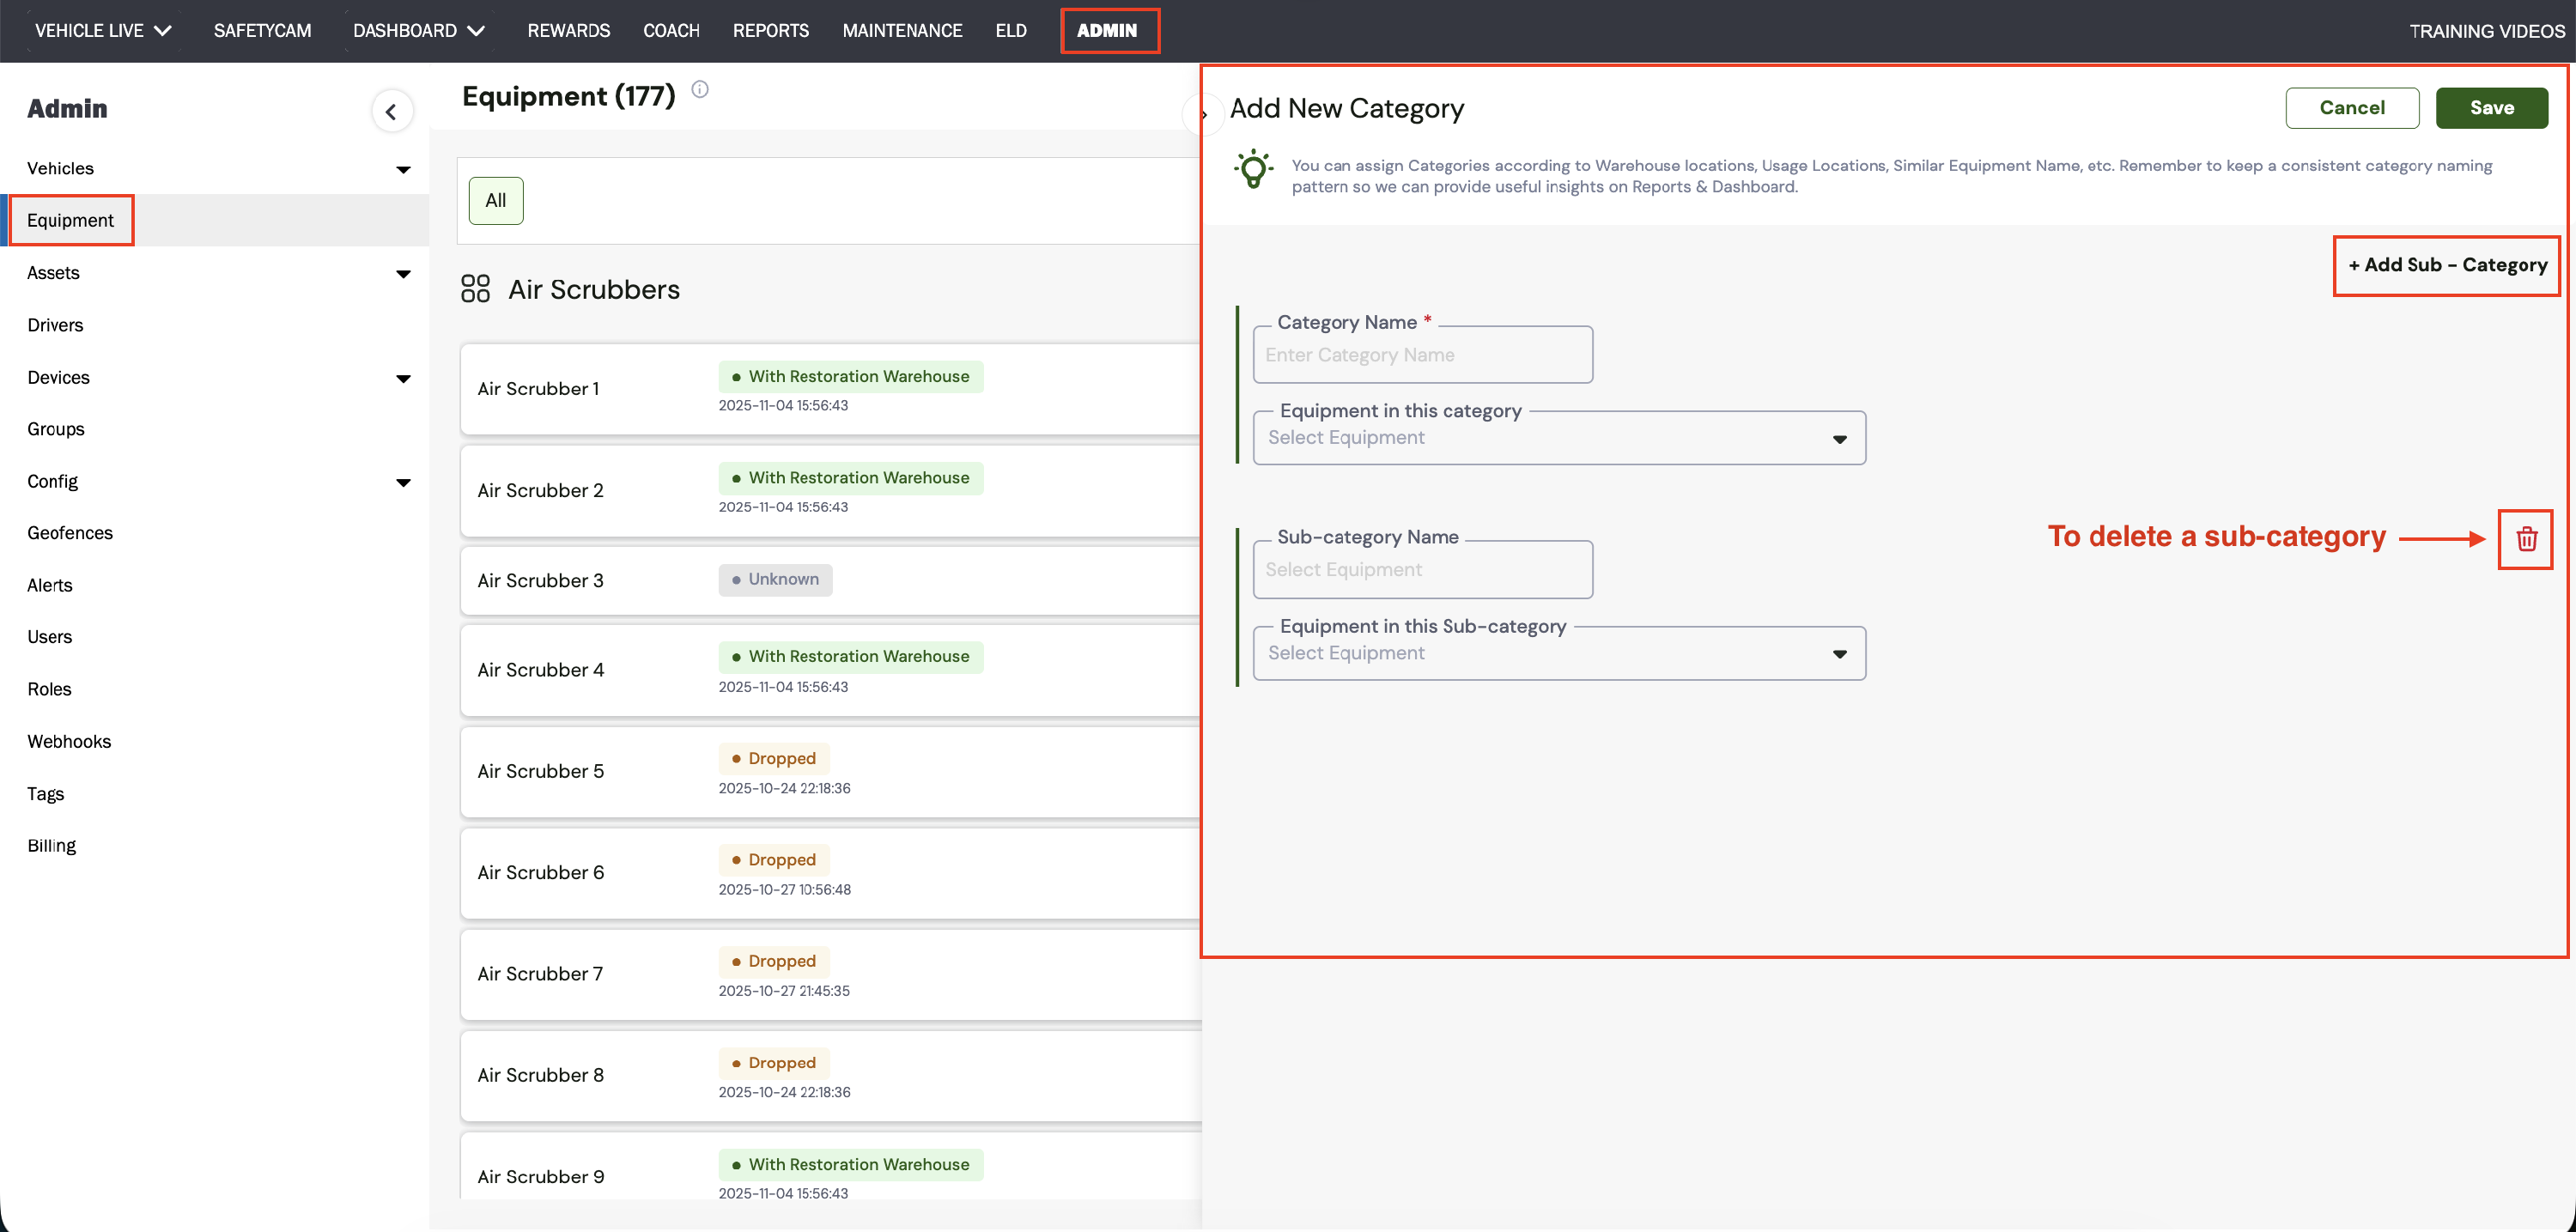
- To create a new category, navigate to the top right corner of the Equipment page and click on the three-dots menu. From the dropdown options, select + Add Category.
-
Enter Category Details:
-
Enter a suitable Category Name, then select the required equipment from the Equipment in this Category dropdown. If the desired equipment isn’t listed, click + Add New to add it directly.
Add Sub-Category: - If you need to further categorize your equipment, you can add sub-categories. Enter the desired information for Sub-category Name and Equipment in this Sub-category.
-
To add additional sub categories, simply click on the + Add Sub-Category button and continue entering the necessary details.
Delete Sub-Category: -
Should you need to remove a sub-category, click on the Delete (bin icon) located next to the sub-category you wish to delete. This action will remove the specific sub category from the list.
Saving Your Changes: - Once you've entered all the necessary information and made any adjustments, click the Save button at the top right corner of the screen to save your new category and subcategories.
-
b. Categories with no subcategories are listed with 0 items, ensuring that all items are accounted for and can be easily categorized later. This layout streamlines the process of managing and organizing equipment, making it more intuitive and efficient.
Setting Up Equipment in Azuga Fleet Mobile:
Adding Asset Trackers & Equipment Beacons:
With your subscription activated, you’ll find your asset tracker and the equipment beacons details prefilled in the Azuga UI, streamlining the setup process.
Adding Equipment:
- Log in to the Azuga Fleet Mobile app with your credentials.
- From the Dashboard, select the Equipment tab to open the Equipment Live page.
- Tap the Equipment menu (second icon in the bottom navigation bar) on the live map.
-
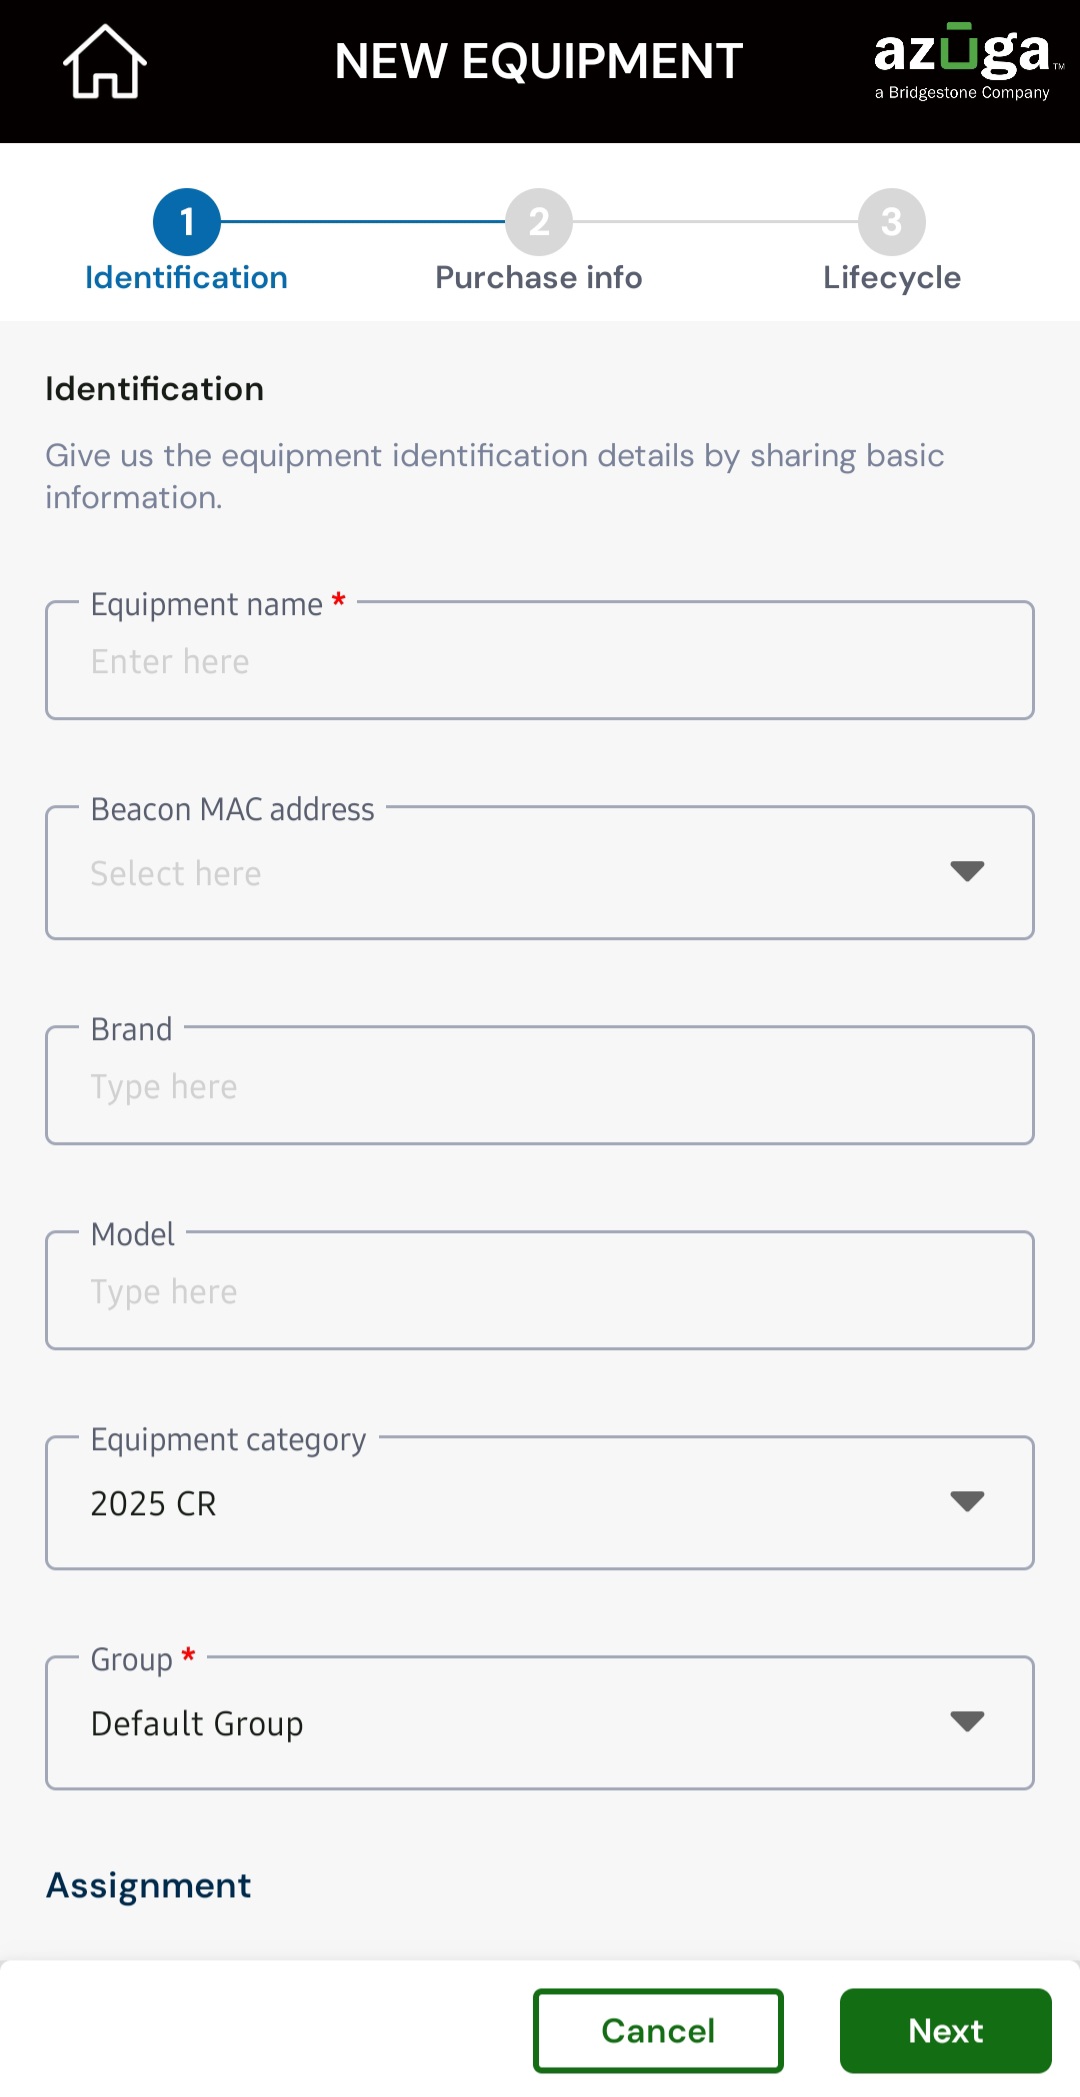
Click +Add present at the bottom right side of the page.
In the New Equipment screen:- Under the Identification section, enter the Equipment Name.
- Select the Beacon MAC Address from the drop-down list.
- Enter the Brand and Model, and select the Equipment Category from the drop-down list.
- Choose the desired Group.
- Fill in the other required details on the page.
- Click Next to enter Purchase Information and Lifecycle details.
- Click Create Equipment to add the new equipment.
|
Note: Fields marked with a red star are mandatory. |
Equipment Page Overview in Azuga Fleet Mobile:
-
Access the Equipment Section:
- From the Dashboard, select the Equipment tab to open the Equipment Live page.
-
Tap the Equipment menu (second icon in the bottom navigation bar) on the live map.
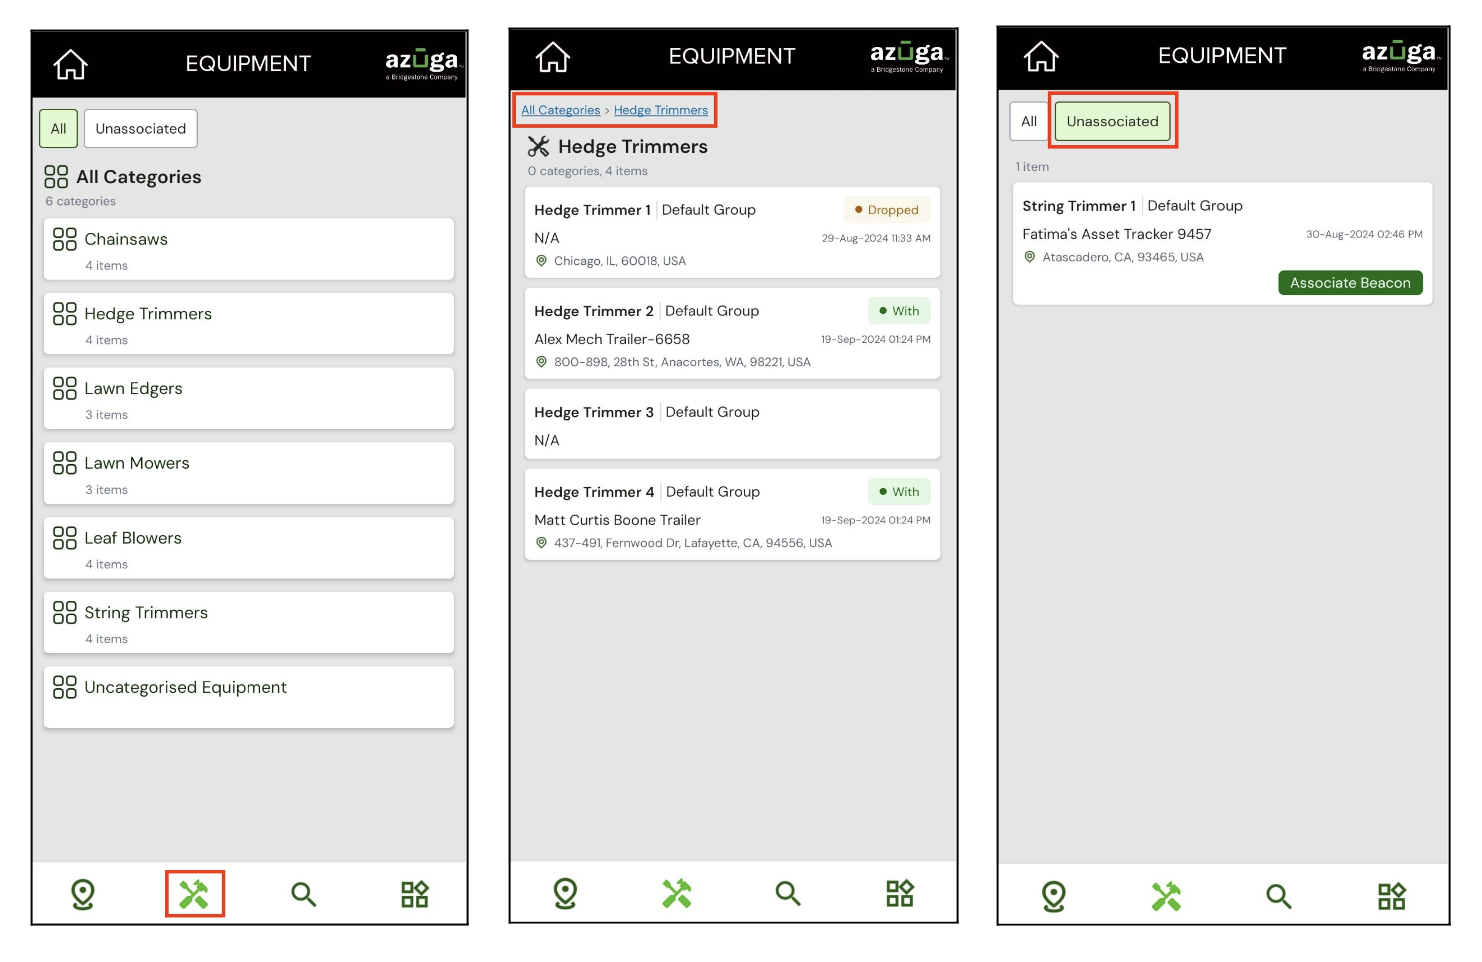
Viewing Categories and Subcategories: - All Categories: Displays all categories and optional subcategories created on the web platform, organizing equipment under them to make it easier to locate specific items.
- Uncategorised: A separate section within "All Categories" that lists equipment that hasn't been categorized yet, allowing for easy organization later.
- Unassociated Category: Lists all equipment that has no active association with an equipment beacon and is ready to be paired for tracking.
-
Accessing Equipment Details:
-
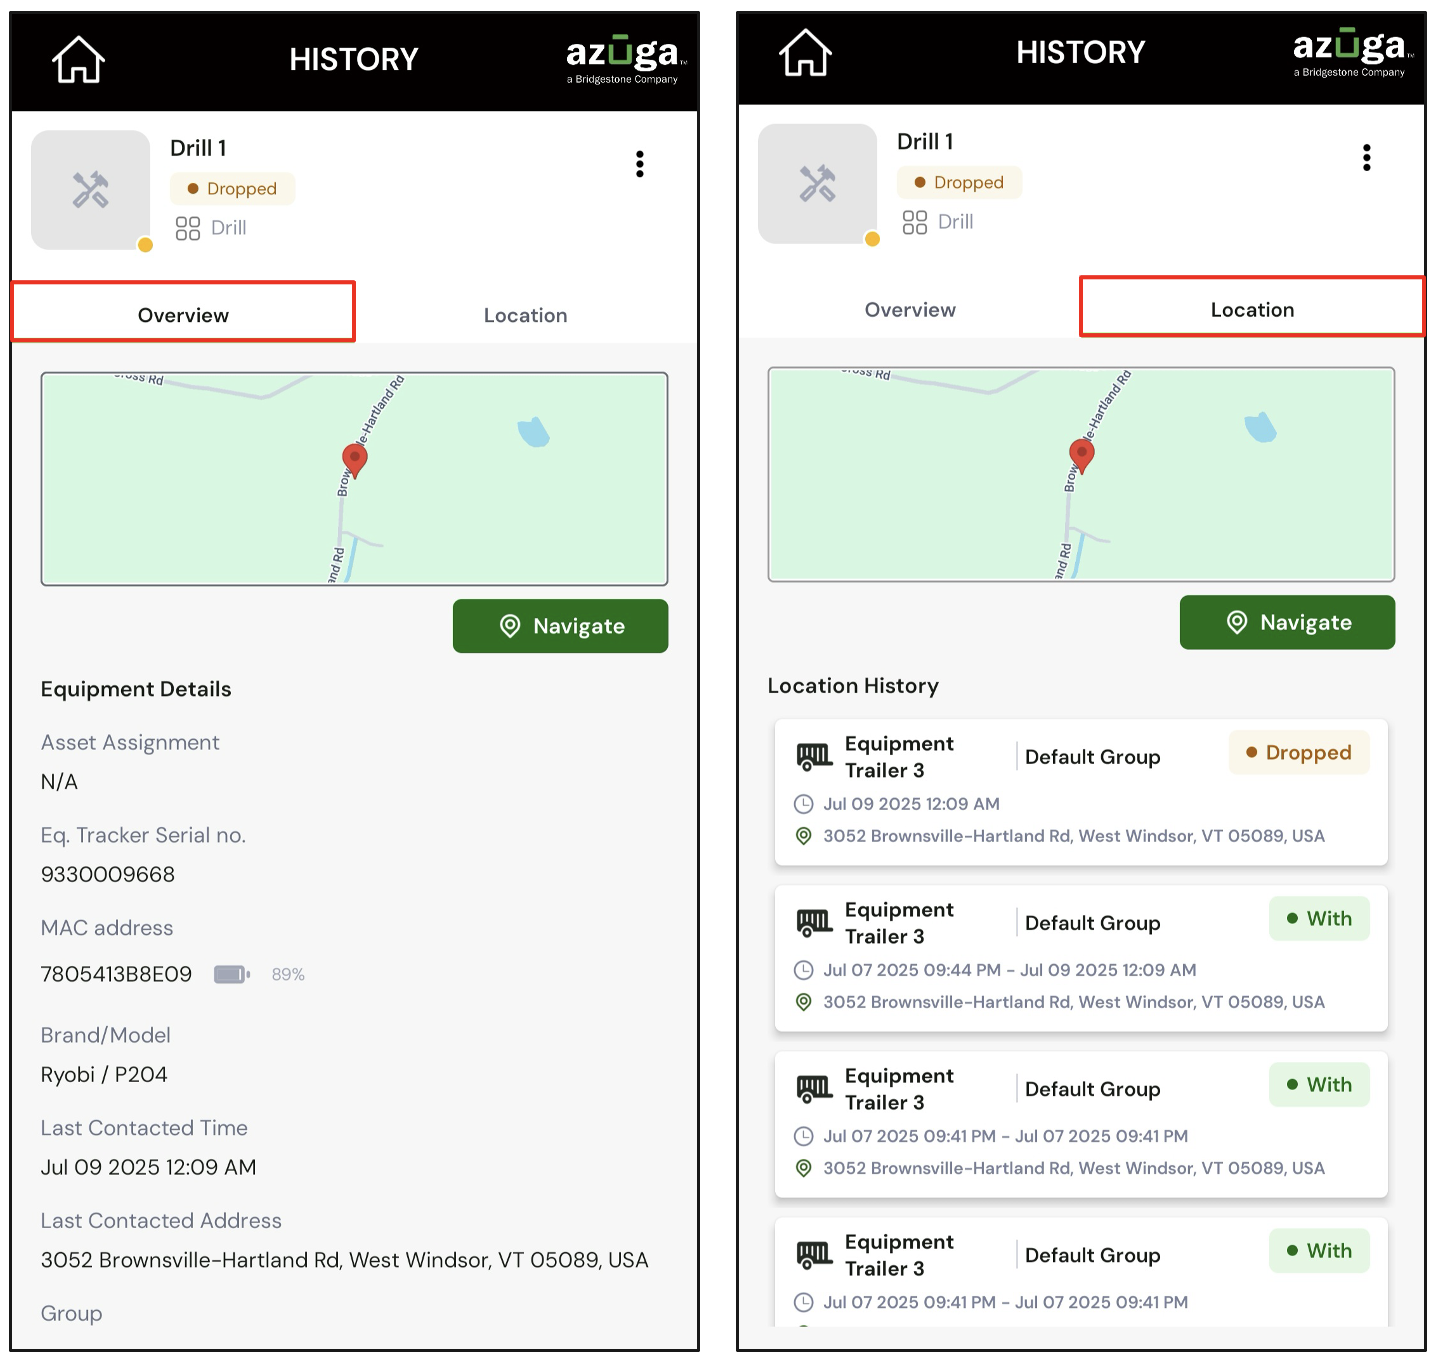
From All Categories: Navigate through the categories and subcategories to view equipment details. If the selected item is a dropped equipment, its detailed view will appear, showing information such as:
- Overview: Displays the equipment’s current location and other key details.
-
Location: Shows the history of the equipment's previous locations.
From Unassociated Equipment: -
Click on an unassociated equipment item to view its Overview section.
Delete Equipment: - Click the three-dot menu on the History page to delete equipment.
-
|
Note: If the equipment has been dropped and is unassociated, the Associate Beacon button will appear, allowing you to re-associate the beacon directly from this section. |
-
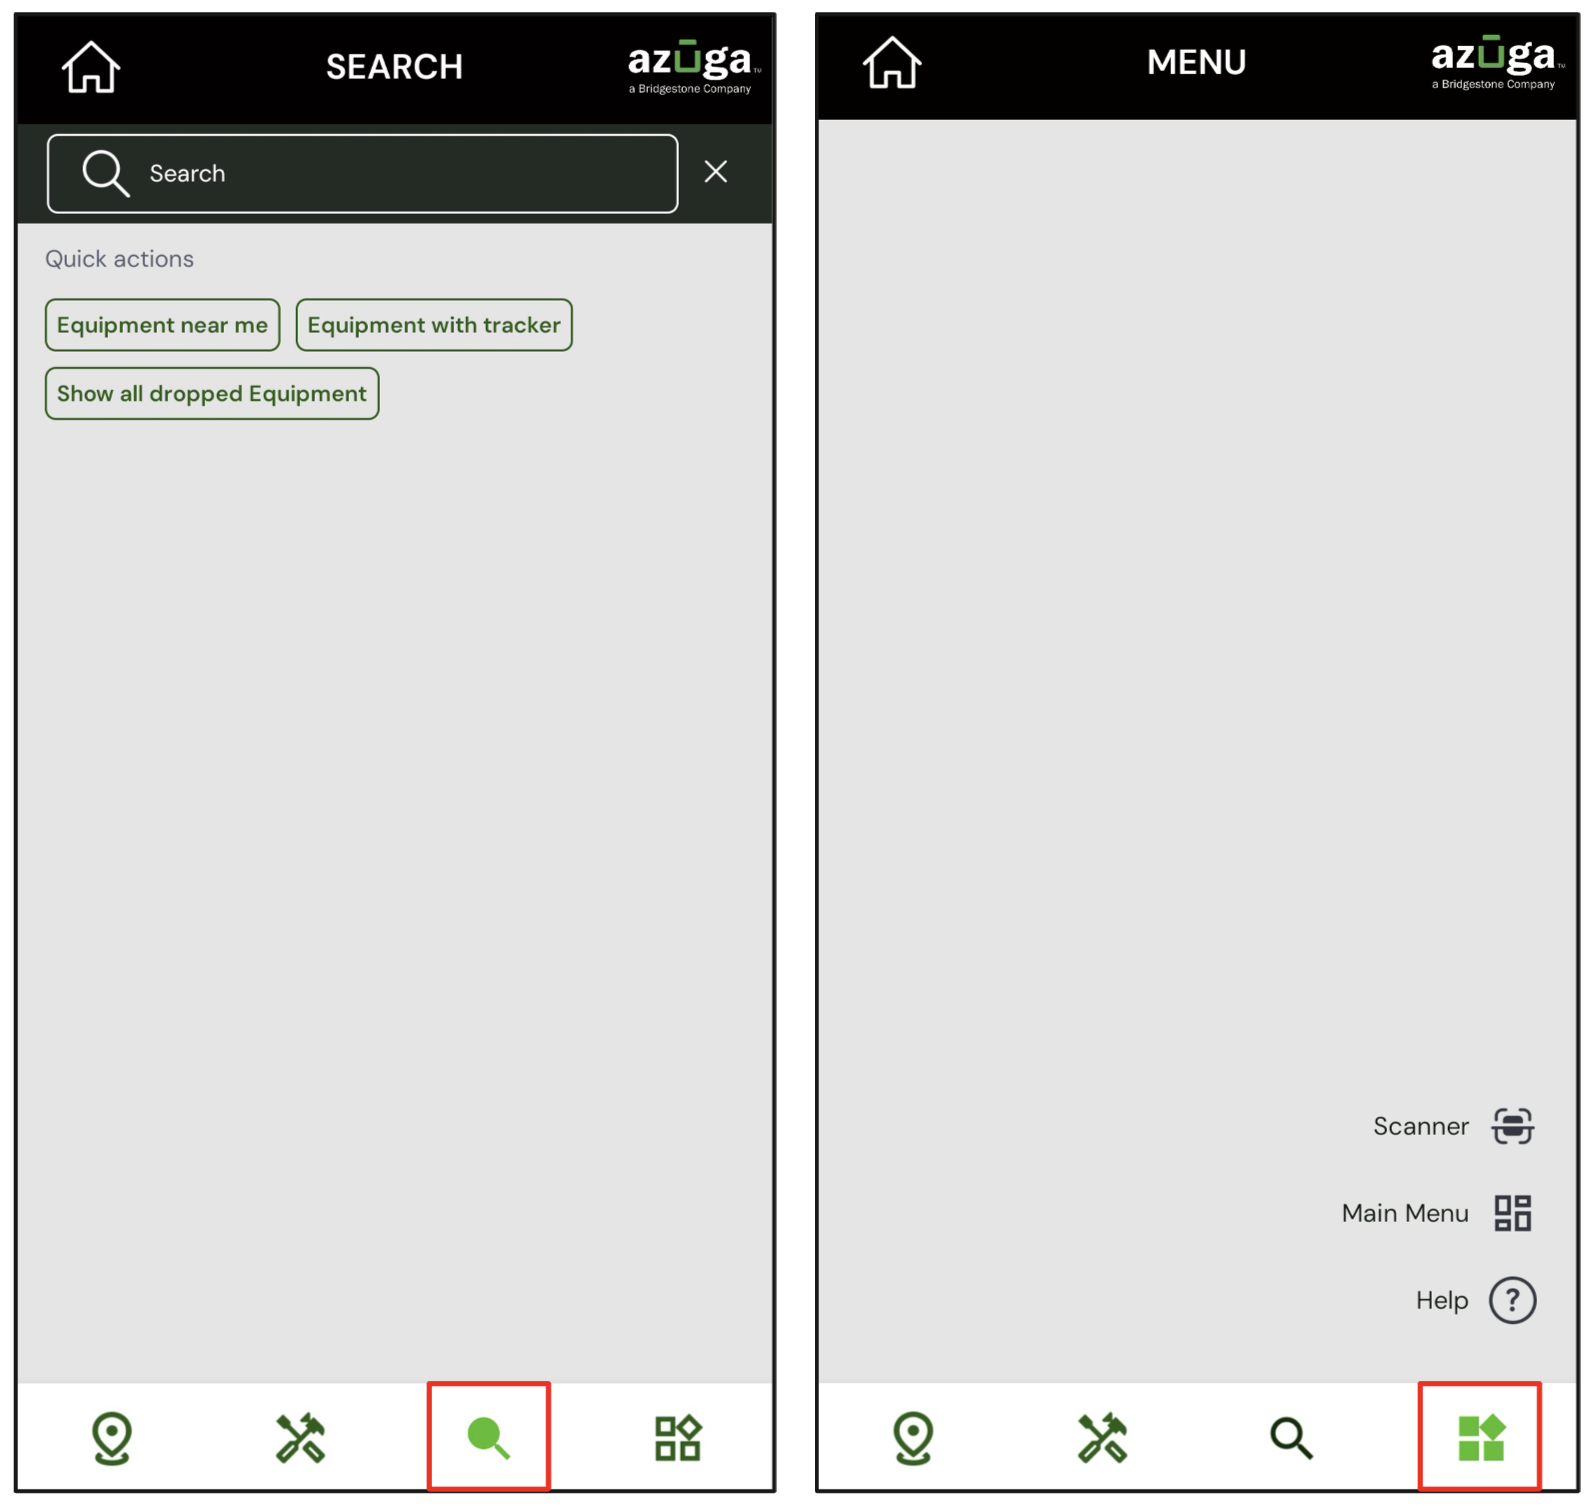
Search Equipment:
The Search page allows you to quickly locate and filter equipment within the app.
-
Use the Search bar at the top to find specific equipment by name or keyword.
Under Quick Actions, you can instantly filter results using the following options:
- Equipment Near Me: Displays equipment located closest to your current position.
- Equipment with Tracker: Lists equipment that has an active tracker device assigned.
- Show All Dropped Equipment: Displays all equipment that has been dropped or unassigned.
- These options make it easy to identify and manage equipment based on location, tracking status, or assignment state.
-
-
Explore the Menu:
The Menu screen provides quick access to essential tools and navigation options, enabling you to move between key functions and manage tasks efficiently.
- Scanner: Opens the scanner tool to quickly scan barcodes or QR codes for equipment identification or assignment.
- Main Menu: Returns you to the primary navigation screen of the app.
- Help: Provides access to support resources and assistance documentation.
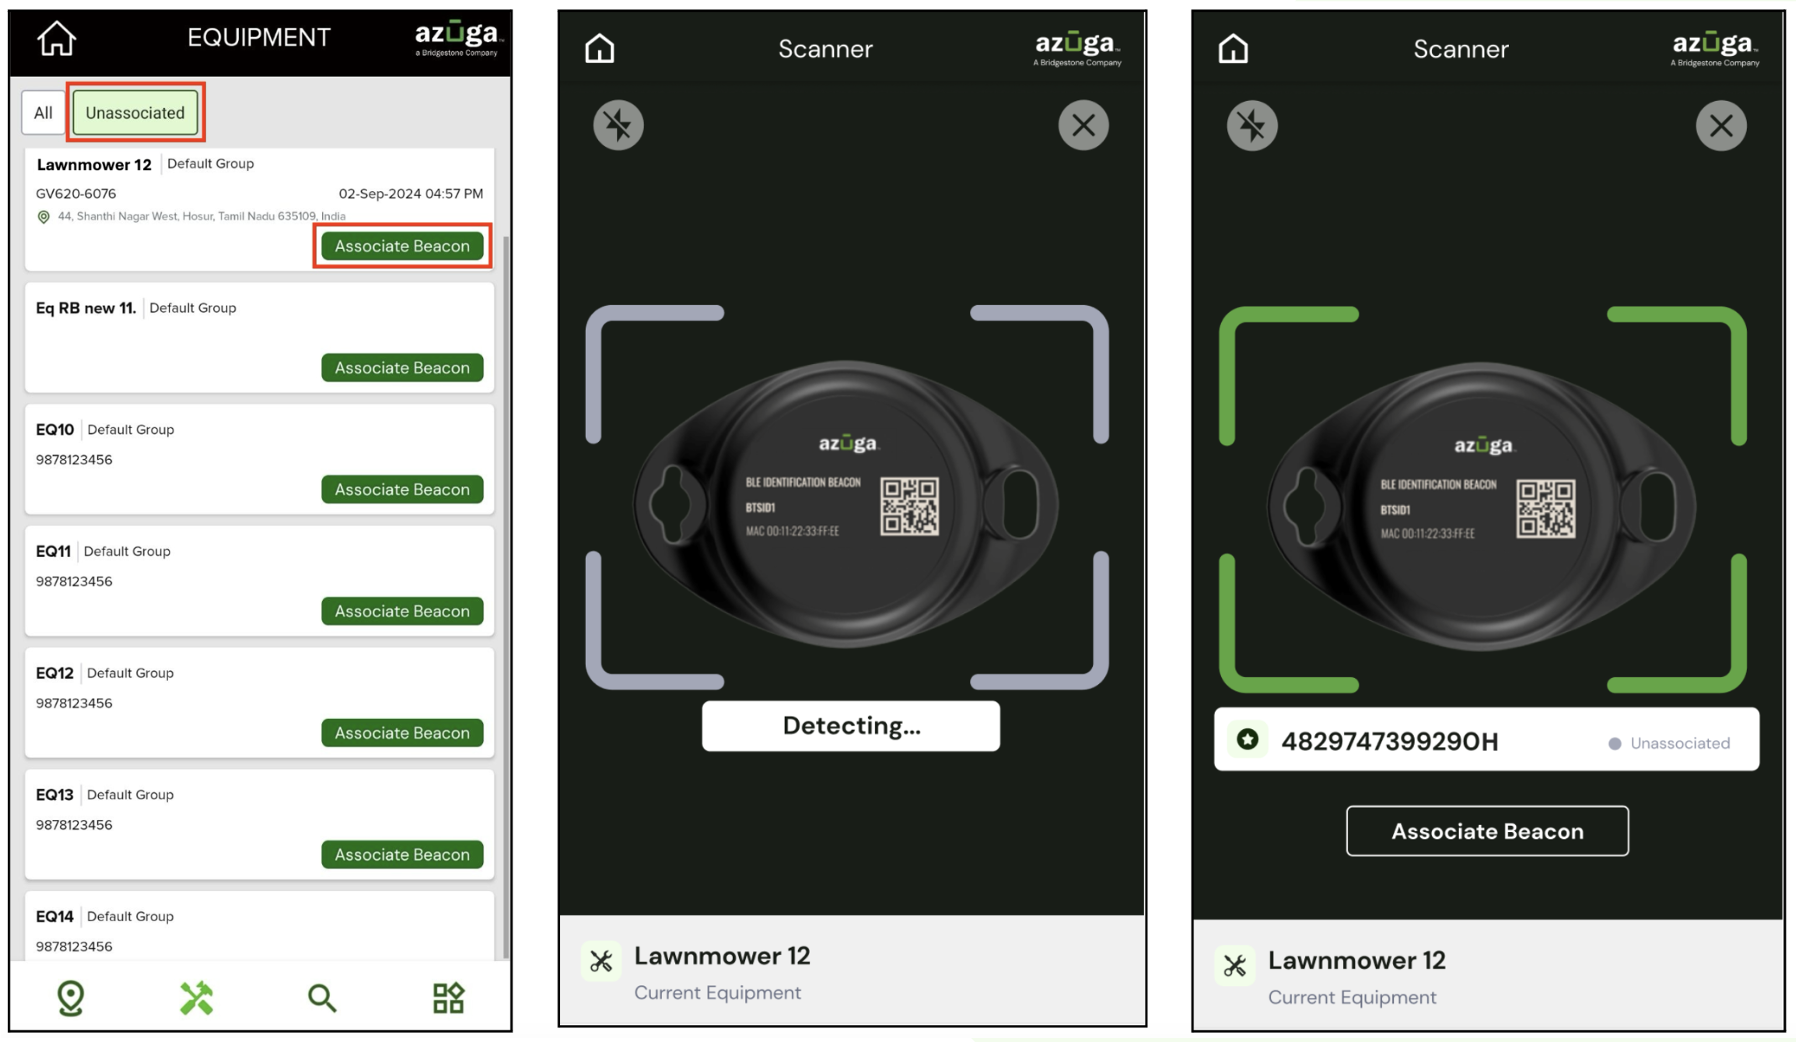
Pairing Equipment With an Equipment Beacon:
Pairing via Azuga Fleet Web:
-
Access the Equipment Details page:
-
Initiate the QR Code scan using the Azuga Fleet Mobile App:
- Log in to the Azuga Fleet Mobile app with your credentials.
- Navigate to Dashboard > Equipment.
- On the Equipment Live page, tap the Menu (fourth icon in the bottom navigation bar).
- Select Scanner to scan the QR code displayed on the equipment's details page in the Azuga web portal.

-
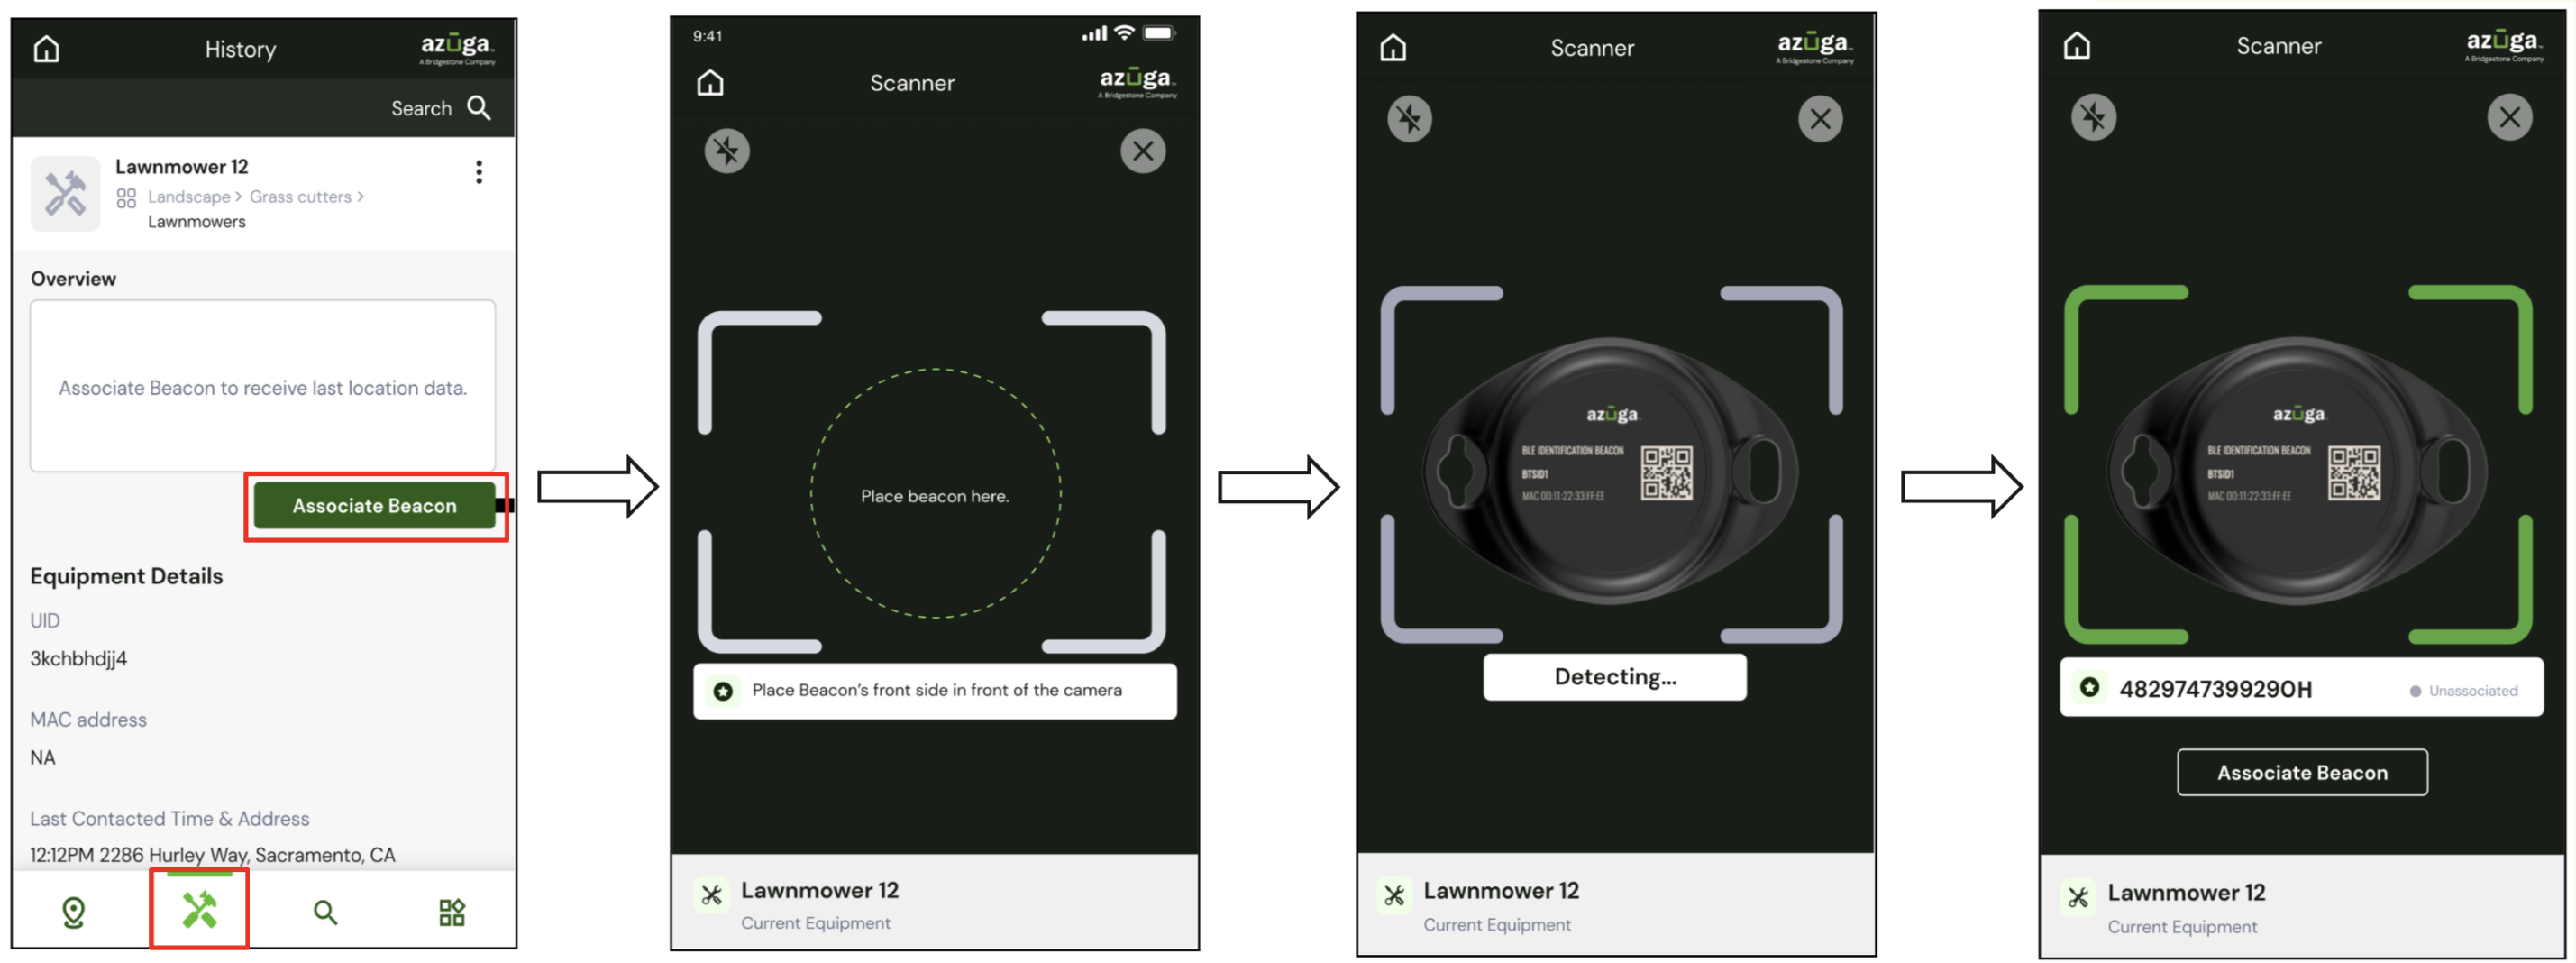
Pair Equipment with an Equipment Beacon:
- After scanning the equipment's QR code, the Fleet Mobile app will display the equipment name along with its status as Unassociated with a beacon.
- Tap See Equipment History on the mobile app scanner page, then select Associate Beacon to begin pairing.
- Position the front side of the equipment beacon in front of the camera, then tap Associate Beacon again to complete the pairing.
-
Confirm Successful Pairing:
- Once pairing is complete, a success message will appear on both the mobile app and the web interface, confirming that the equipment has been successfully paired with the beacon.
Pairing Equipment With an Equipment Beacon:
Pairing via Azuga Fleet Mobile App:
-
Log in and Navigate to the Equipment Section:
- Log in to the Azuga Fleet Mobile app with your credentials.
-
From the Dashboard, select the Equipment section to access the Equipment Live page.
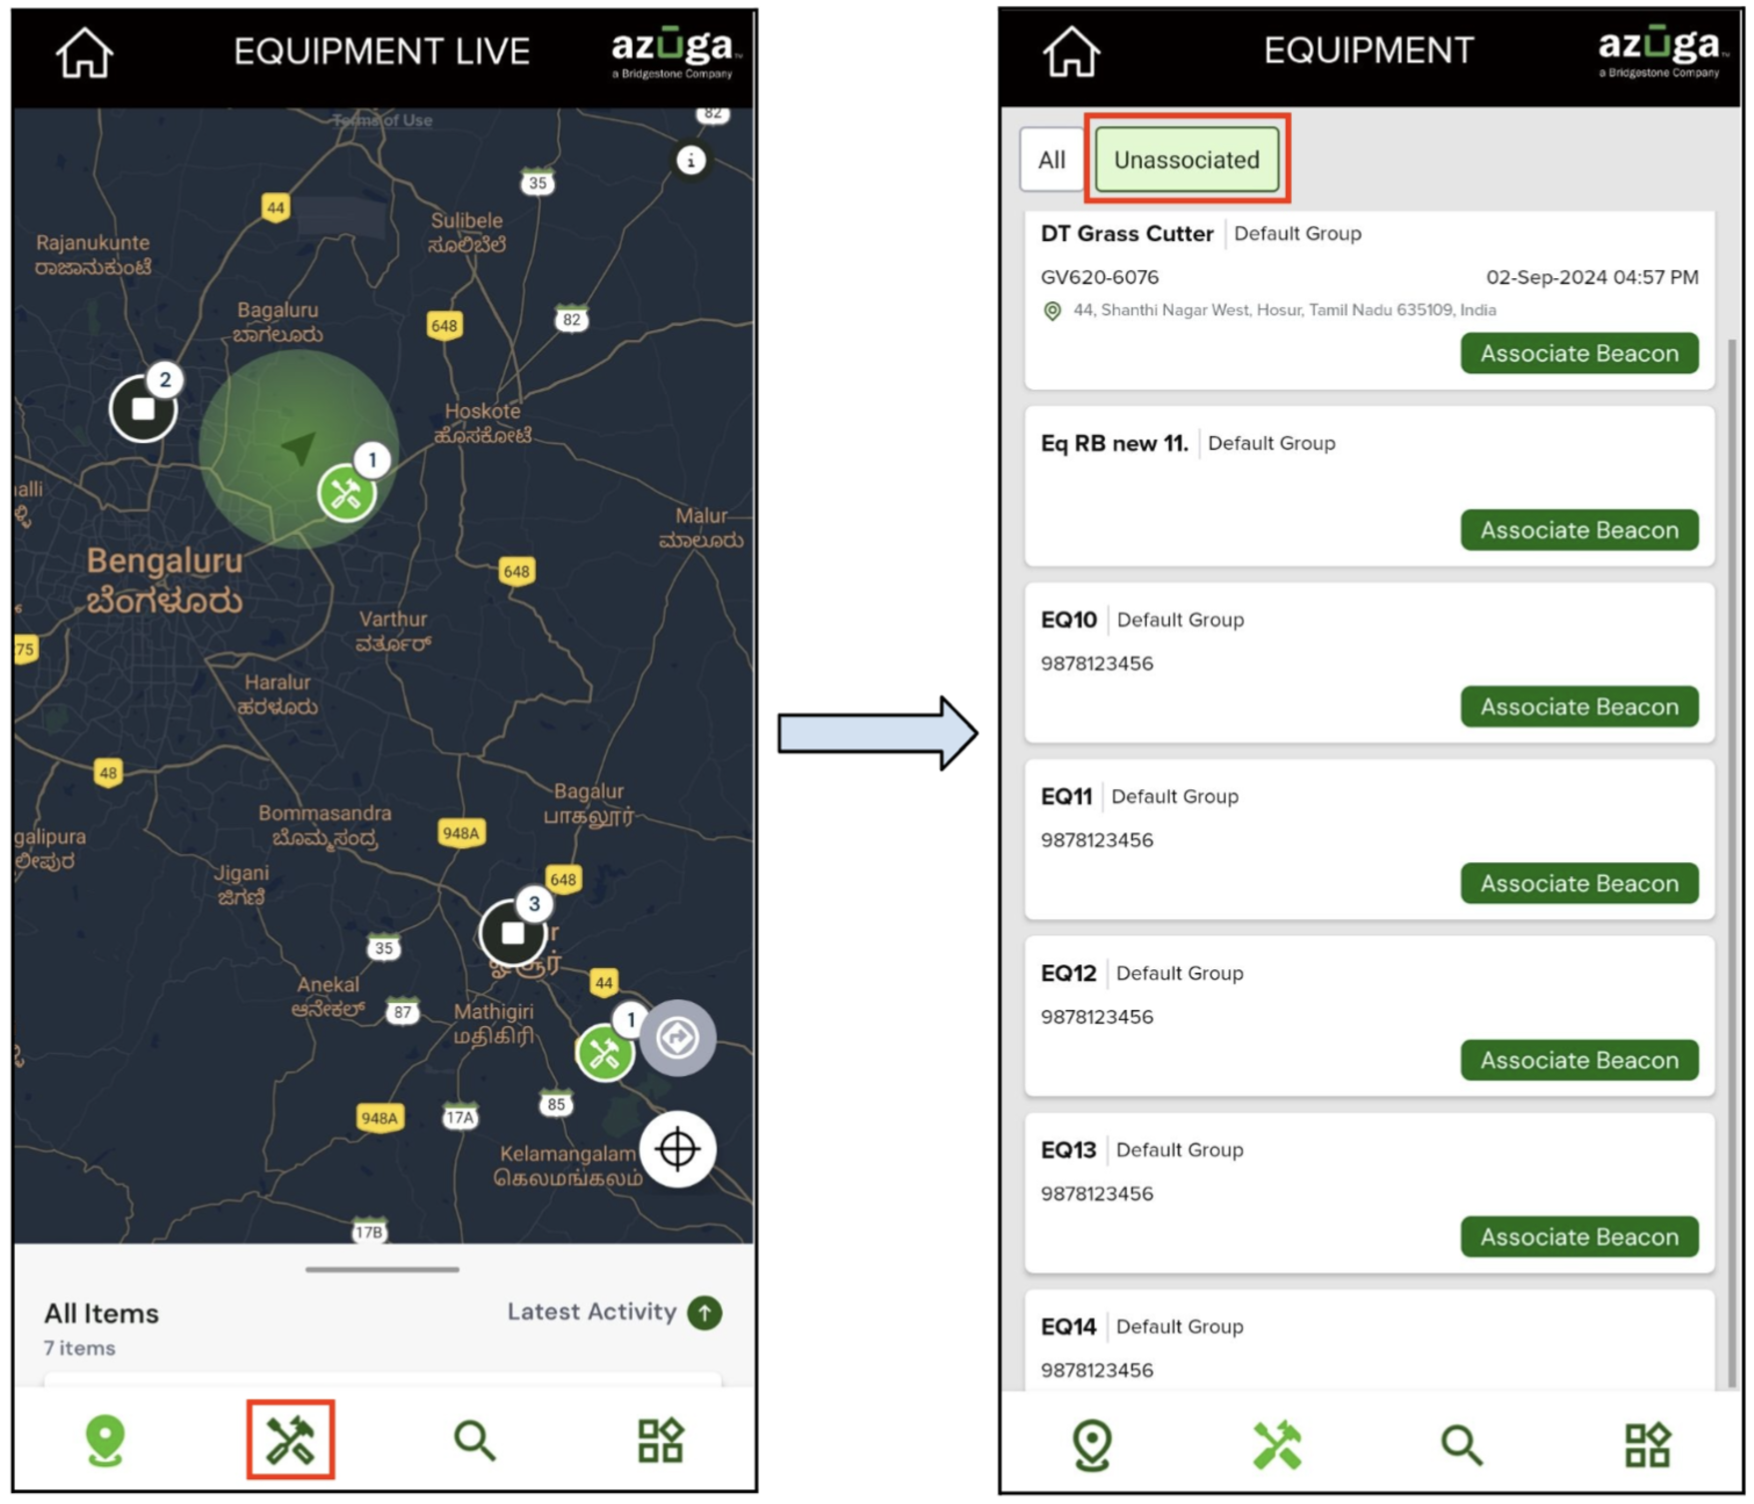
Access Unassociated Equipment: - On the Equipment Live page, tap the Equipment menu (second icon in the bottom navigation bar).
- Apply the Unassociated filter to quickly view all equipment that has not been paired with an equipment beacon.
-
Prepare for Pairing:
- Locate each unassociated equipment item in the app’s list.
-
Ensure the corresponding equipment is physically available and ready for pairing.
Pair the Equipment with an Equipment Beacon: - .Tap Associate Beacon for the equipment you want to pair. This will open the scanner.
-
Position the front side of the equipment beacon in front of the camera, then tap Associate Beacon again to complete the pairing.
Confirm Successful Pairing: - After pairing, a success message will appear on both the mobile app and the web interface, confirming that the equipment has been successfully paired with the beacon.
Managing Equipment in Fleet Web and Mobile App:
Managing Equipment via Azuga Fleet Web:
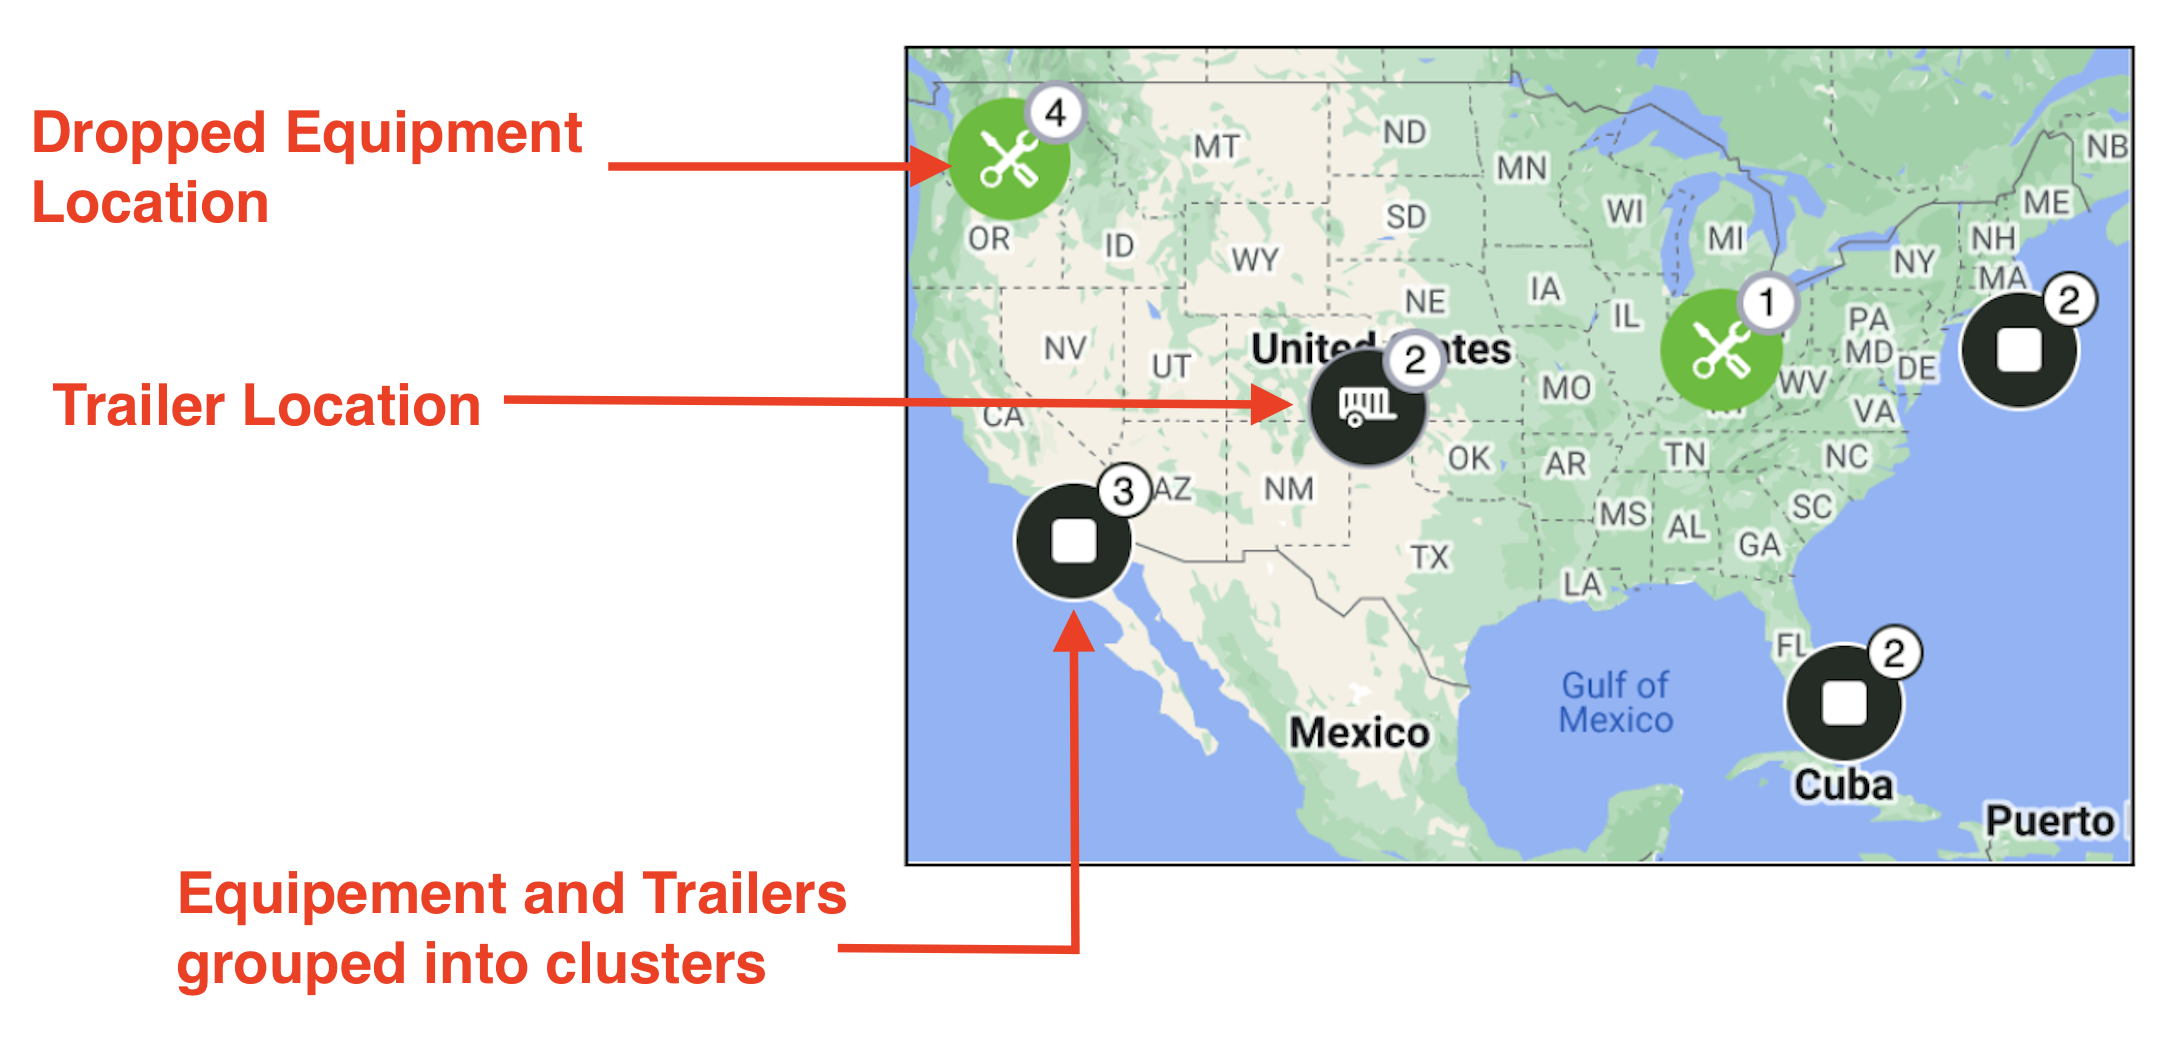
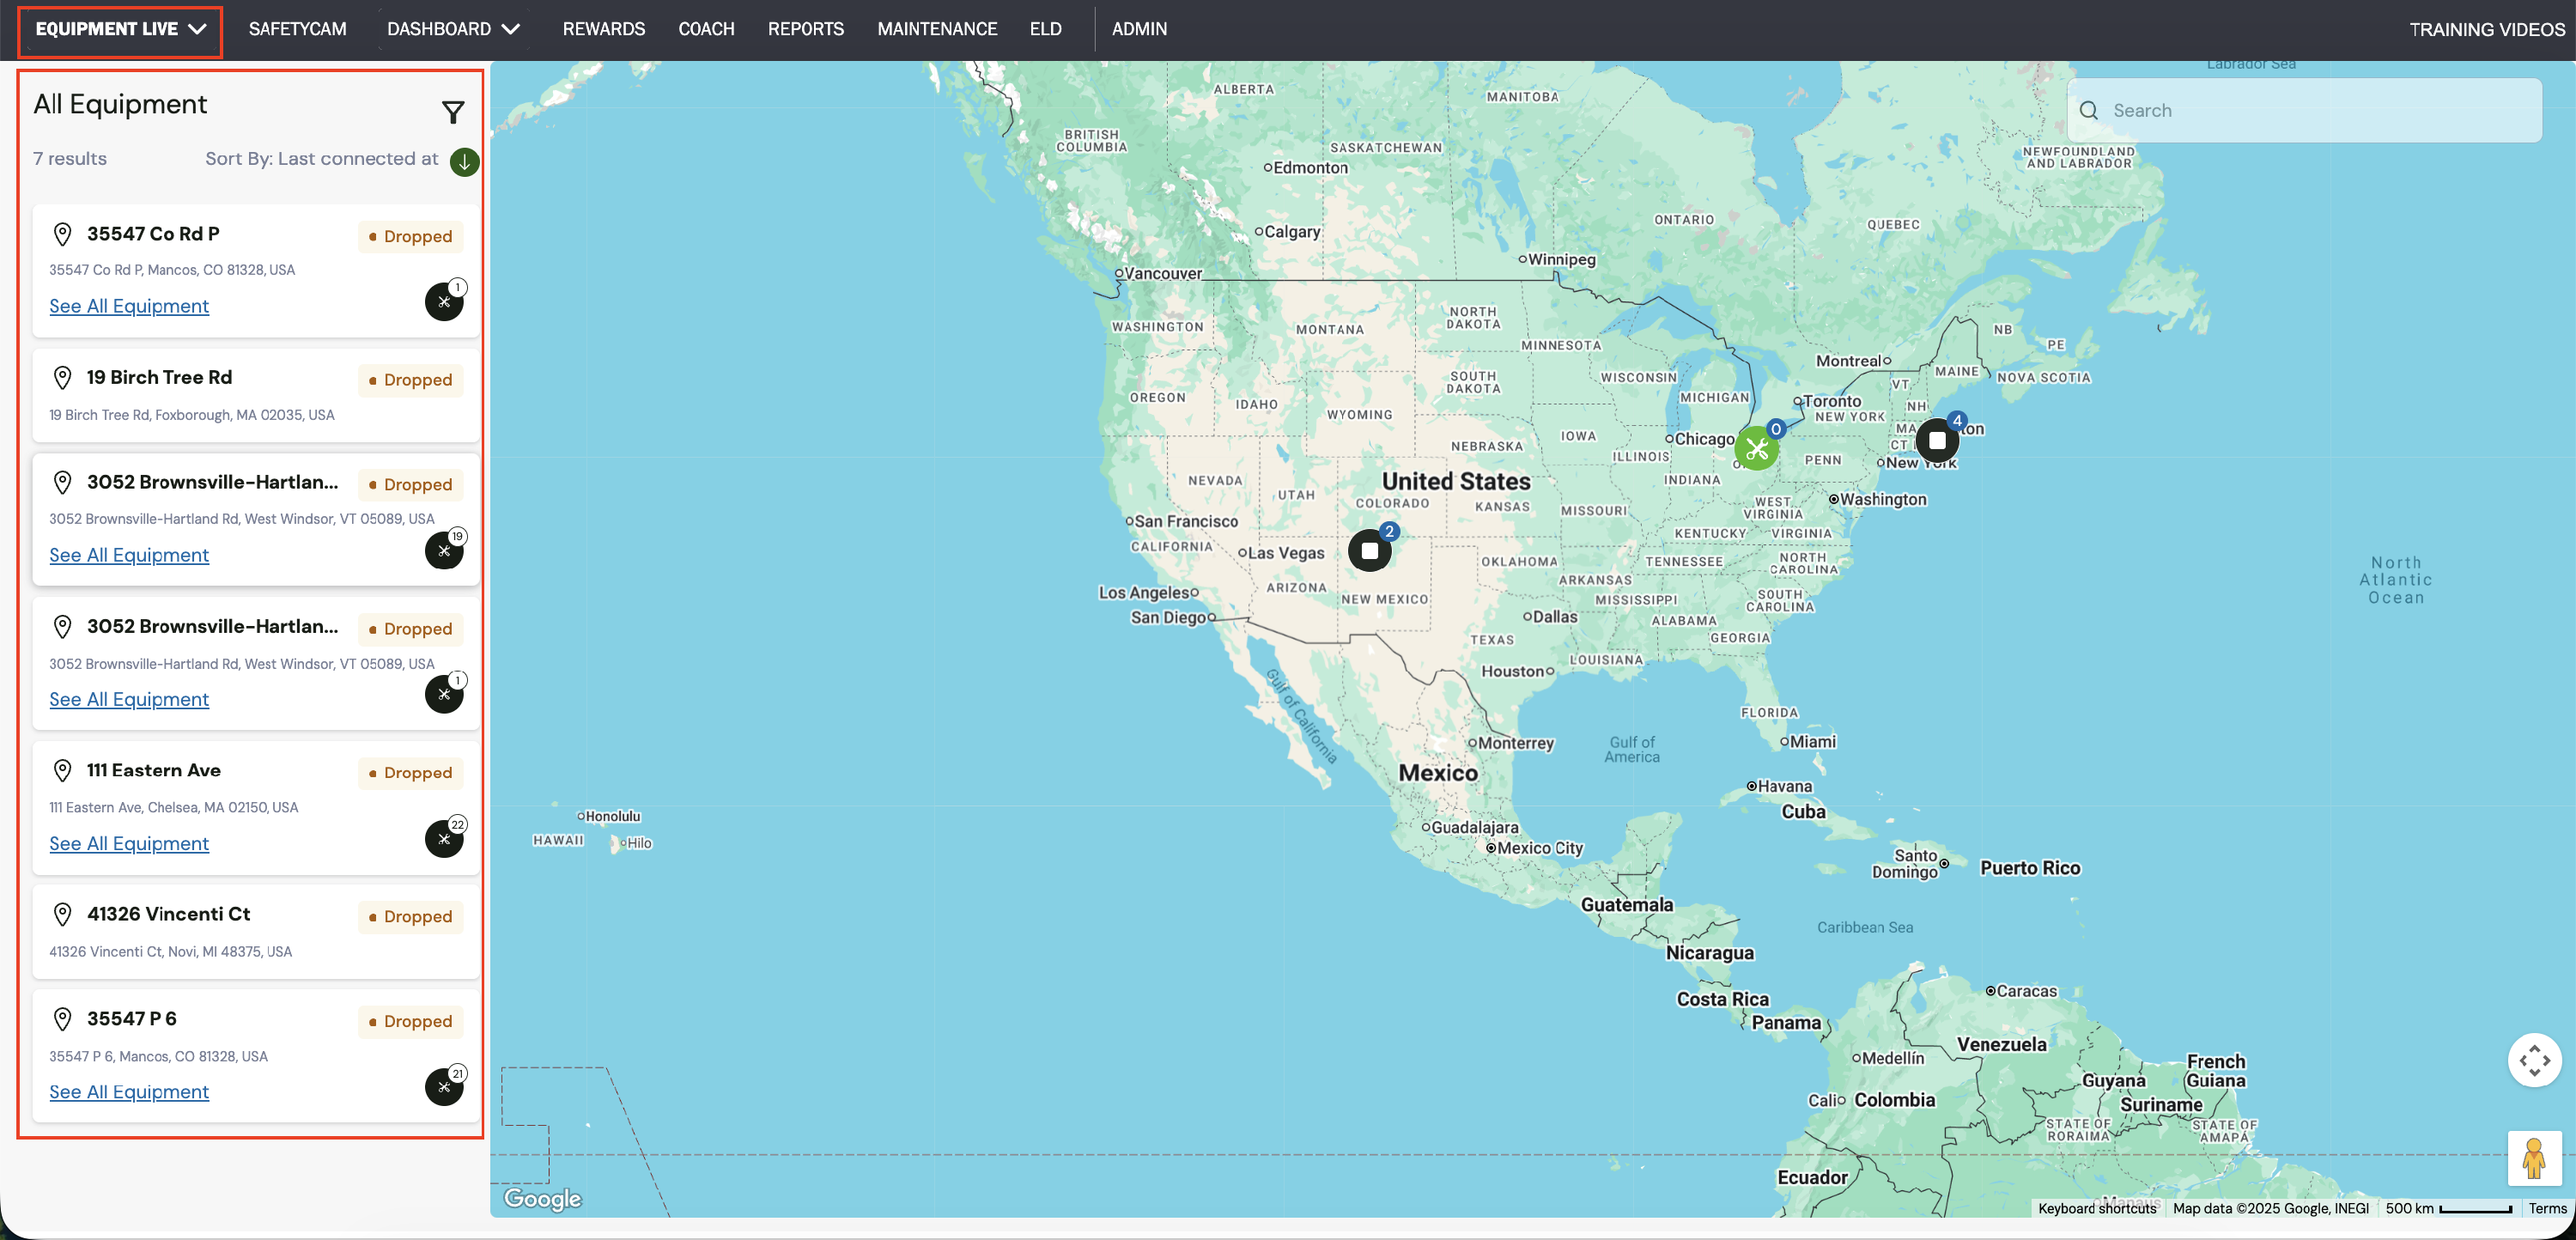
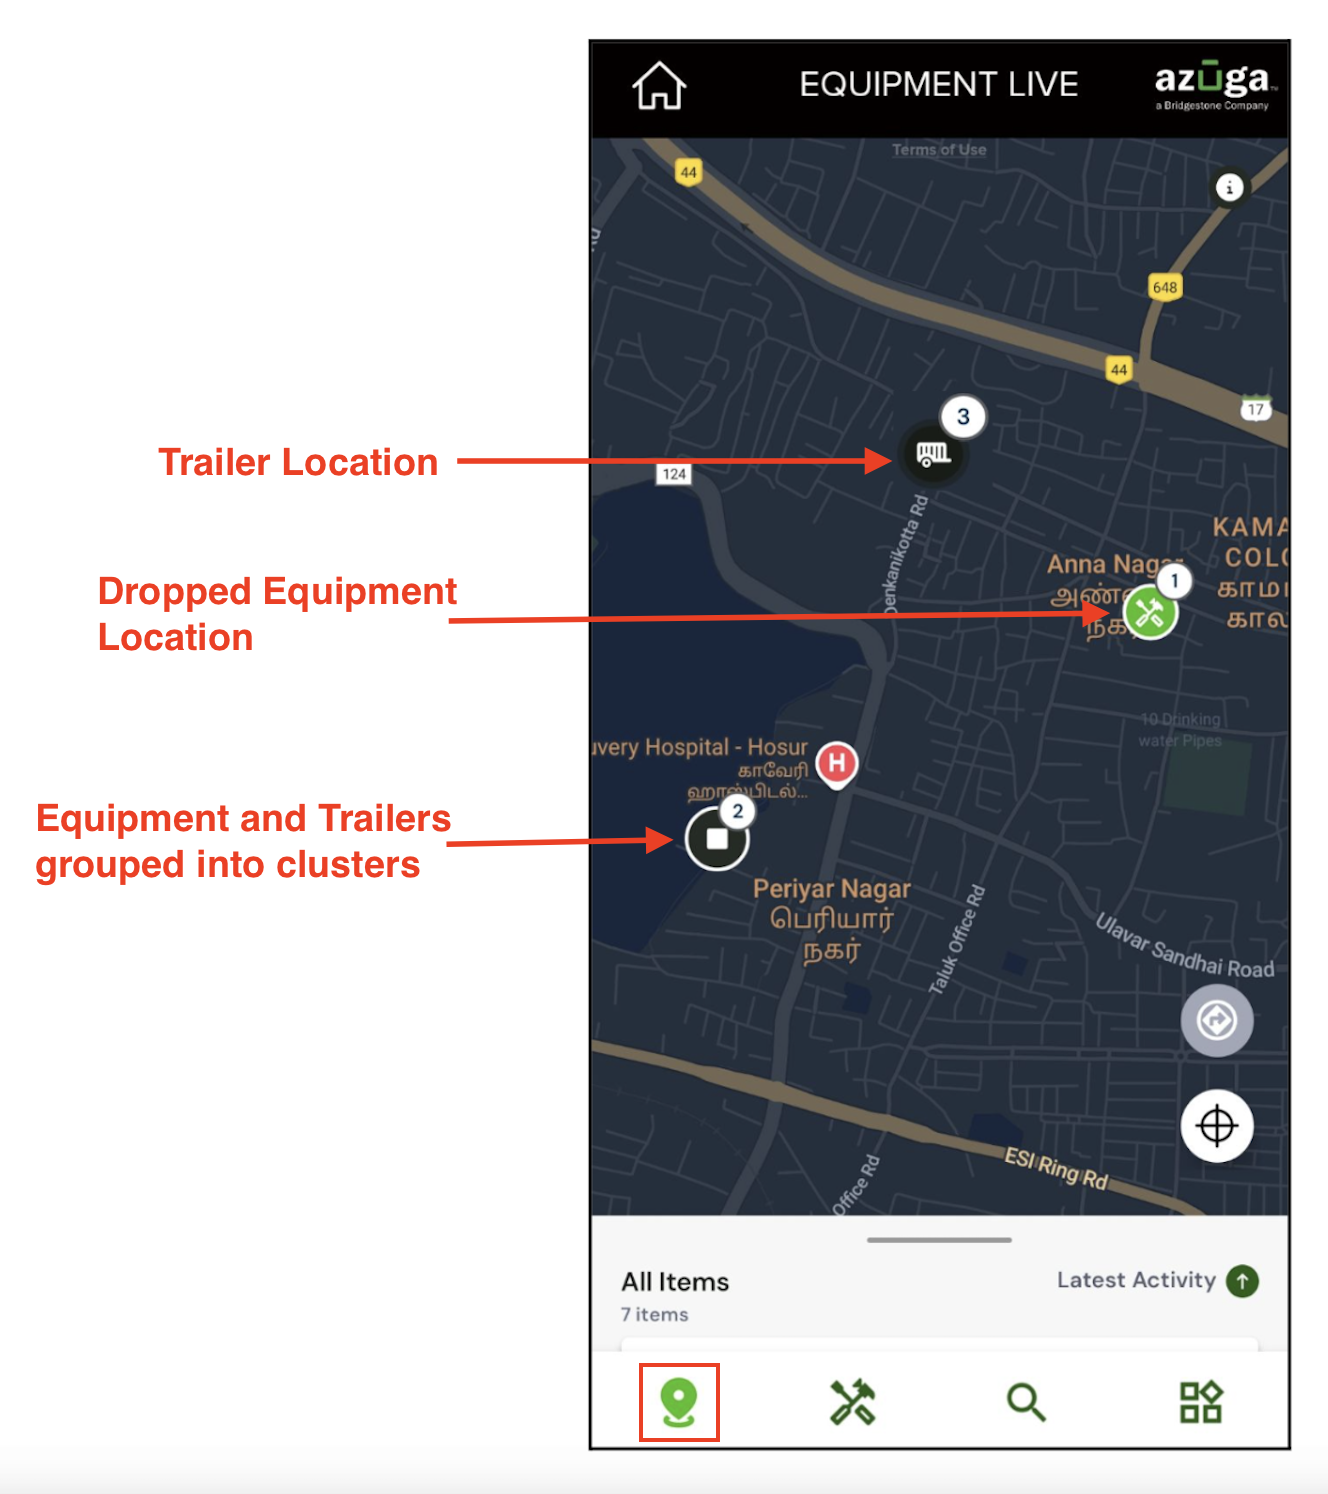
After pairing the equipment with a beacon, the GV620MG initiates real-time location monitoring. Tracked items appear on Live Maps, where equipment and trailers are grouped into clusters for easier viewing. Clicking a cluster zooms in to reveal the specific equipment and trailers in that area.
Detailed information about each item is available under the All Equipment card in the left panel.
-
Accessing the Equipment Live View:
- Log in to the Azuga Fleet web application using your credentials.
- Go to the extreme left of the top bar and select Equipment Live from the dropdown menu.
-
In the All Equipment panel on the left, view all connected trailers.
View All Trailers: -
The left navigation panel lists all connected trailers, showing key details such as trailer names, current locations, and the status of their tracked equipment:
- With: Indicates that the equipment beacon is actively detected by an asset tracker. The beacon’s location is updated based on the tracker’s position.
- Dropped: Indicates that the equipment beacon is not currently detected by any asset tracker. The system displays its last known location.
-
Drill Down to Specific Equipment:
- In the All Equipment panel, each card represents either a trailer or a dropped location, displaying its location. For dropped location cards, it also shows the current status and the number of equipment items allocated to that site.
- Click See All Equipment under a location to view the equipment items linked to that site.
-
The expanded view shows all connected equipment along with their associated trailers and last tracked timestamps, helping you monitor equipment activity and status.
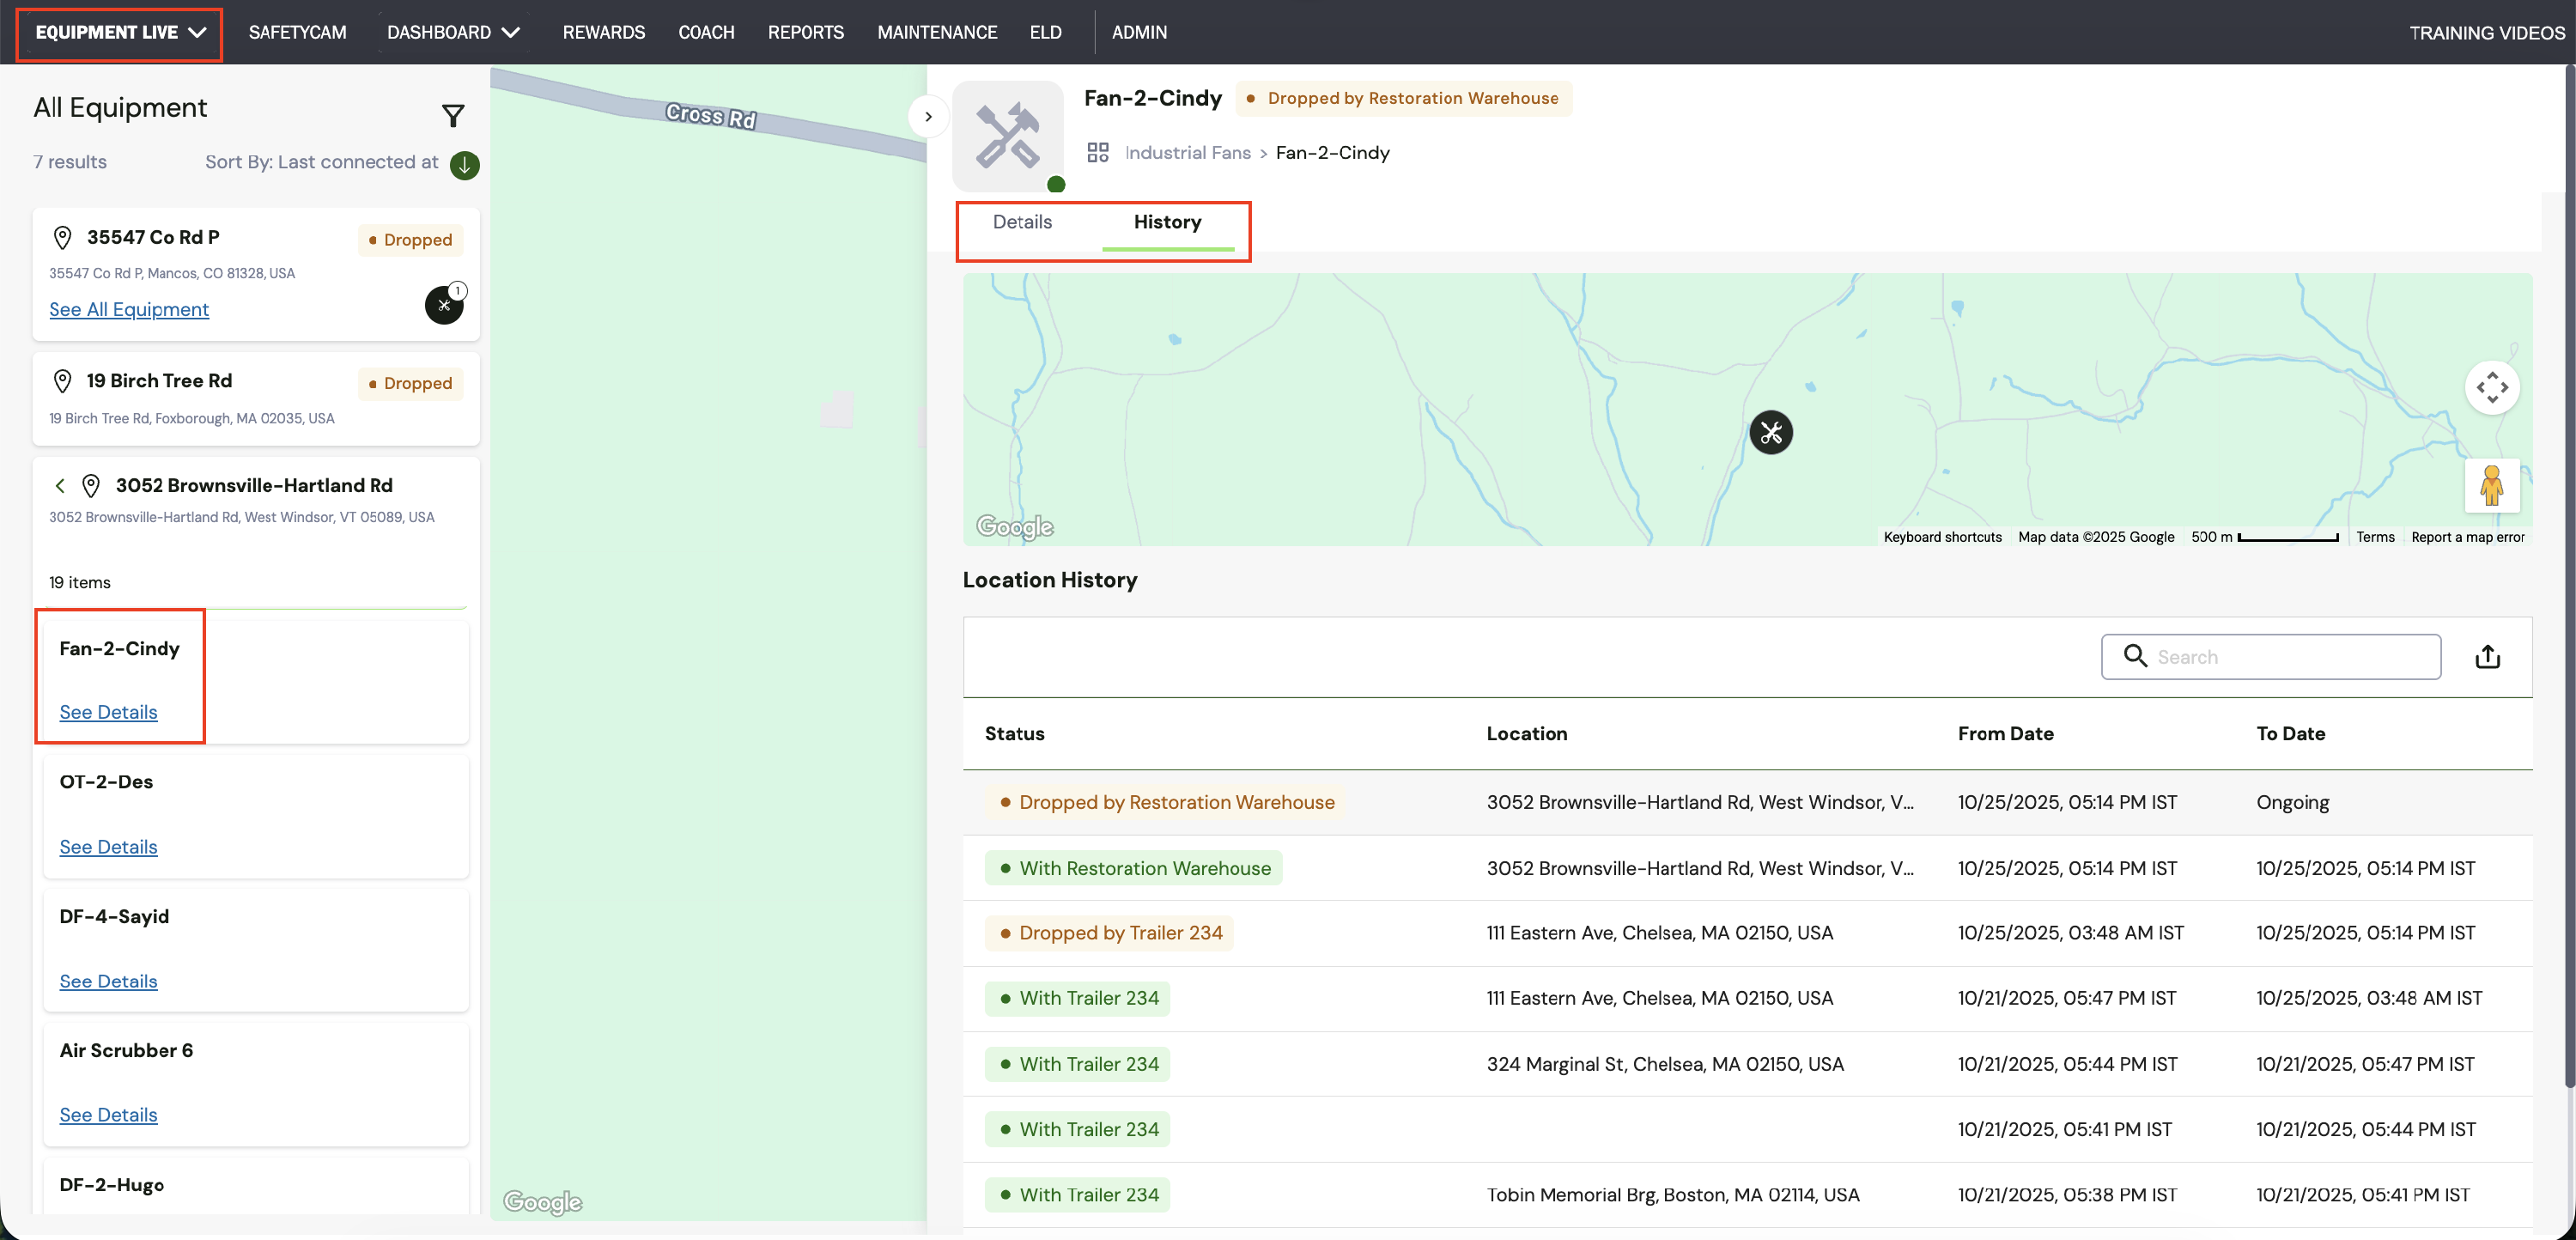
Check Equipment History:
-
Click See Details for any listed equipment. The details are divided into the following sections:
- Details: Displays key information about the equipment, including its current location, status, associated beacon MAC address, and purchase and service details.
- History: Shows the equipment’s location history, including associated trailers, past and current locations, timestamps, and status at each recorded point.
Managing Equipment in Fleet Web and Mobile App:
Managing Equipment via Azuga Fleet Mobile:
-
Accessing the Equipment Live View:
- Log in to the Azuga Fleet Mobile app using your credentials.
- From the Dashboard, select Equipment to manage and track your equipment.
-
By default, the app opens on the Equipment Live page (first icon in the bottom navigation bar). This section displays real-time tracking data for all equipment and trailers.
View Real-Time Tracking on the Equipment Live Page: - Tracked items are displayed on Live Maps, with equipment and trailers grouped into clusters for easier viewing.
- Tap a cluster to zoom in and view specific equipment and trailer details.
-
View Details of All Tracked Items:
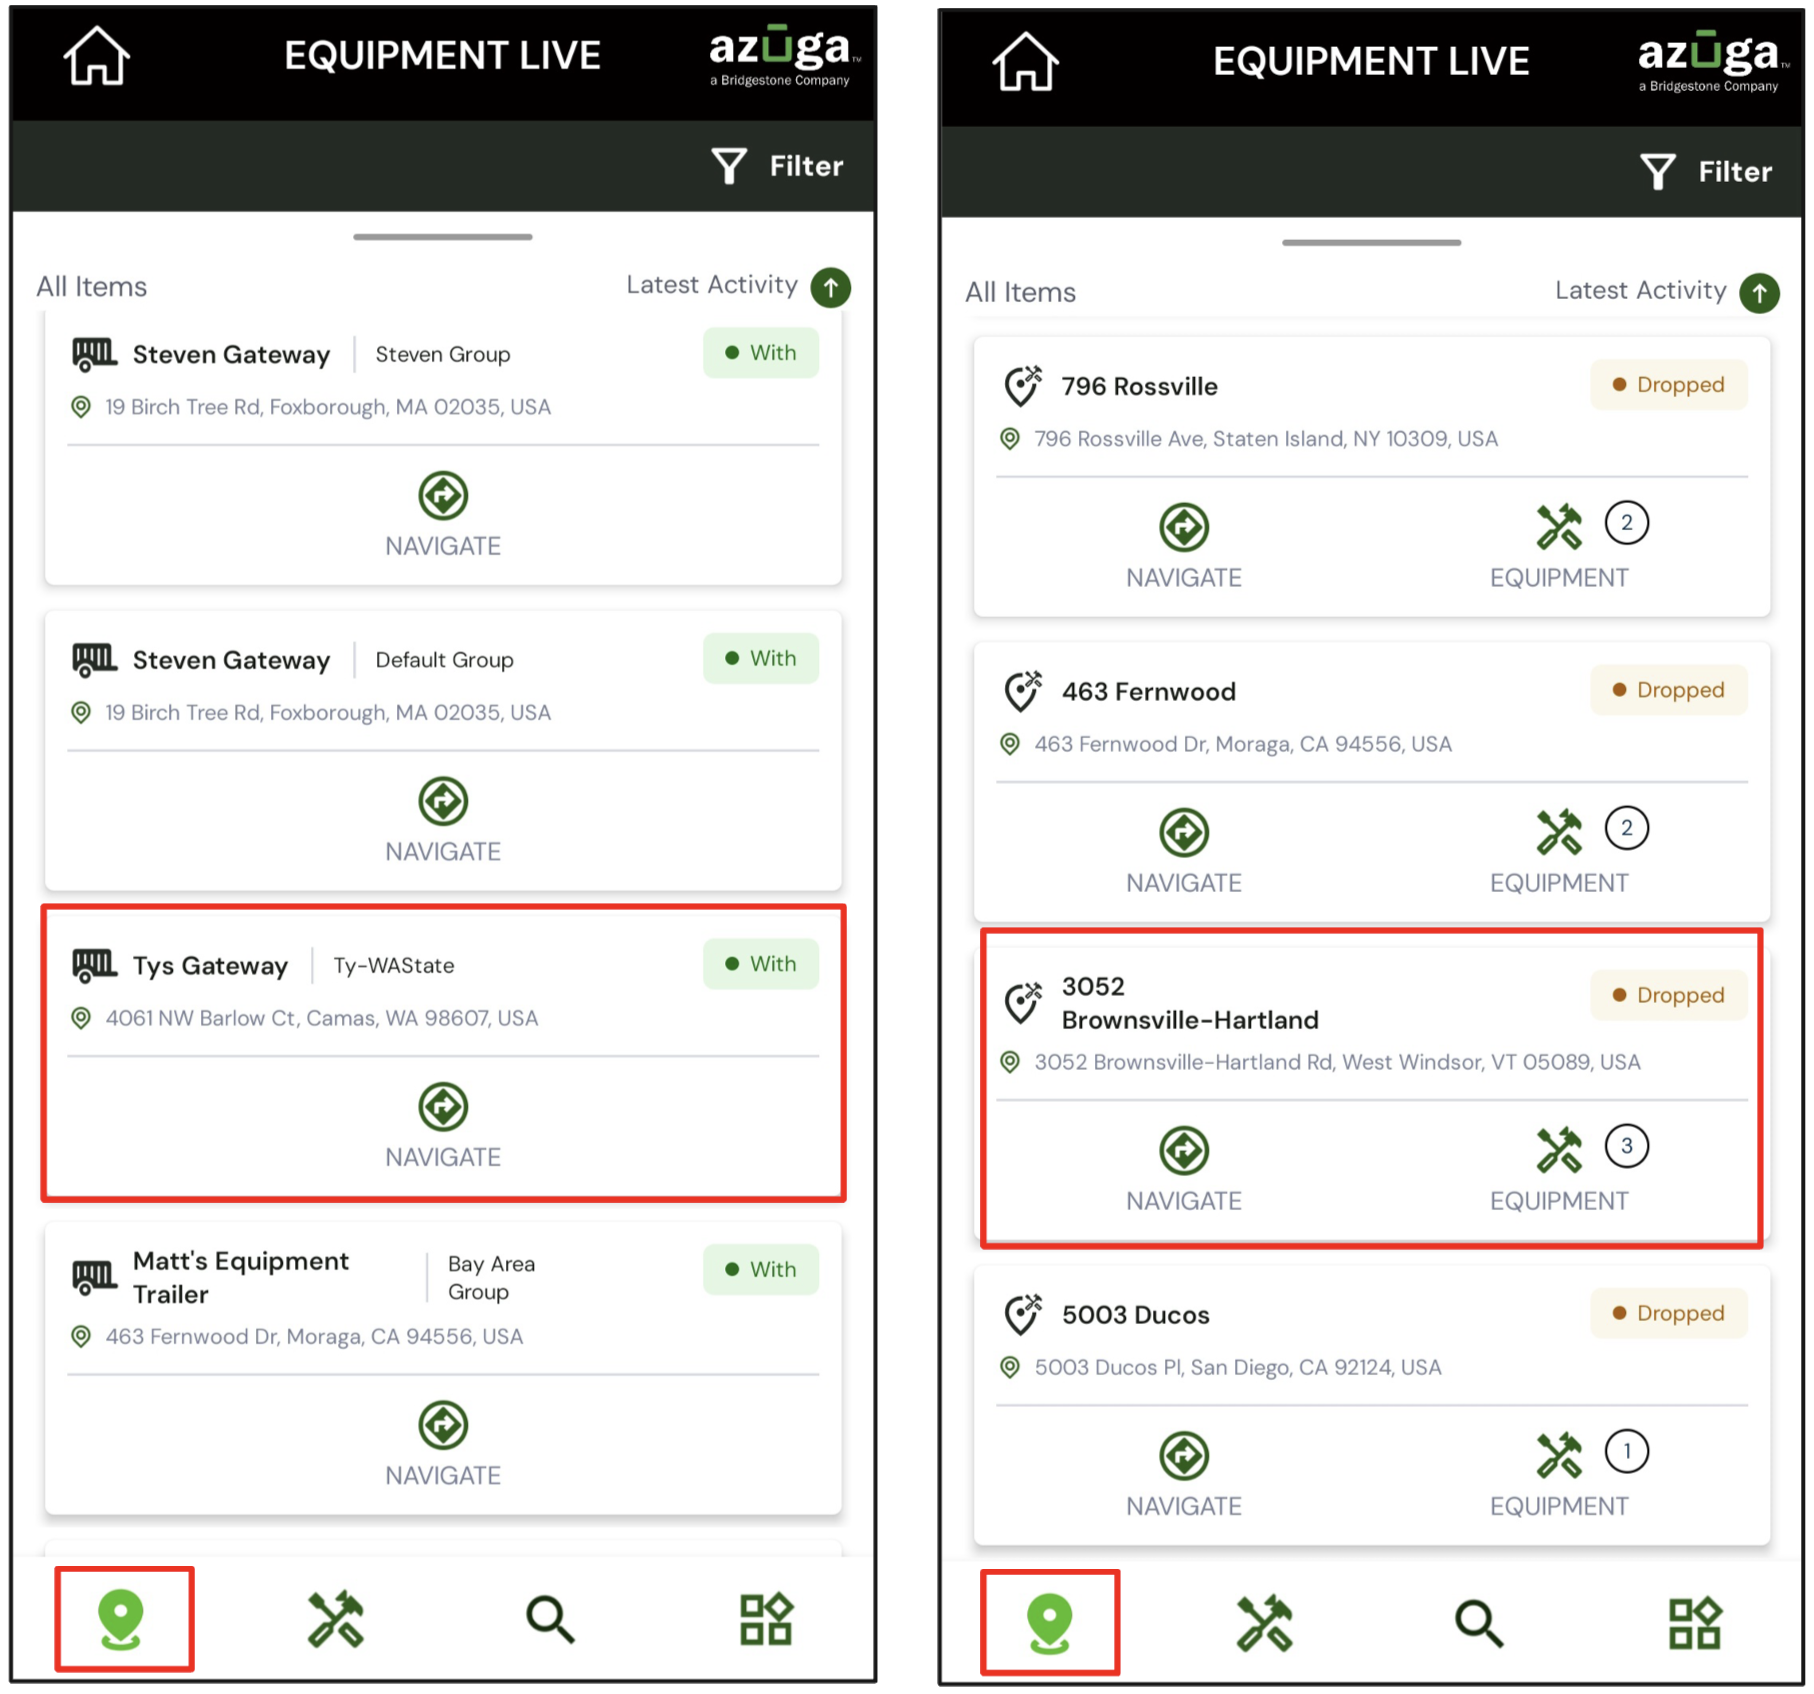
- On the Equipment Live page, swipe up the All Items section to view a list where each item card represents either a trailer or a dropped location, displaying its location, status, and navigation option. For dropped location cards, it also shows the number of equipment items assigned to that site.
-
Alternatively, on the Live Map, tap any trailer icon or dropped equipment to view details such as the item name and current location. To view all tracked items, tap View More to expand the All Items section.
Review Equipment Status: -
In the All Items section, all trailers and equipment are listed and sorted by the most recent event.
-
For trailers with the “With” status: The card shows the current location and includes a Navigate option that opens that opens your device’s default maps application for directions to the trailer’s location.
For dropped equipment: The card displays the last dropped location and provides two options:- Navigate: Opens your device’s default map application to guide you to the equipment’s last known dropped location.
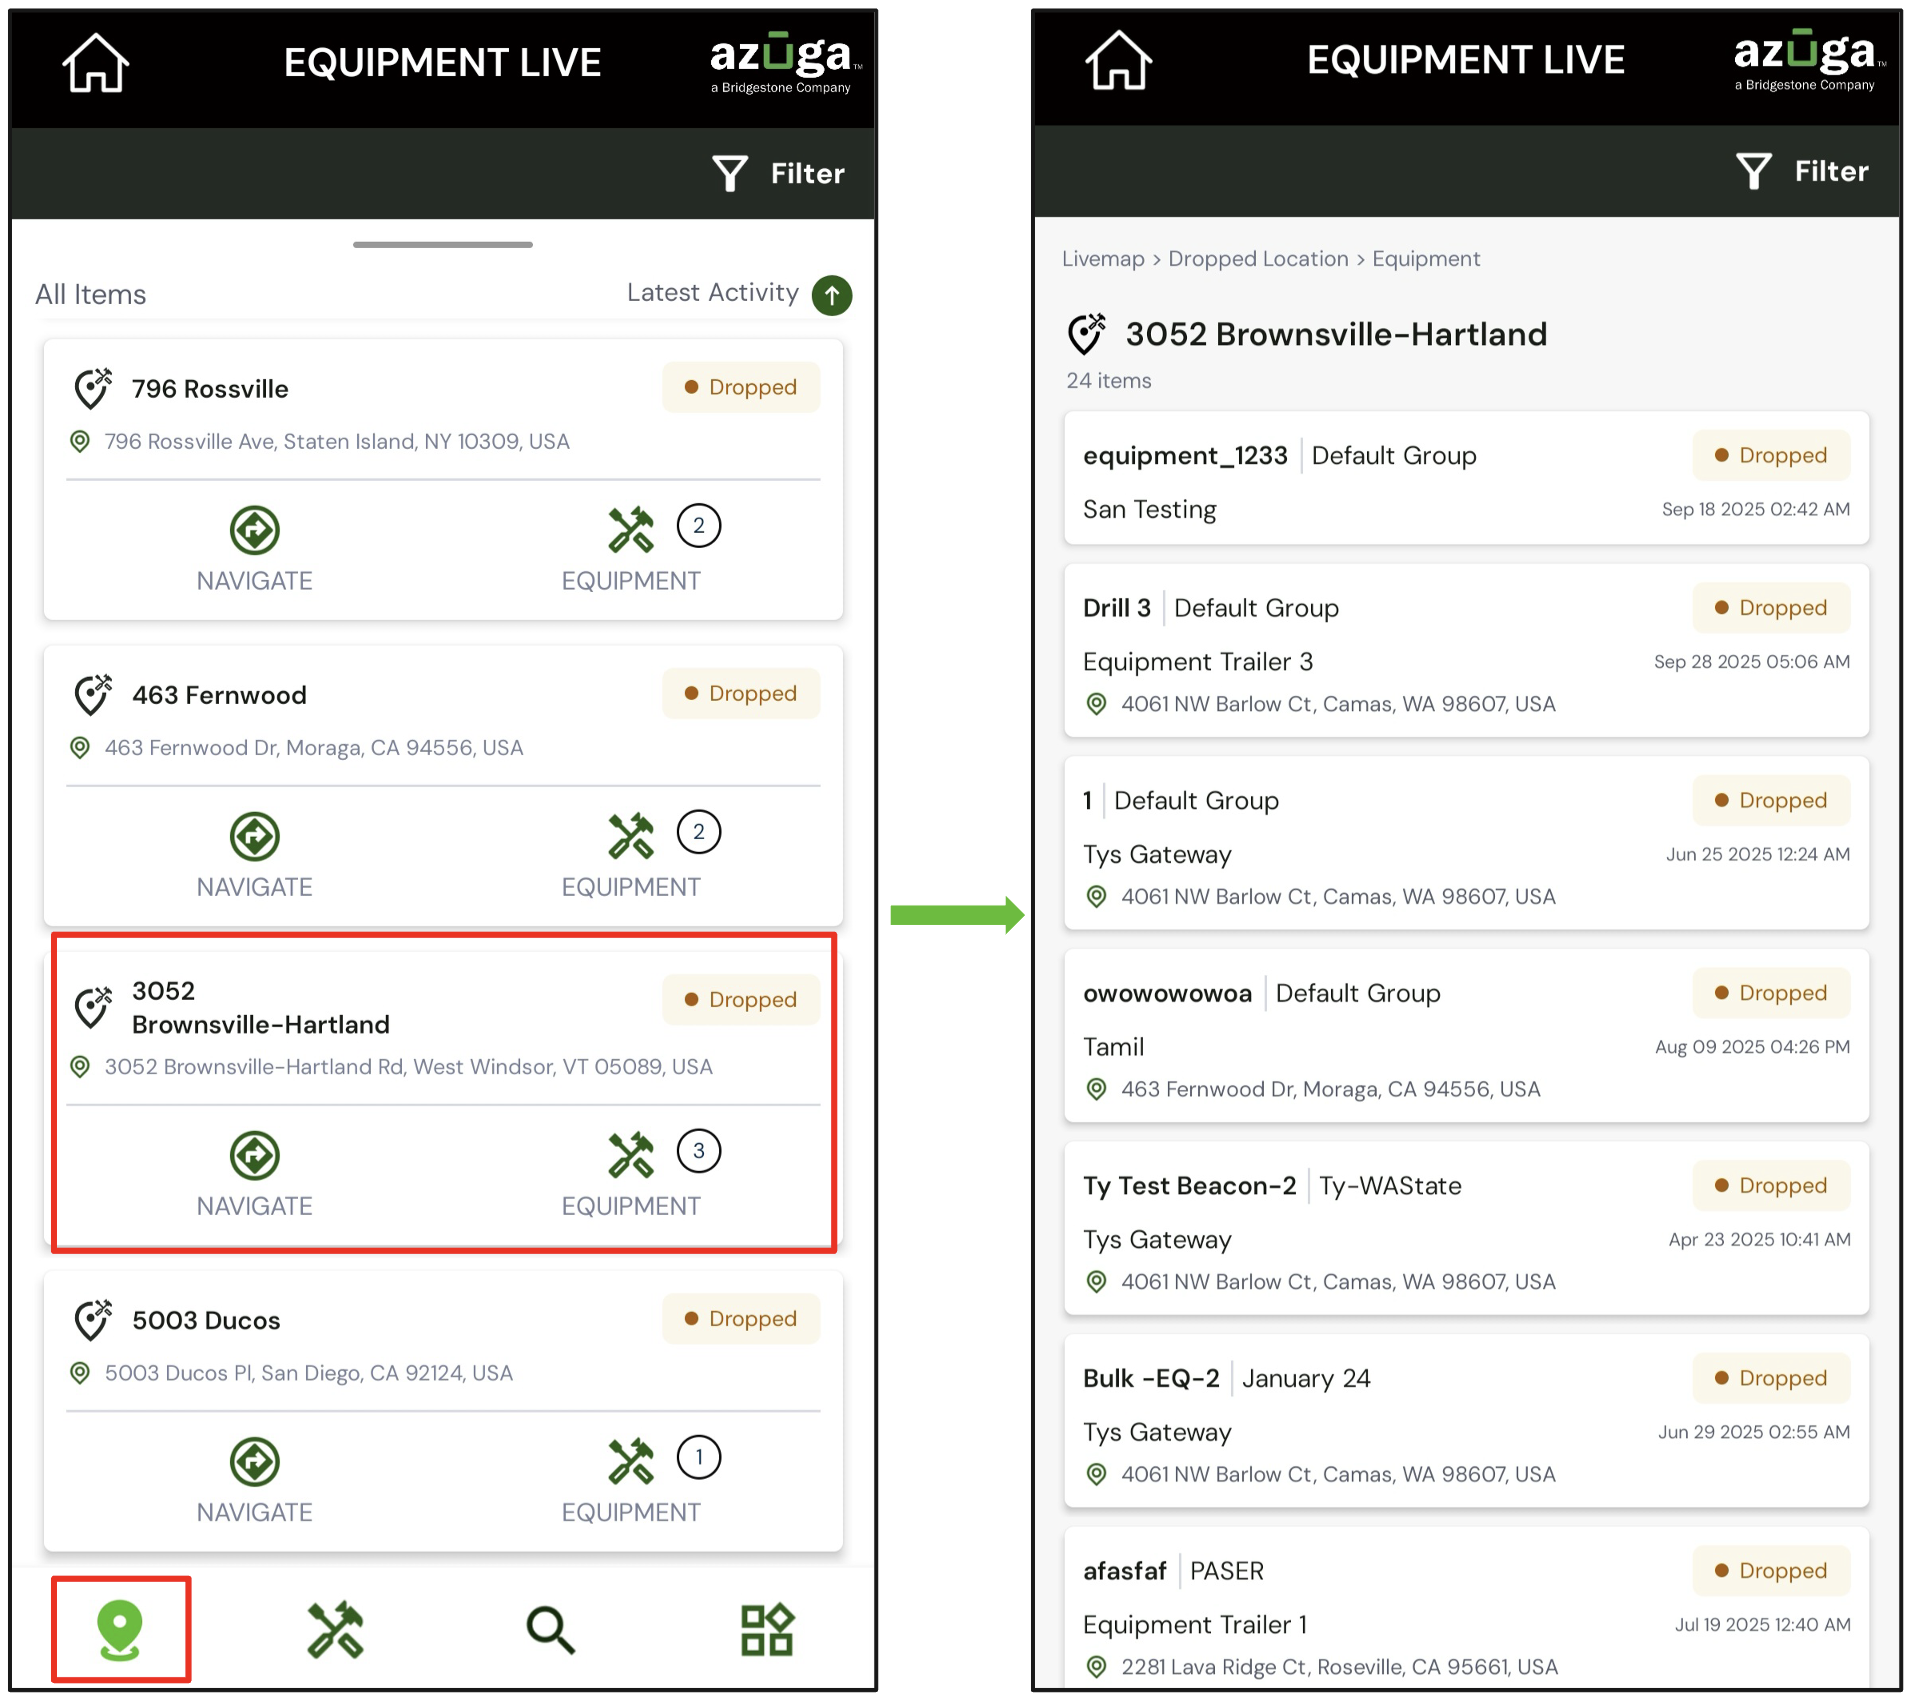
- Equipment: Shows the total number of equipment items dropped at that location. Tap to view individual equipment details shown on a dropped location card. Each entry displays the trailer name, last known location, and the current status of the tracked equipment.
-
-
Explore the detailed Equipment overview on the History page:
-
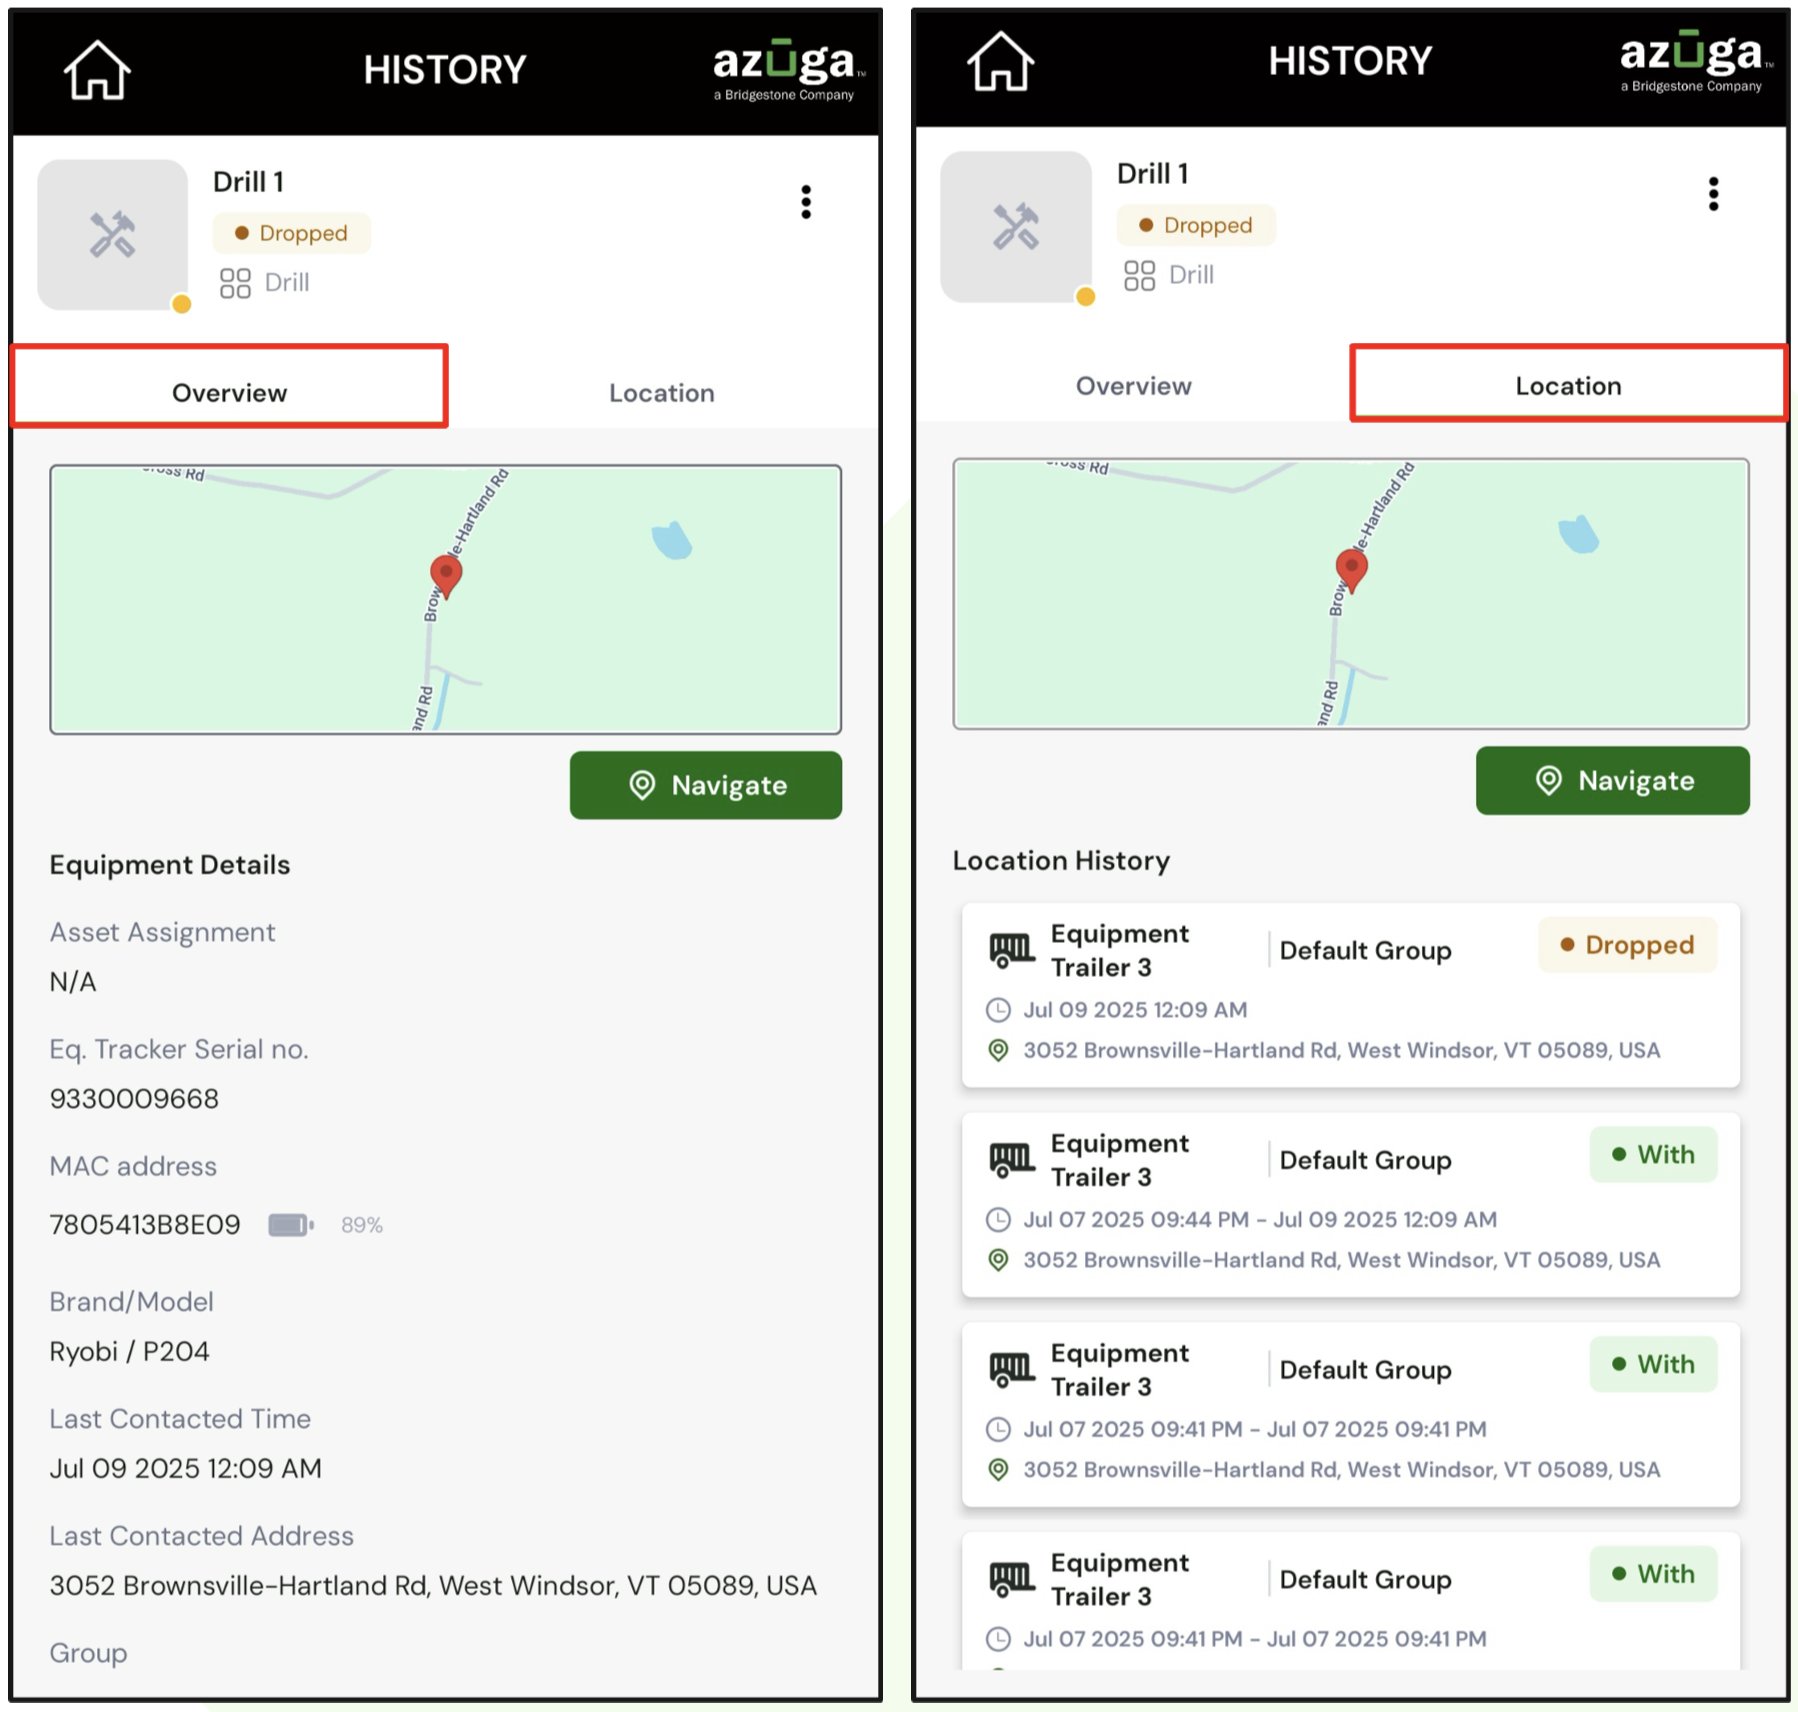
Tap any individual equipment item to open the History page for a comprehensive overview of its details and historical tracking data.
- Overview: Displays key equipment information, including its dropped location, asset name, and the beacon’s MAC address, etc.
- Location: Shows the equipment’s location history, including past locations, associated trackers, timestamps, and status at each recorded point.
- Use the Navigate button on the History page to open the equipment’s current location in device’s maps app.
- Click the three-dots menu at the top right of the History page to Unassociate Beacon or Delete Qquipment, allowing you to manage assets without leaving the page.
-
|
Note: If the equipment has been dropped and is unassociated, the Associate Beacon button will appear, allowing you to re-associate the beacon directly from this section. |
Unassociate Equipment Beacon:
Unassociate via Azuga Web Fleet:
From the Equipment section:
- Log in to the Azuga Fleet web application using your credentials.
- Navigate to Admin > Equipment.
- Click the equipment name to open its Details page.
- Click the three-dot menu at the top right of the Details page.
- Select Unassociate Beacon to unassociate a beacon from that equipment.
Unassociate via Azuga Fleet Mobile:
From the History page:
- Log in to the AFM app with your credentials.
- From the Dashboard, navigate to the Equipment section.
- Go to the History page
3.A From the Equipment Live Page:
- On the Equipment Live page, swipe up the All Items section.
- Navigate to the relevant location card that lists the equipment for that site.
- Select Equipment, then drill down to choose the specific equipment you want to unassociate.
- On the History page, tap the three-dot menu and select Unassociate Beacon.
3.B From the Equipment Page:
- On the Equipment Live page, swipe up the All Items section.
- Navigate to the relevant location card that lists the equipment for that site.
- Select Equipment, then drill down to choose the specific equipment you want to unassociate.
- On the History page, tap the three-dot menu and select Unassociate Beacon.
PDF copy of the document: [Customer] Equipment Management - User Guide.pdf
Last Verified on September 2025